Copyright © IT Resources 2025
ITR POS is a powerful, modern point-of-sale solution designed for businesses of all sizes worldwide. It helps you streamline sales, manage inventory efficiently, and deliver an exceptional customer experience. With intuitive admin and user panels, automated online payment gateways, and real-time reporting, ITR POS ensures smooth operations without any technical expertise. Our documentation guides you through every feature, while our team continuously delivers updates, new functionalities, and security enhancements to provide the best possible user experience globally.
Our Windows Installer ensures that installing the software is a hassle-free experience. With just a few simple steps, you'll be up and running in no time, no technical expertise required. The process is intuitive and designed to make setup as easy as possible.
Installation Steps:
Visit our official website: itresources.com.pk
Navigate to the Services section in the menu.
Click on ITR POS to proceed to the download page.
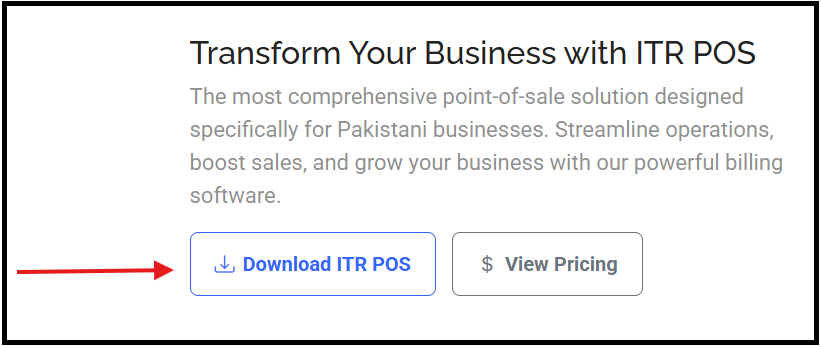
On the download page, click the Download ITR POS button to initiate the download.
Once the download completes, locate the .exe file in your Downloads folder and double-click it to start the installation process.
The installation wizard will appear. Simply click Next on each screen to proceed with the setup.
After installation is complete, the software will be fully installed and ready for use.
Post-Installation Configuration:
After installation, it's crucial to update your WAMP server to version 8.1.31 to ensure optimal performance and compatibility with the software.
To update your WAMP server, open the WAMP manager, navigate to Settings, and select version 8.1.31 from the list of available versions.
Should you encounter any issues during installation or have questions about updating the WAMP version, our support team is ready to assist you. Feel free to reach out, and we'll be happy to guide you through any challenges.
Activating your ITR POS software is quick and simple. Once the software is installed, it will automatically prompt you for activation when you launch it for the first time.
Activation Steps:
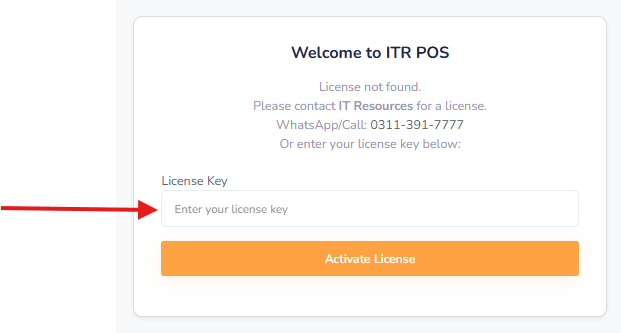
Once the software is installed and you launch it for the first time, the activation window will appear automatically.
Enter your Activation Key in the provided field. Your activation key was provided to you when you purchased the software.
Click on the Activate button.
Your license will be activated immediately and you can start using the software.
If you need your activation key or encounter any issues during activation, please contact our support team.
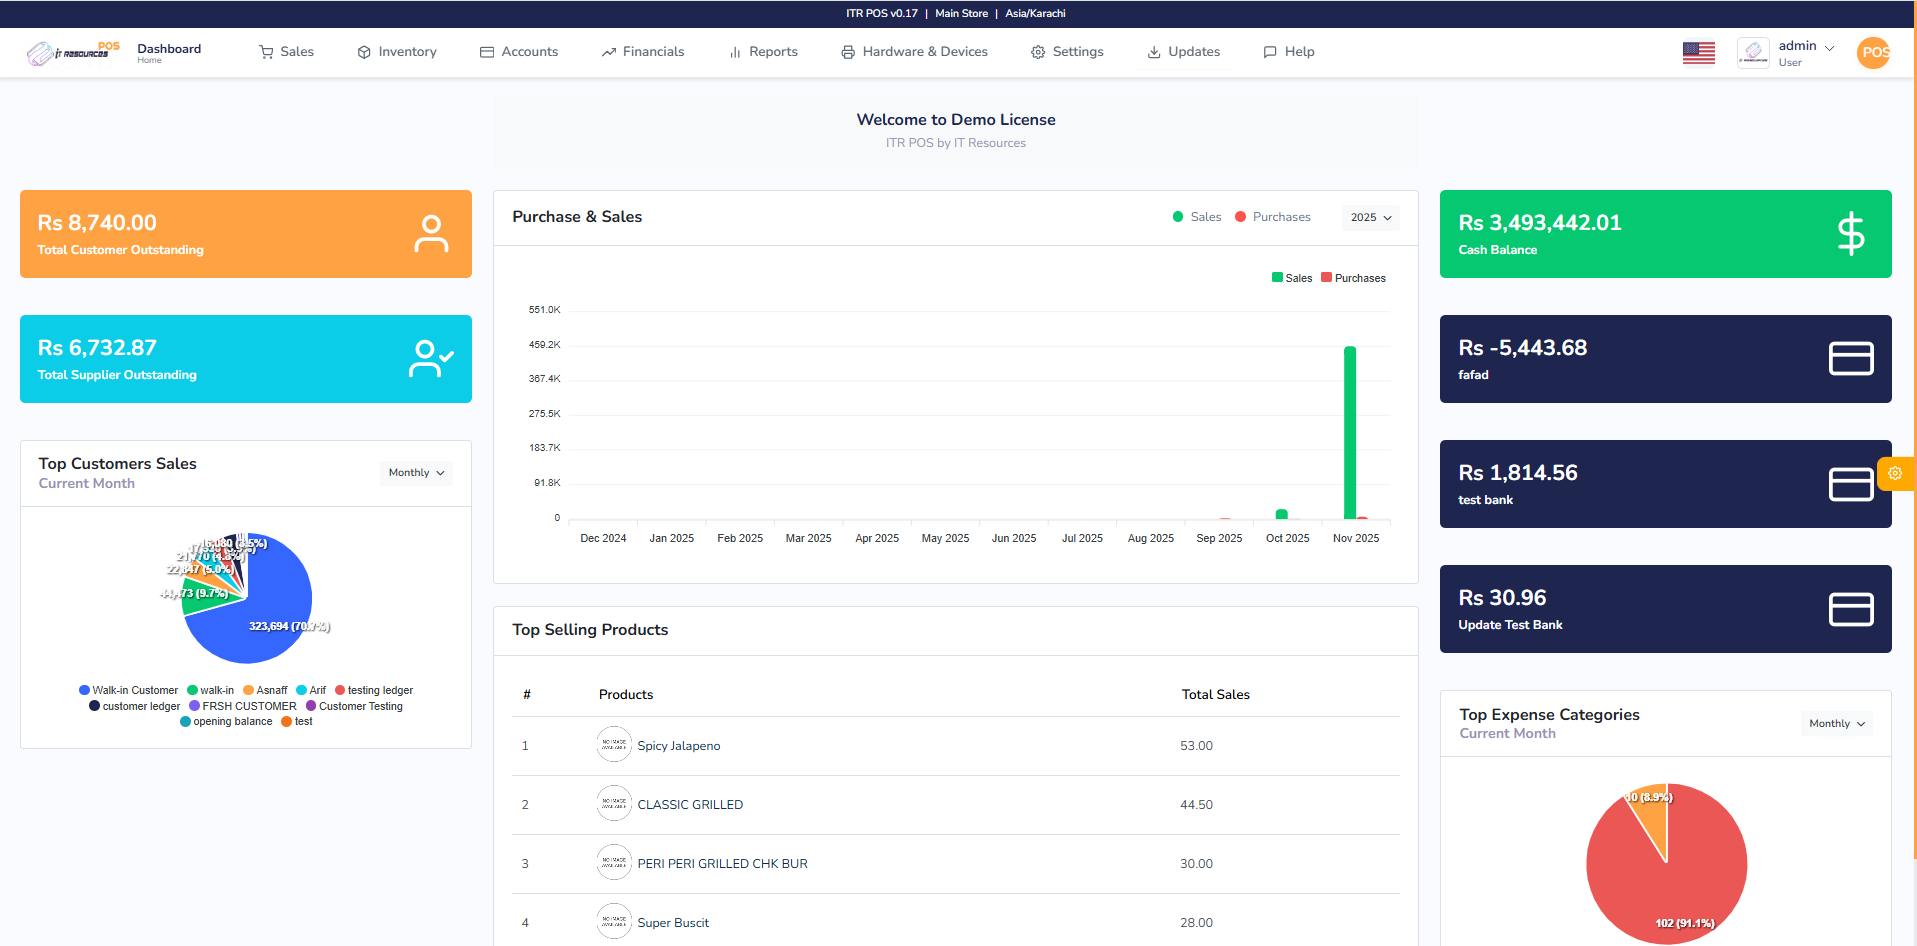
The User Dashboard is designed for users. Users can manage everything on their dashboard, according to the pricing plan, they will be able to buy packages, can withdraw amounts, and can see the wallet.
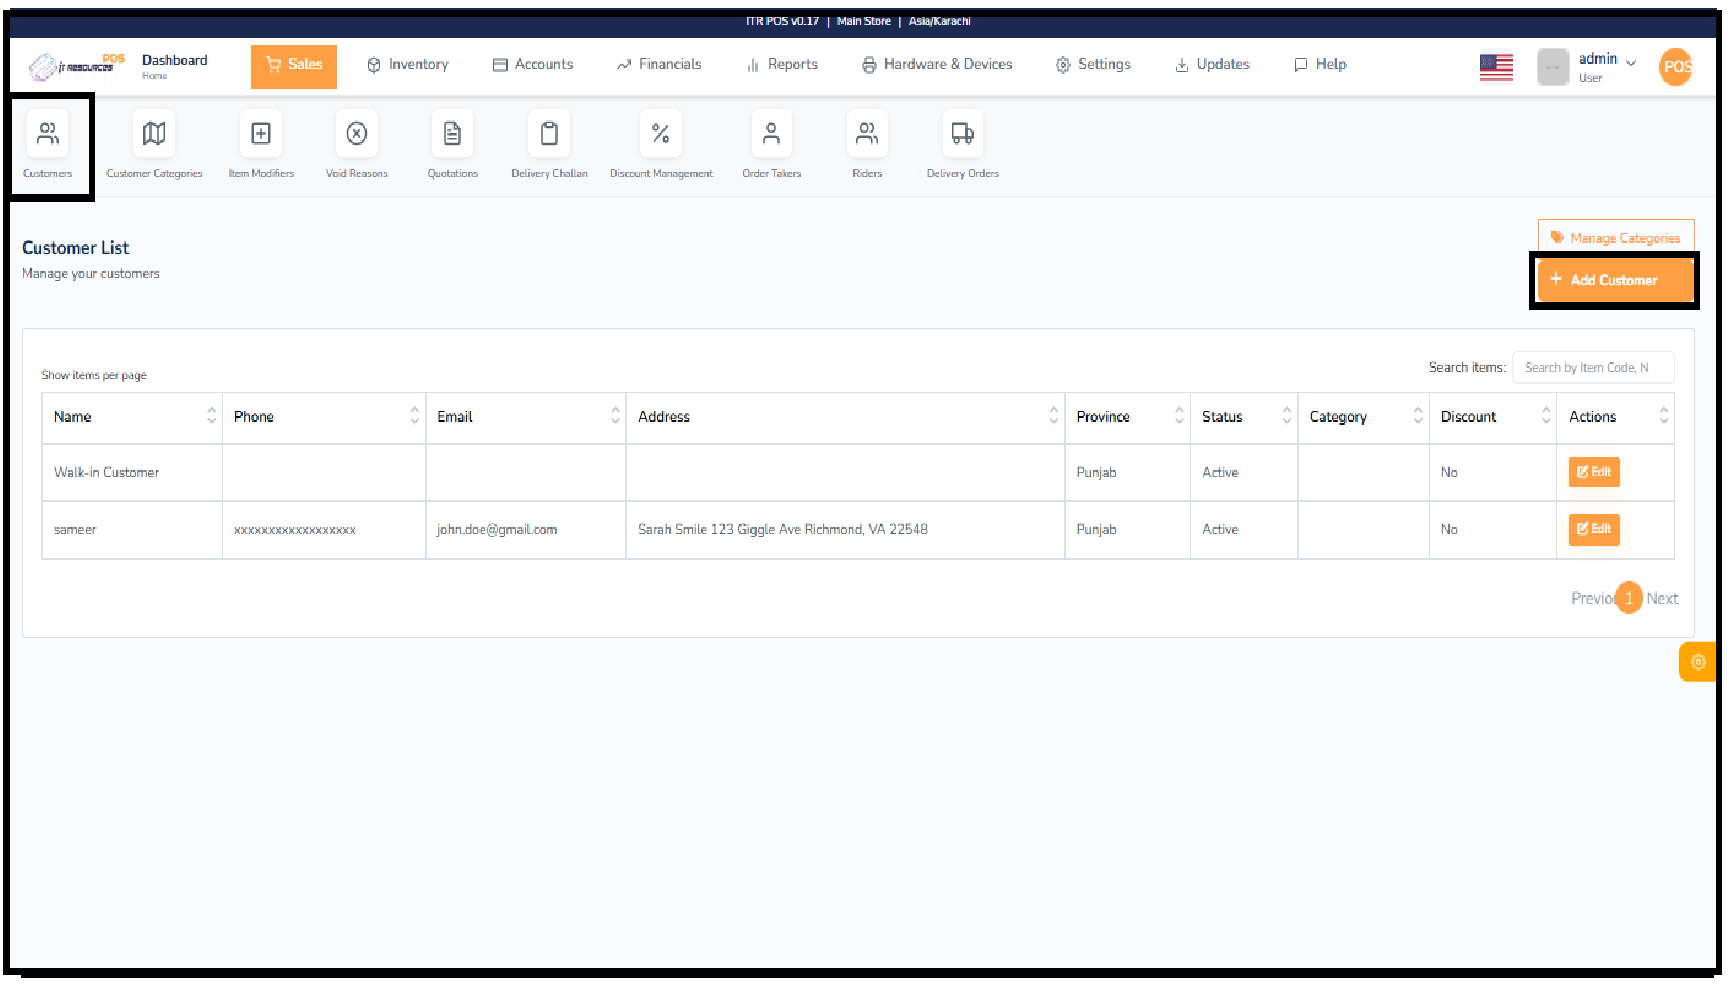
In this section, you can save all types of customer details, and you can also edit all previously saved customer information within the Sales section.
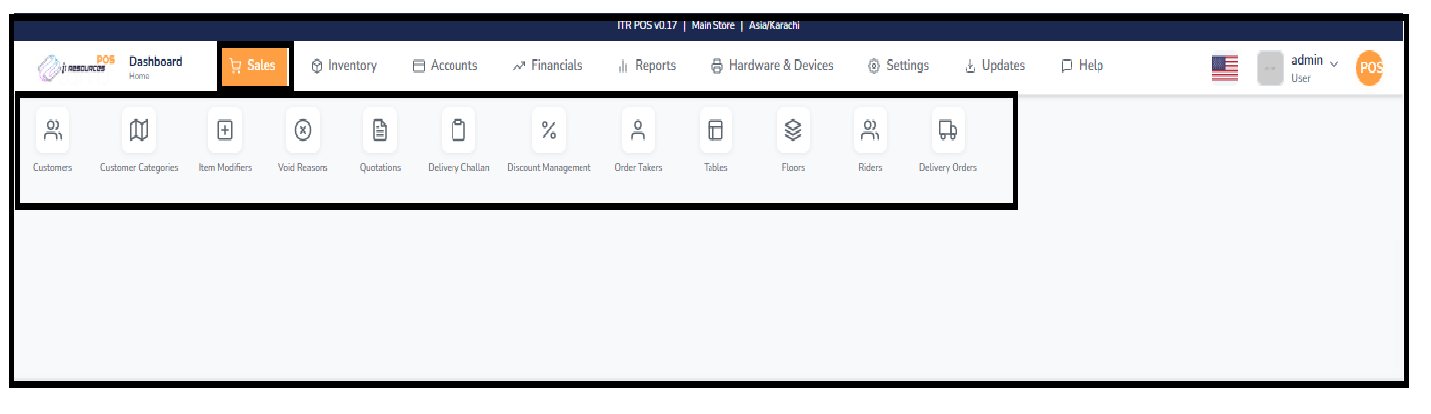
In the Customer Tab, you can view all existing customers along with their stored information. If you need to update any customer's details, simply click on Edit next to their record. To add a new customer, click on Add, enter the required information in the form, and then click Save to store the new customer in the system.

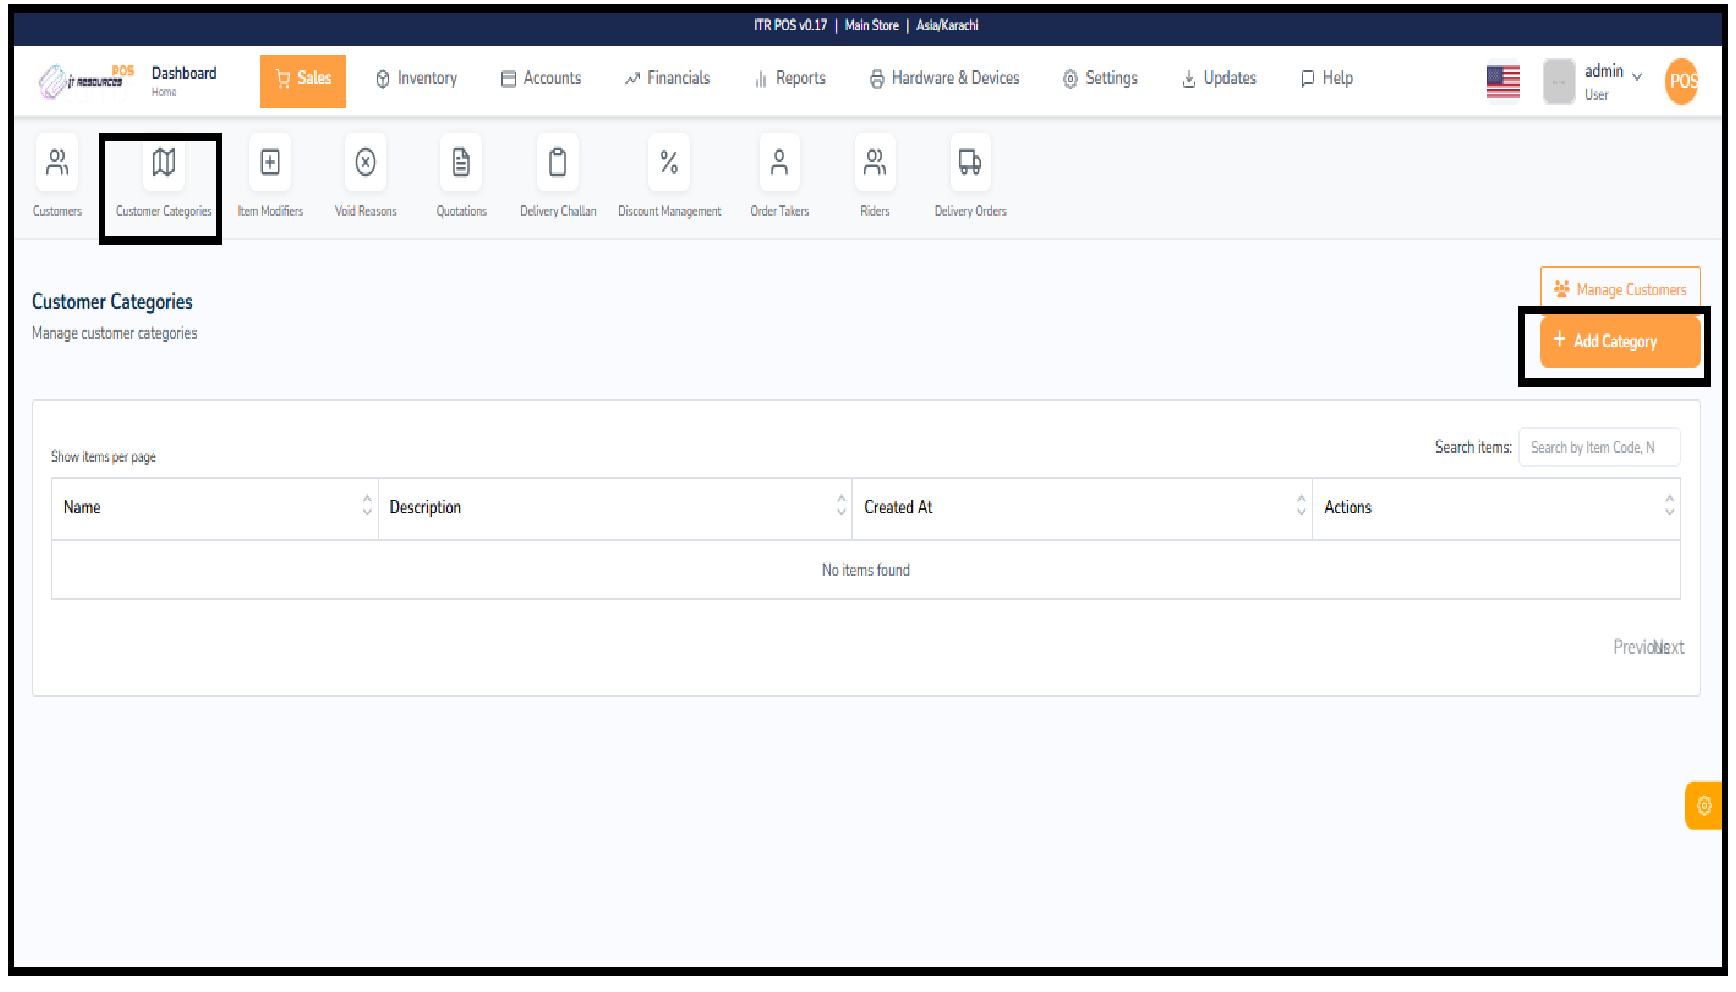
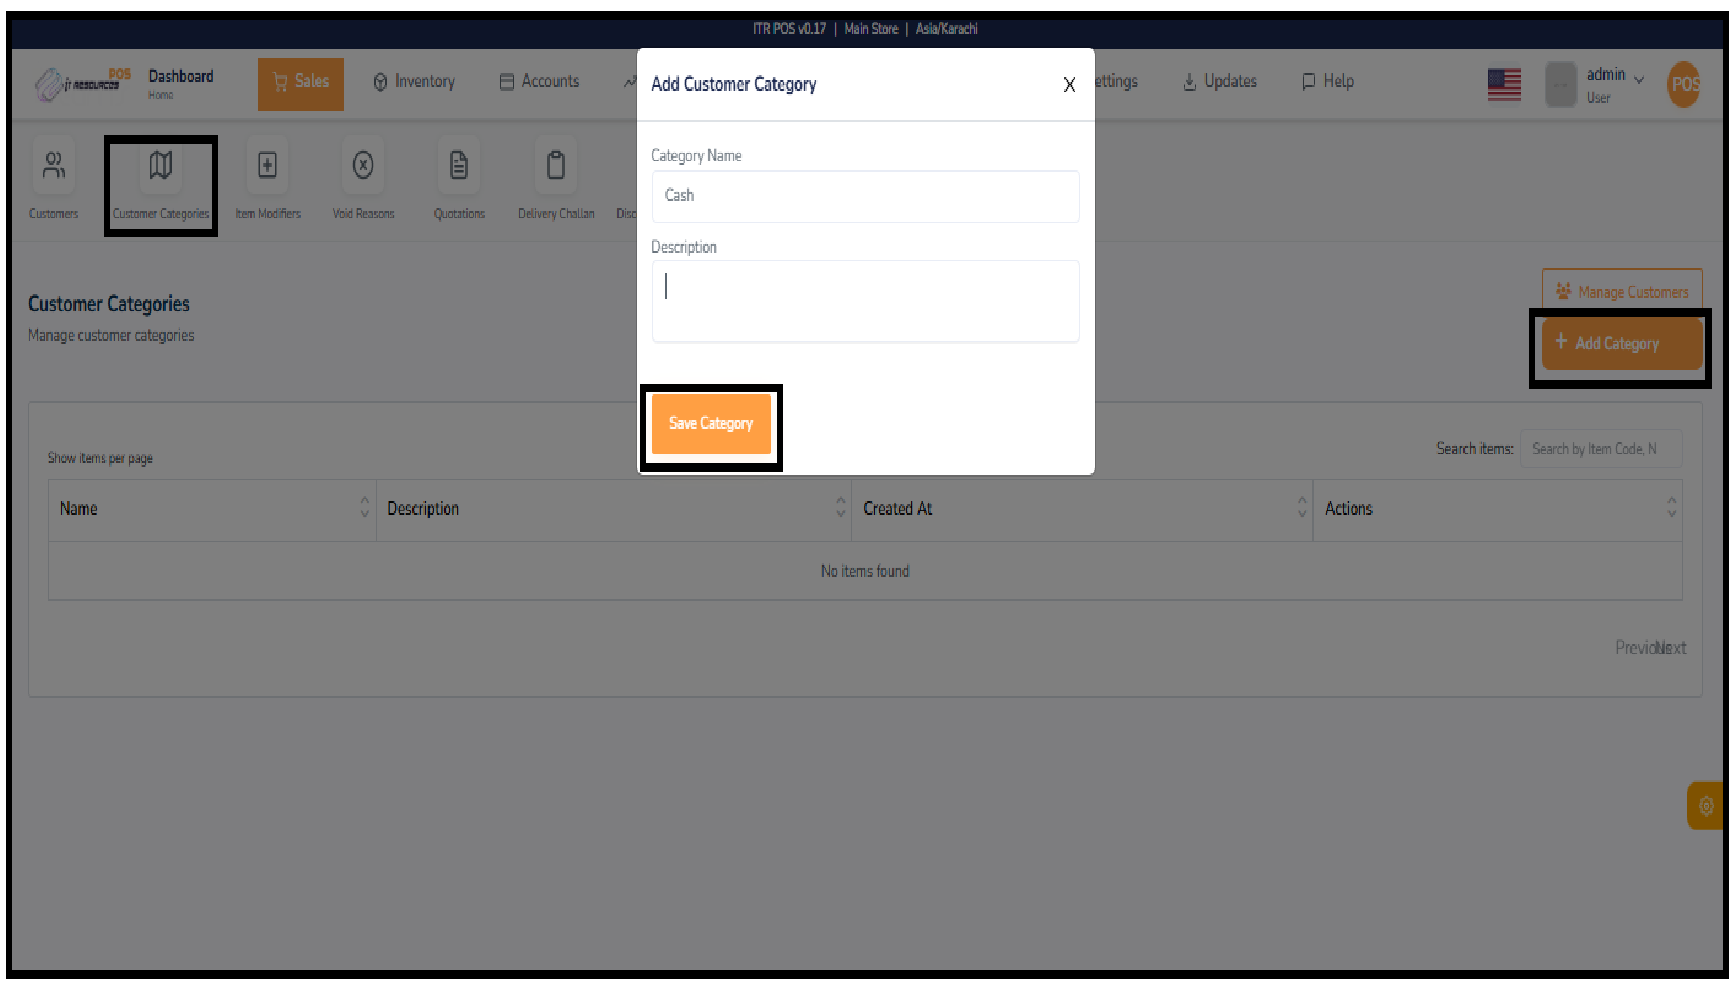
Customer categories allow you to classify your customers into different groups such as Cash, Credit, Retail, or Wholesale. Organizing customers by category helps you manage billing, apply discounts, and filter reports more efficiently. You can create, edit, or delete categories based on the needs of your business.
Item modifiers allow businesses to add optional or configurable choices to their products or services. These modifiers help customize items—such as sizes, variations, additional features, or service options—based on business needs.
Create groups of related modifiers (e.g., size options, variations, features).
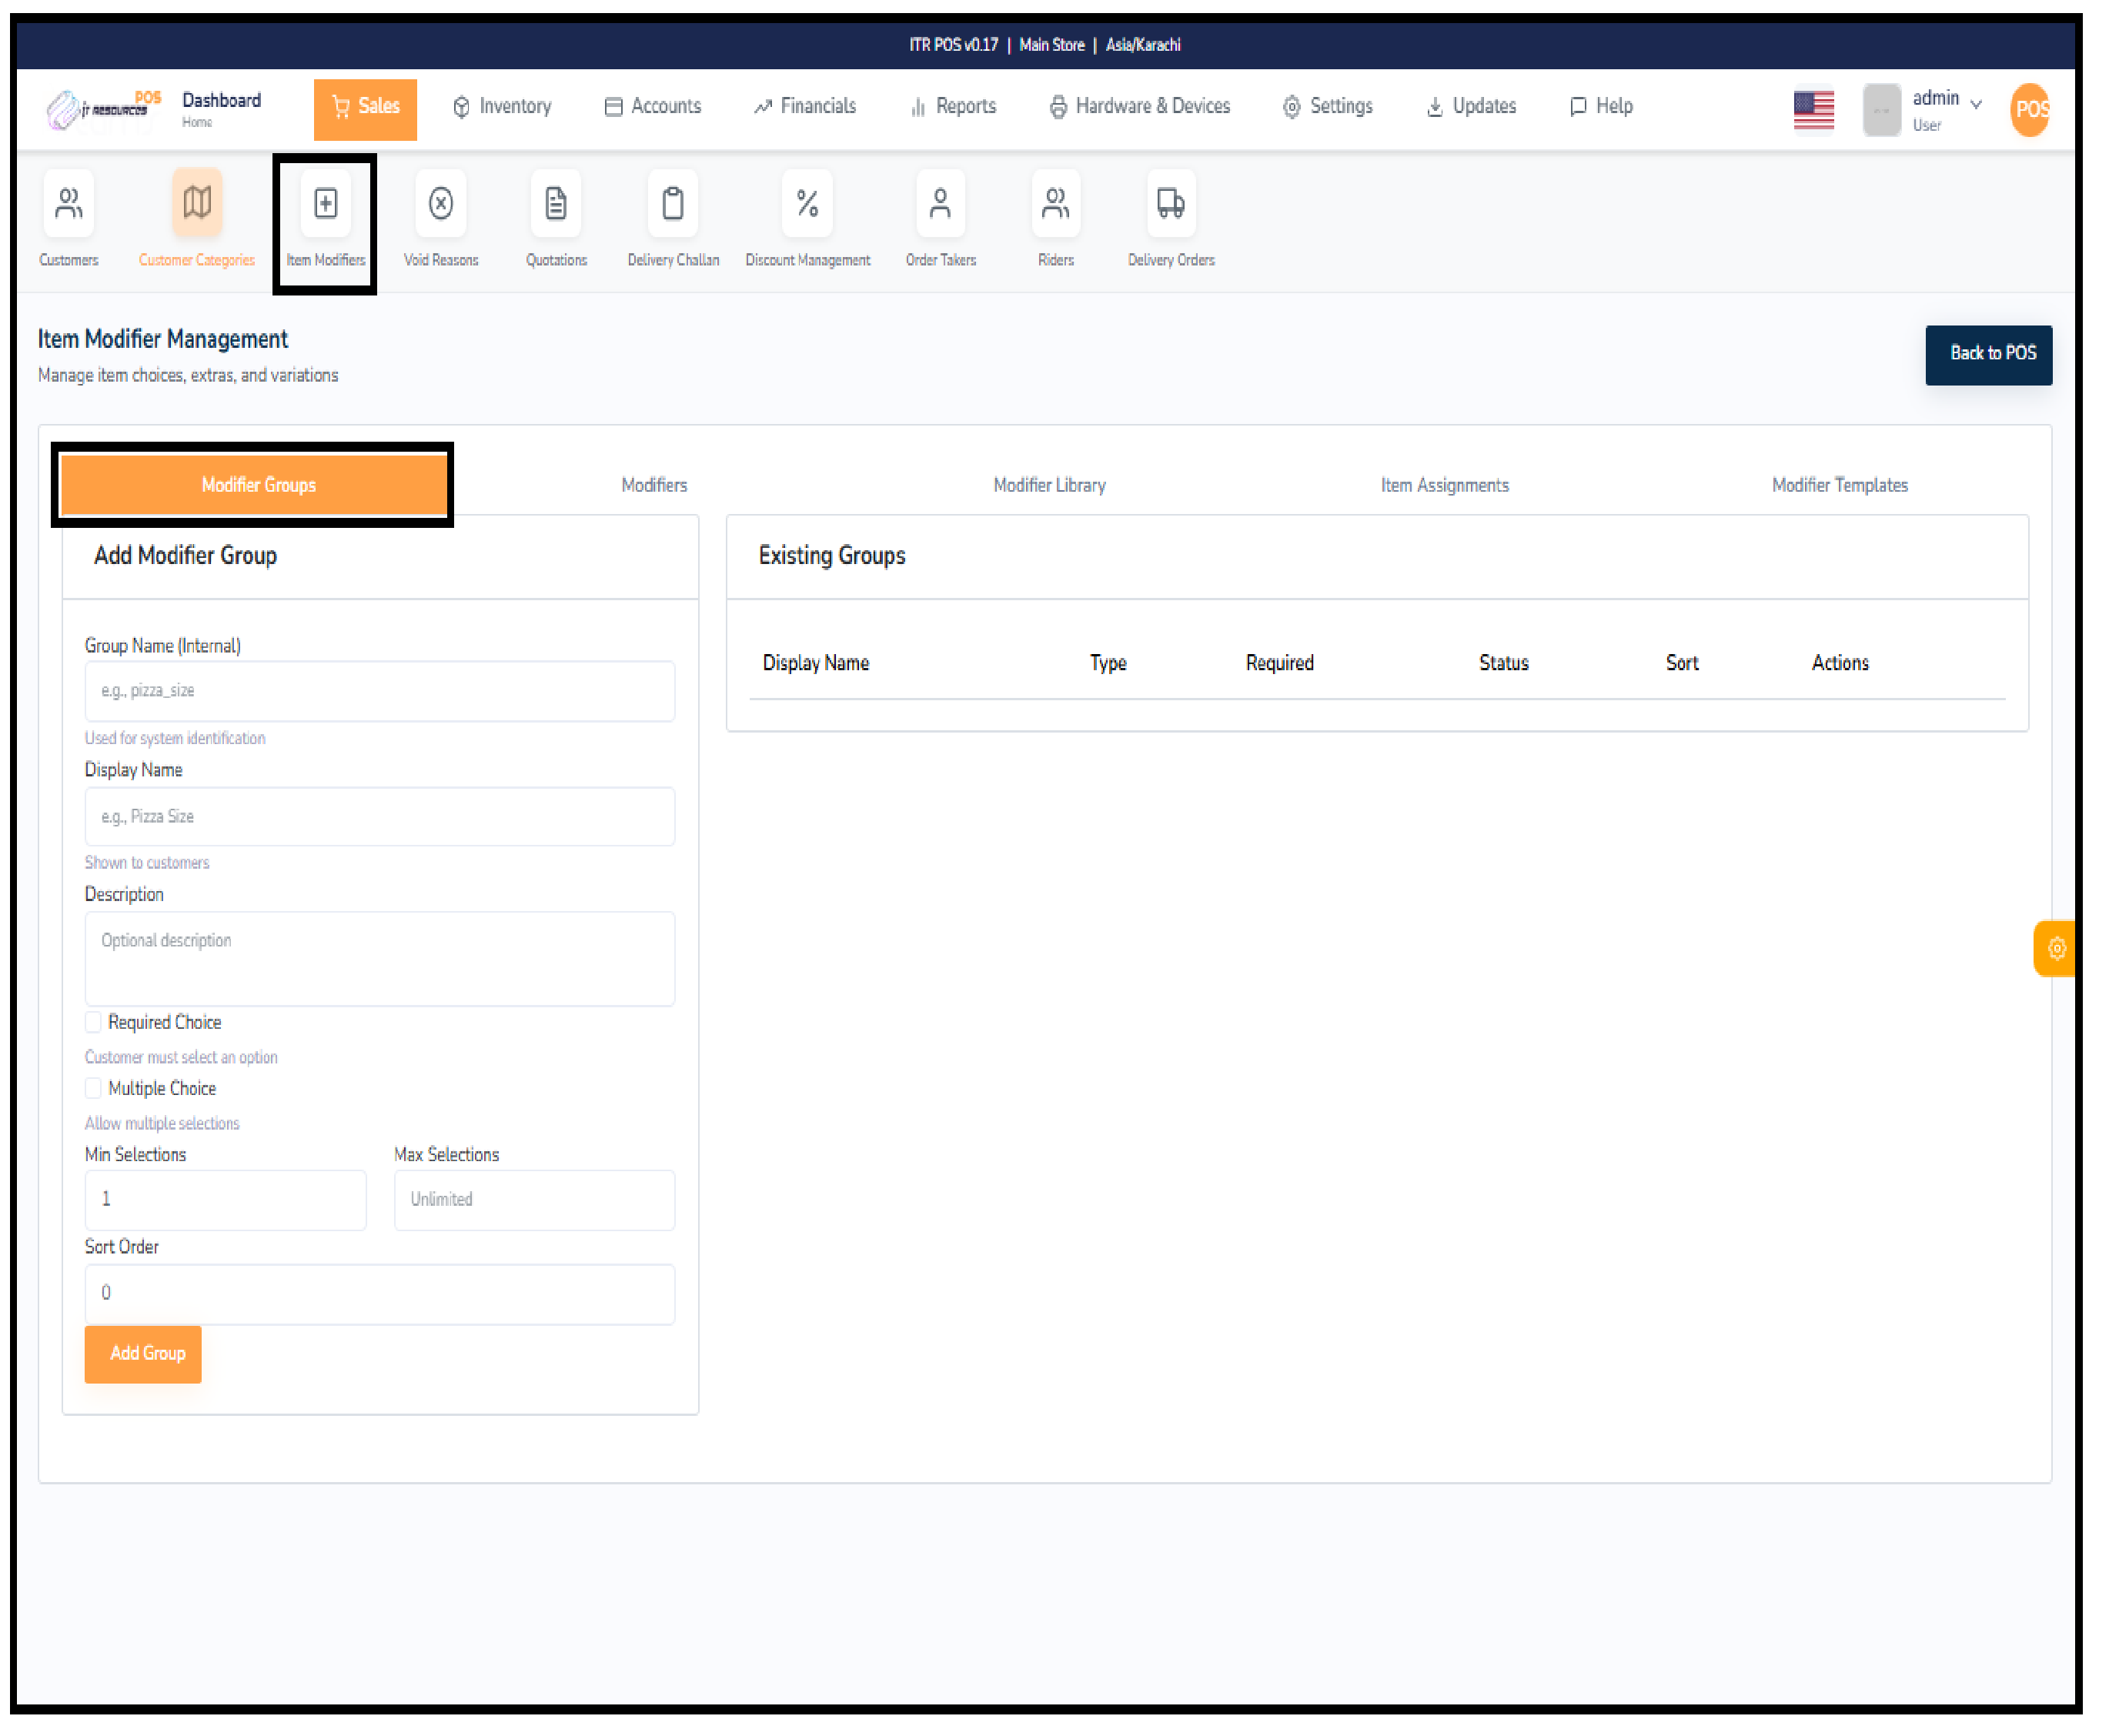
Add individual modifier options inside each group.
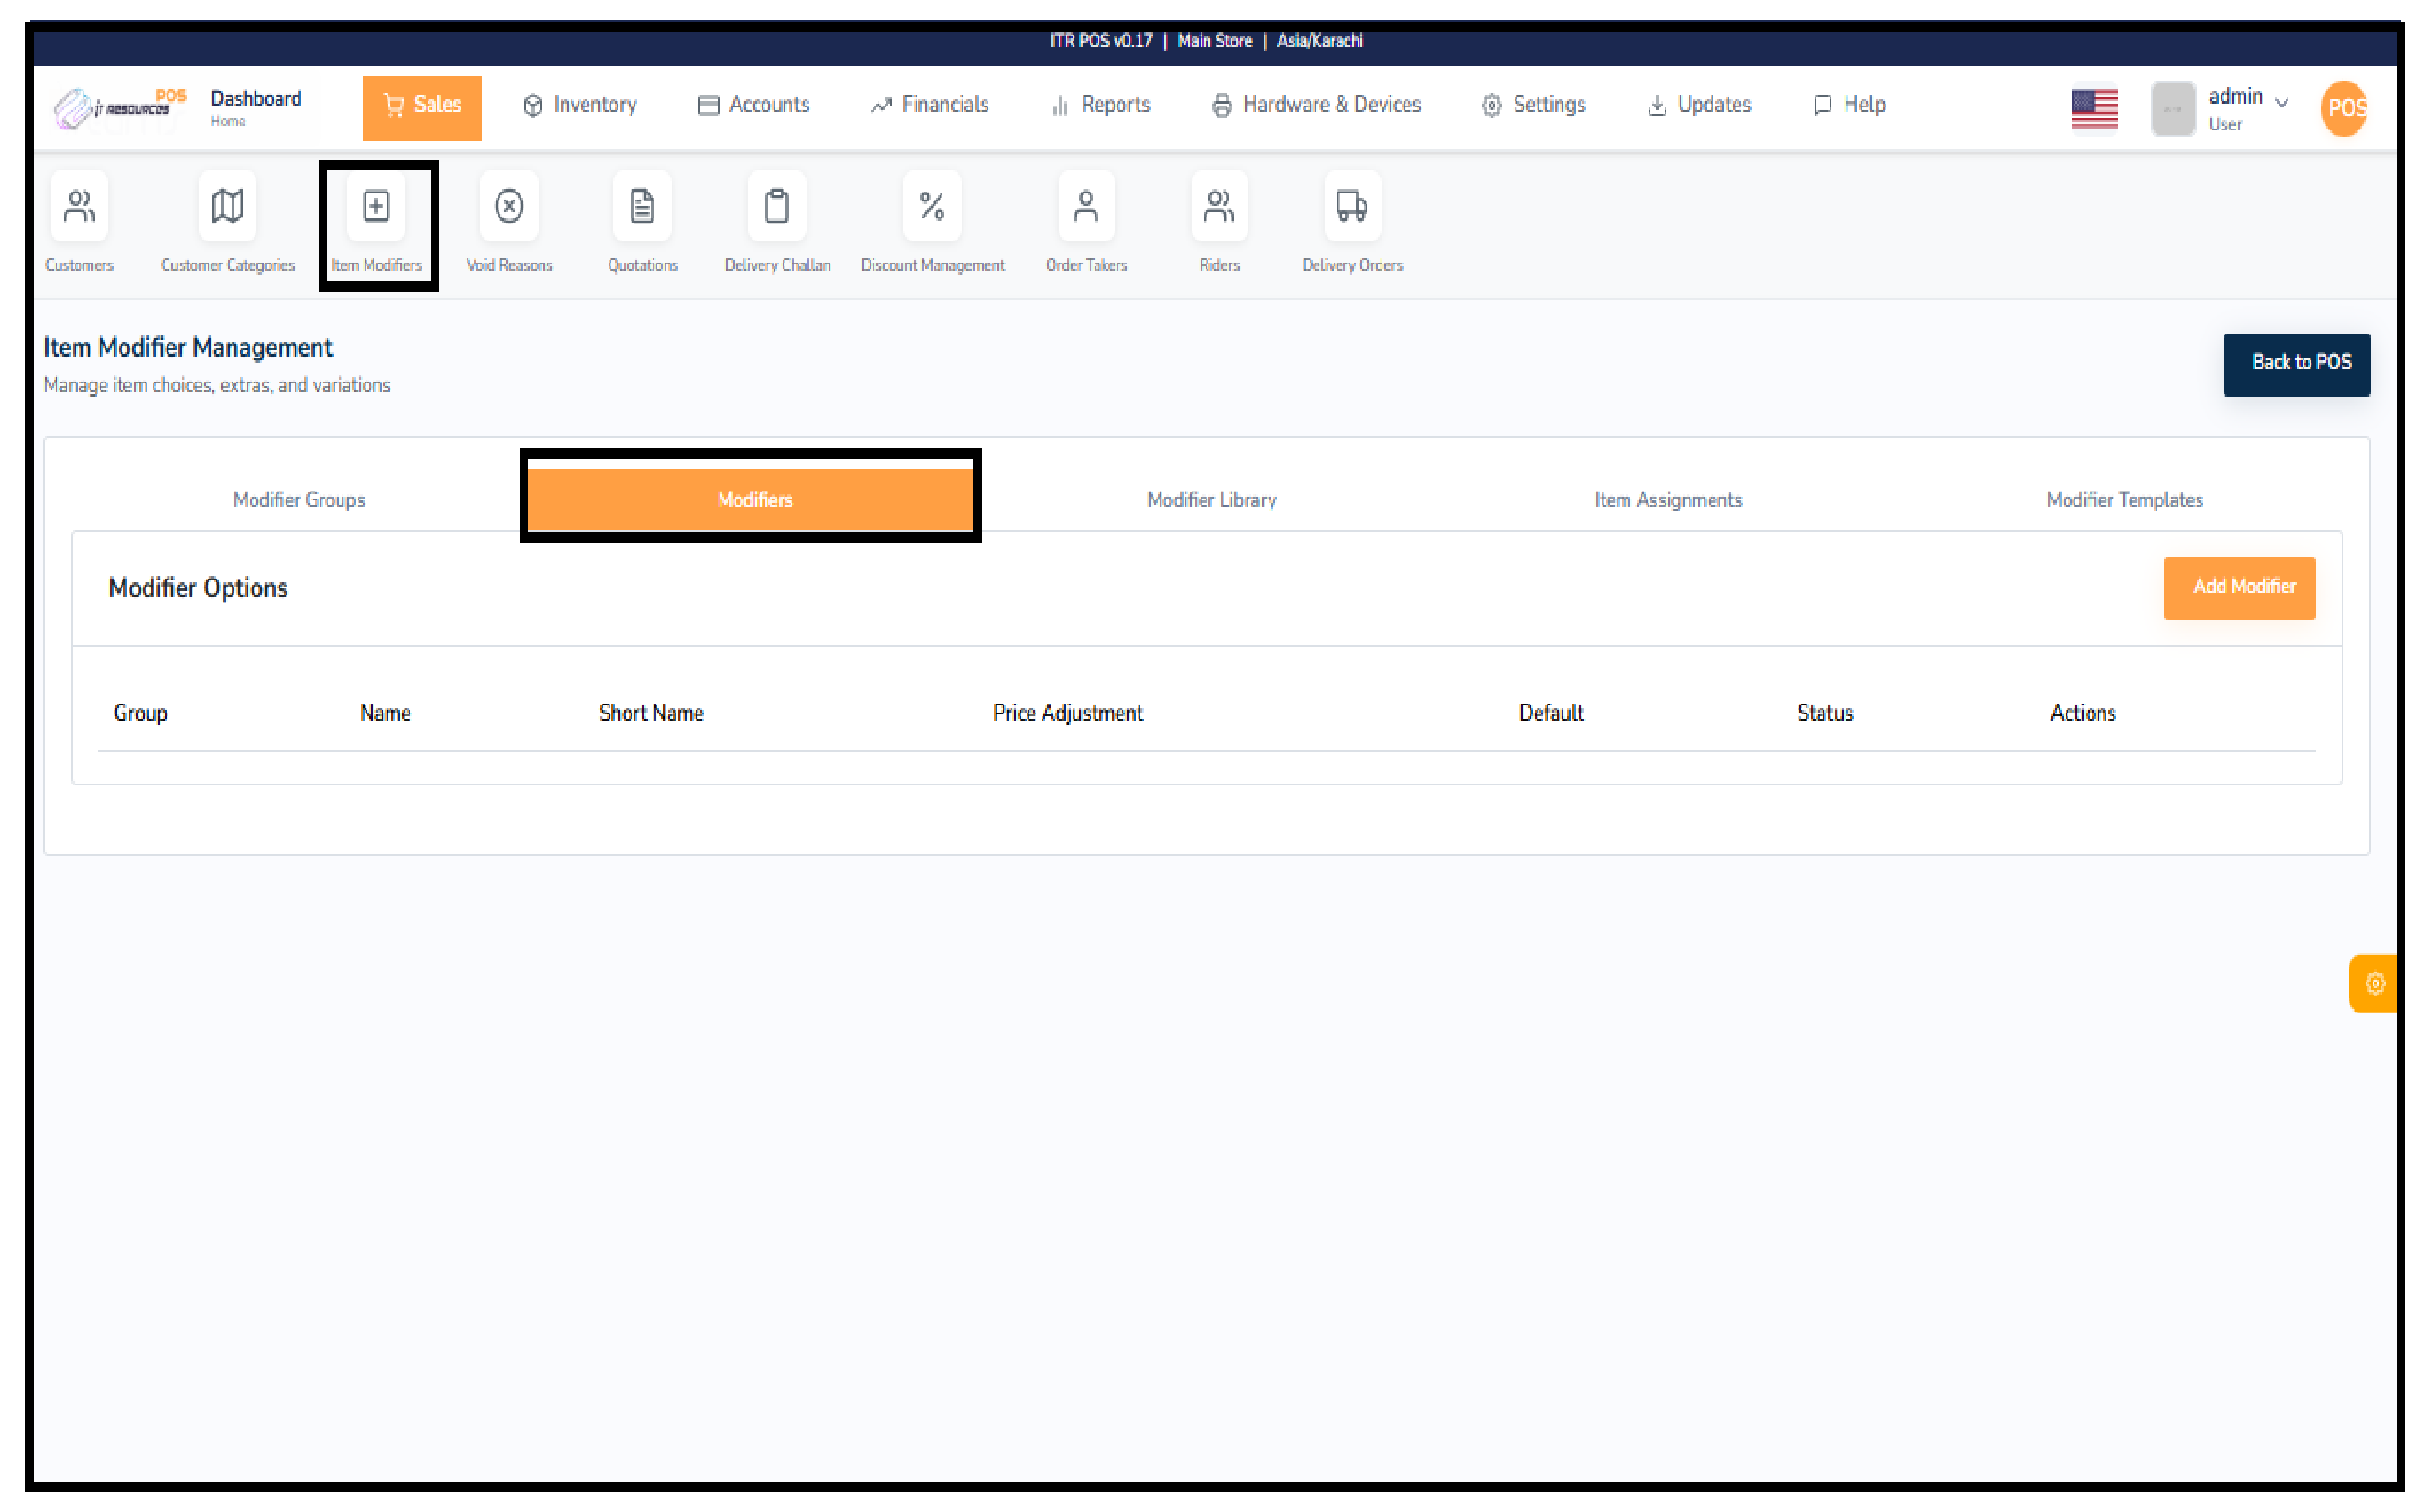
A central list where all product or service modifiers are created and stored.
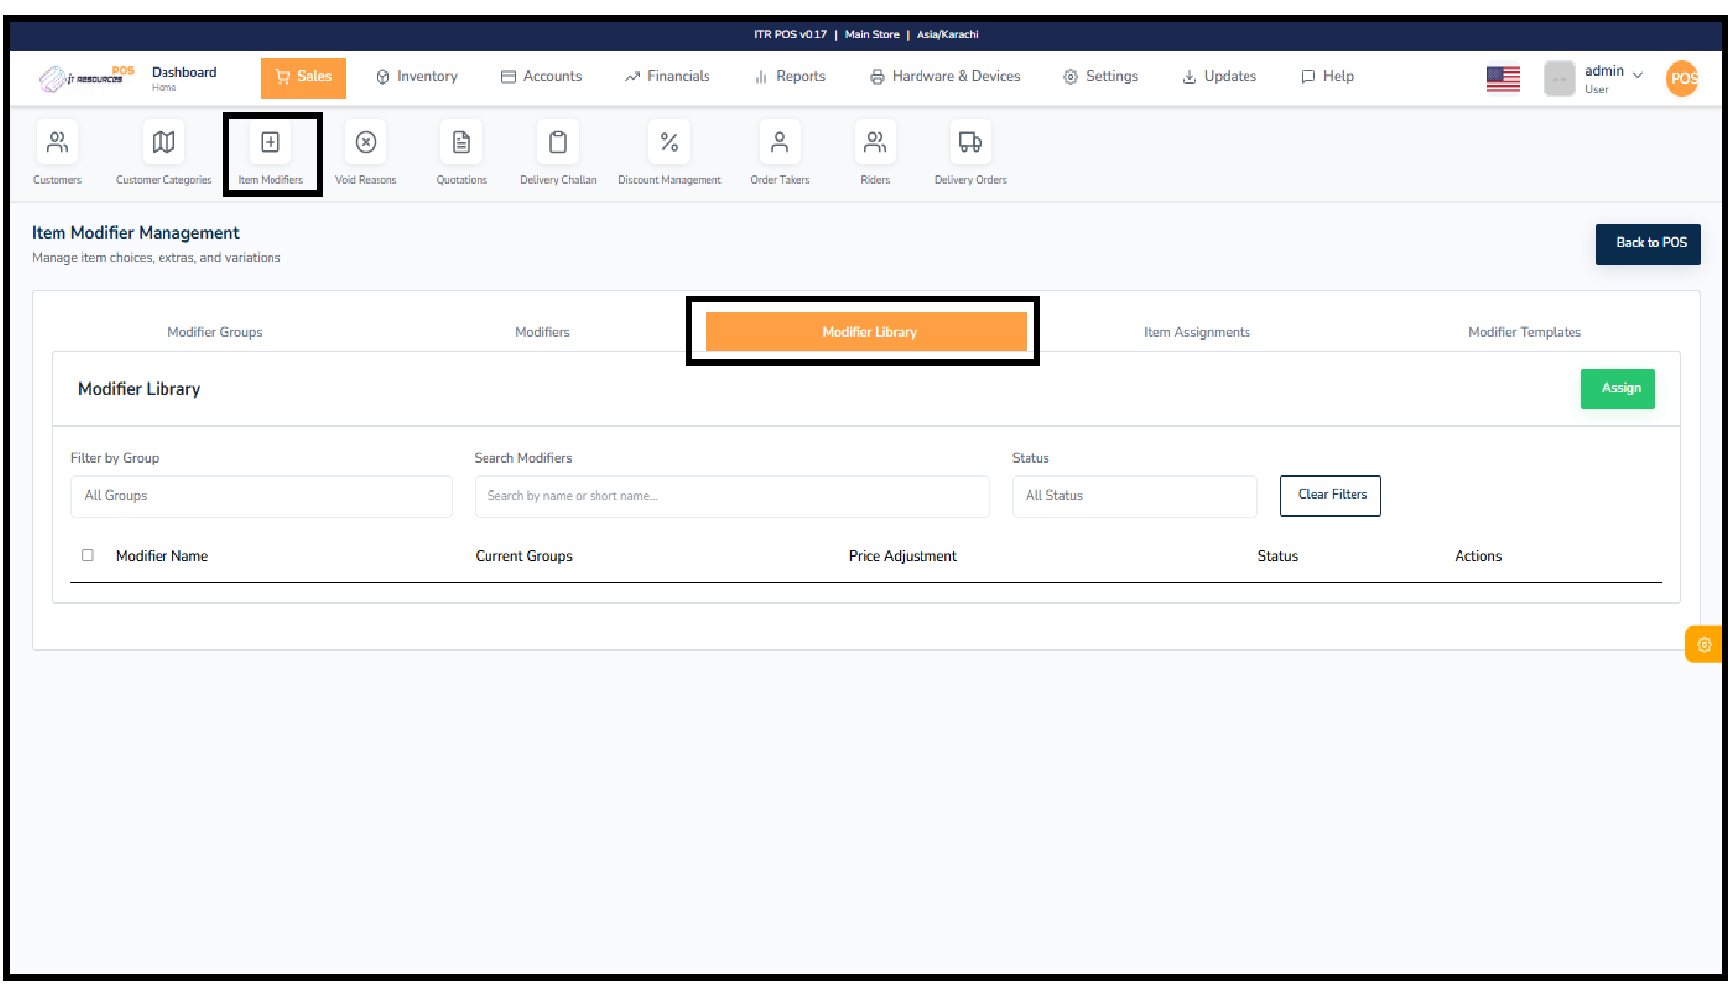
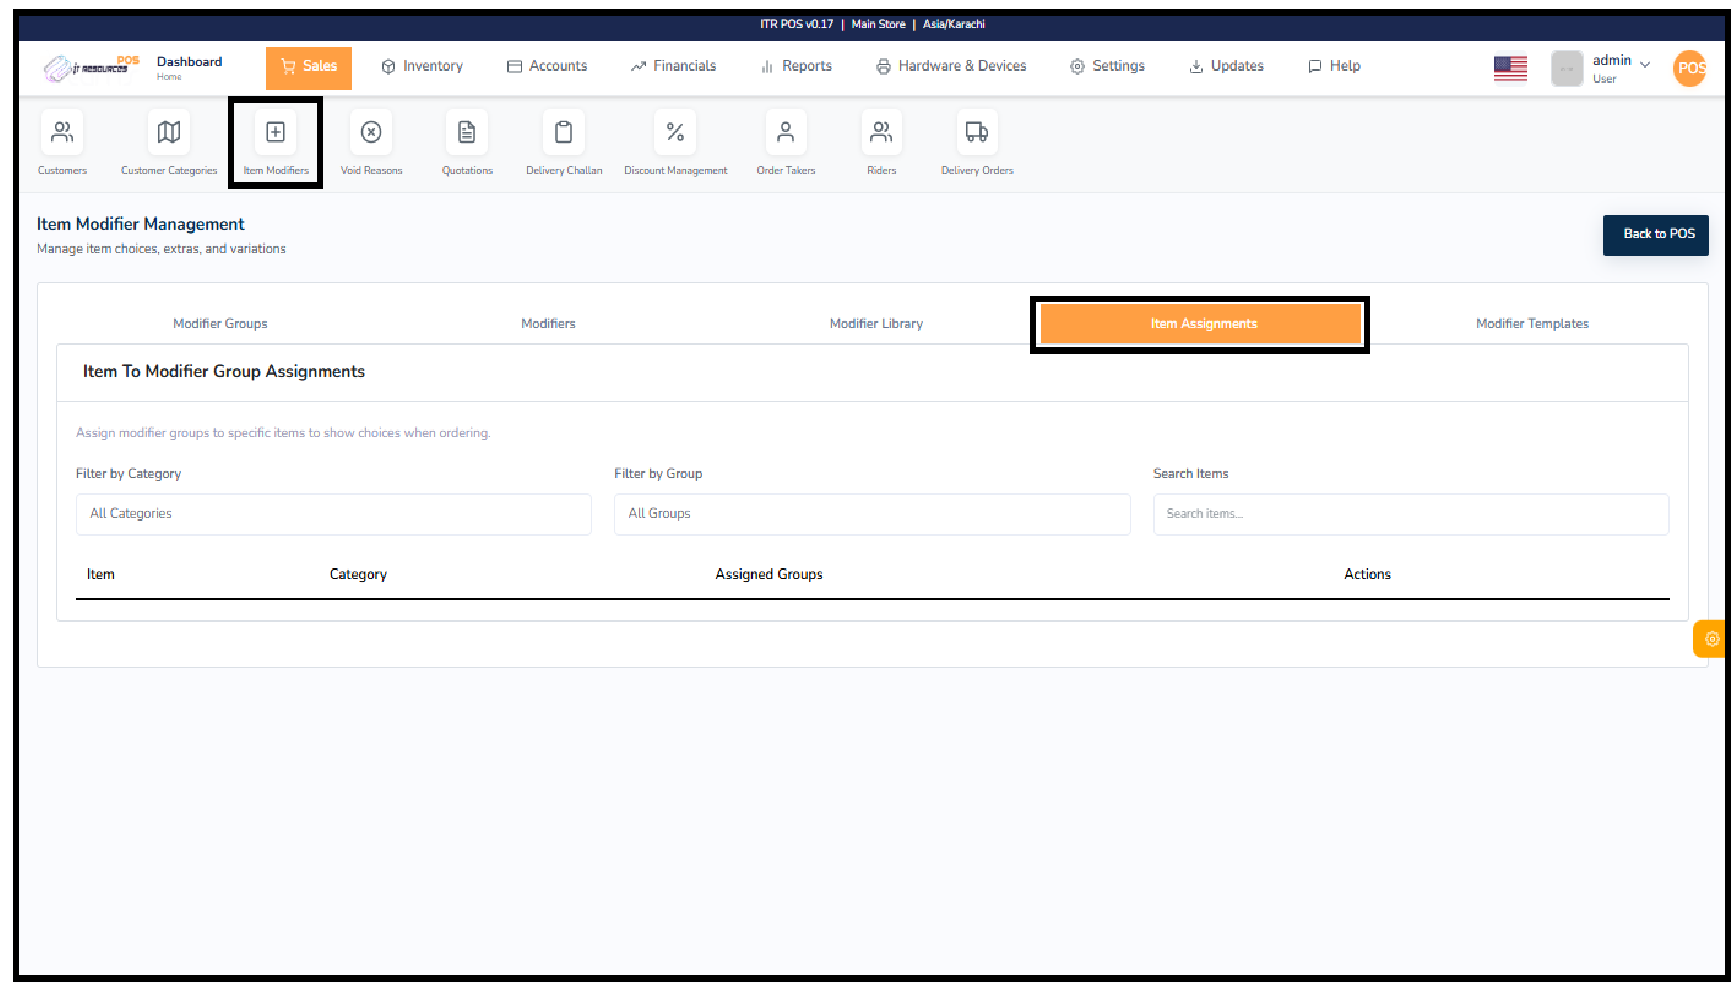
Used to attach existing modifiers from the library to specific items.
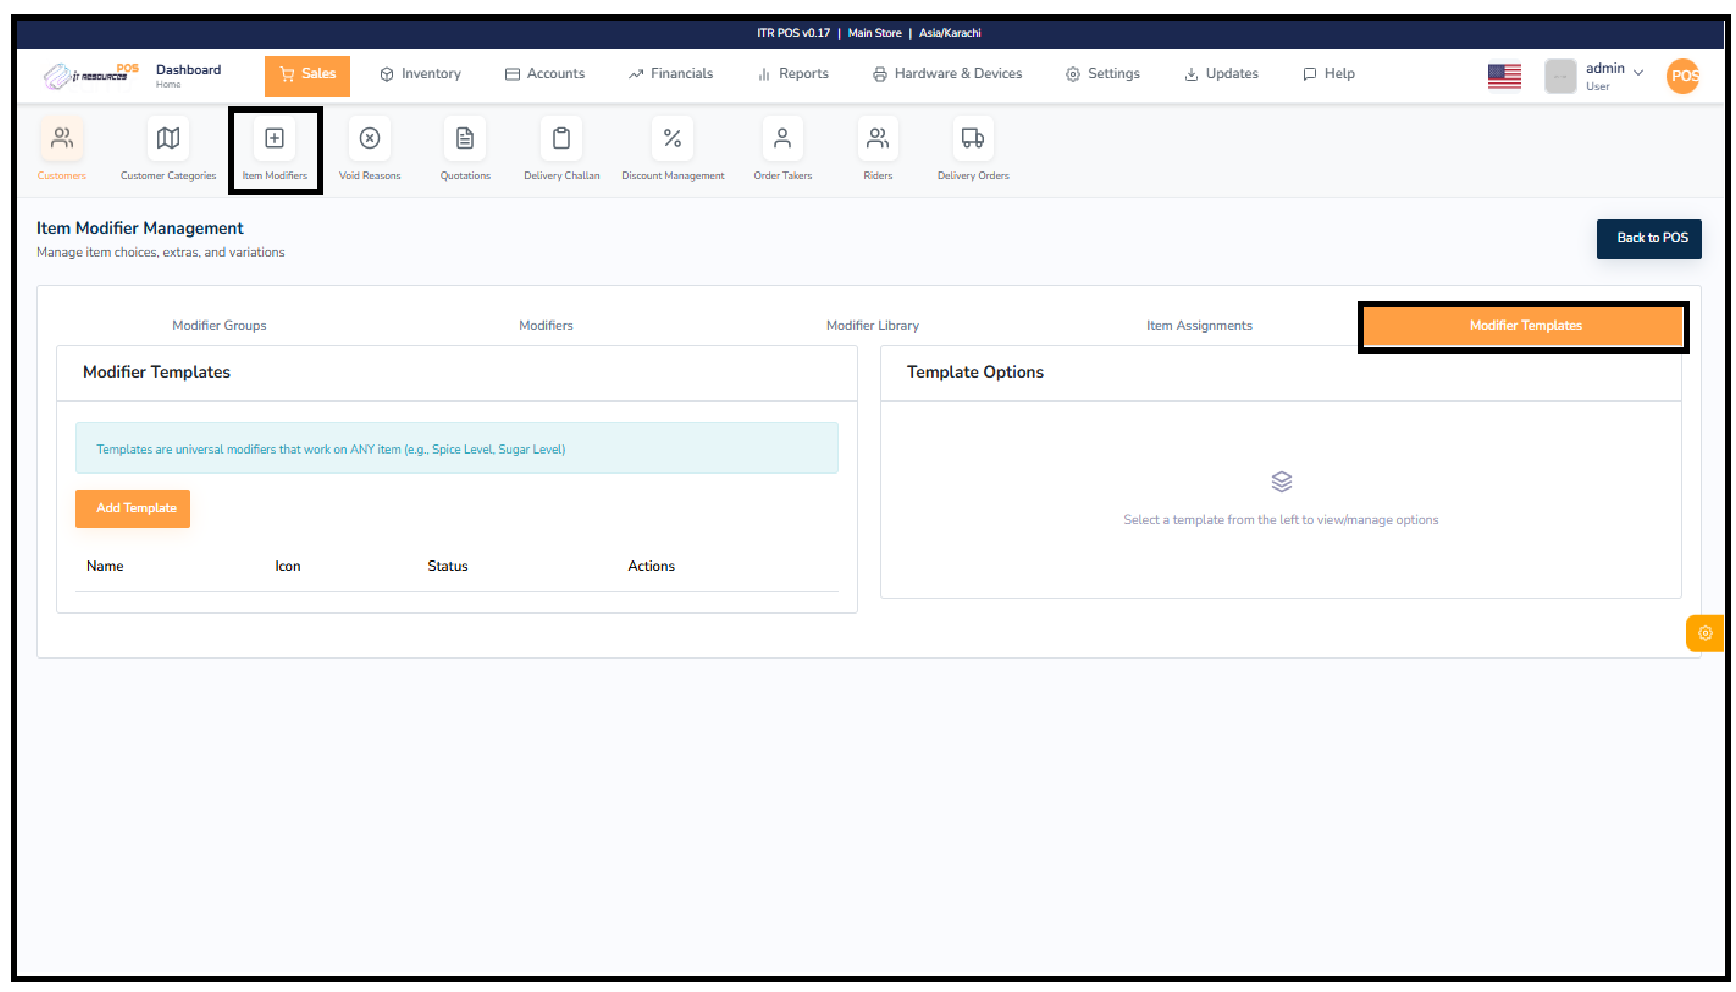
Ready-made modifier sets that can be quickly applied to items for faster setup.
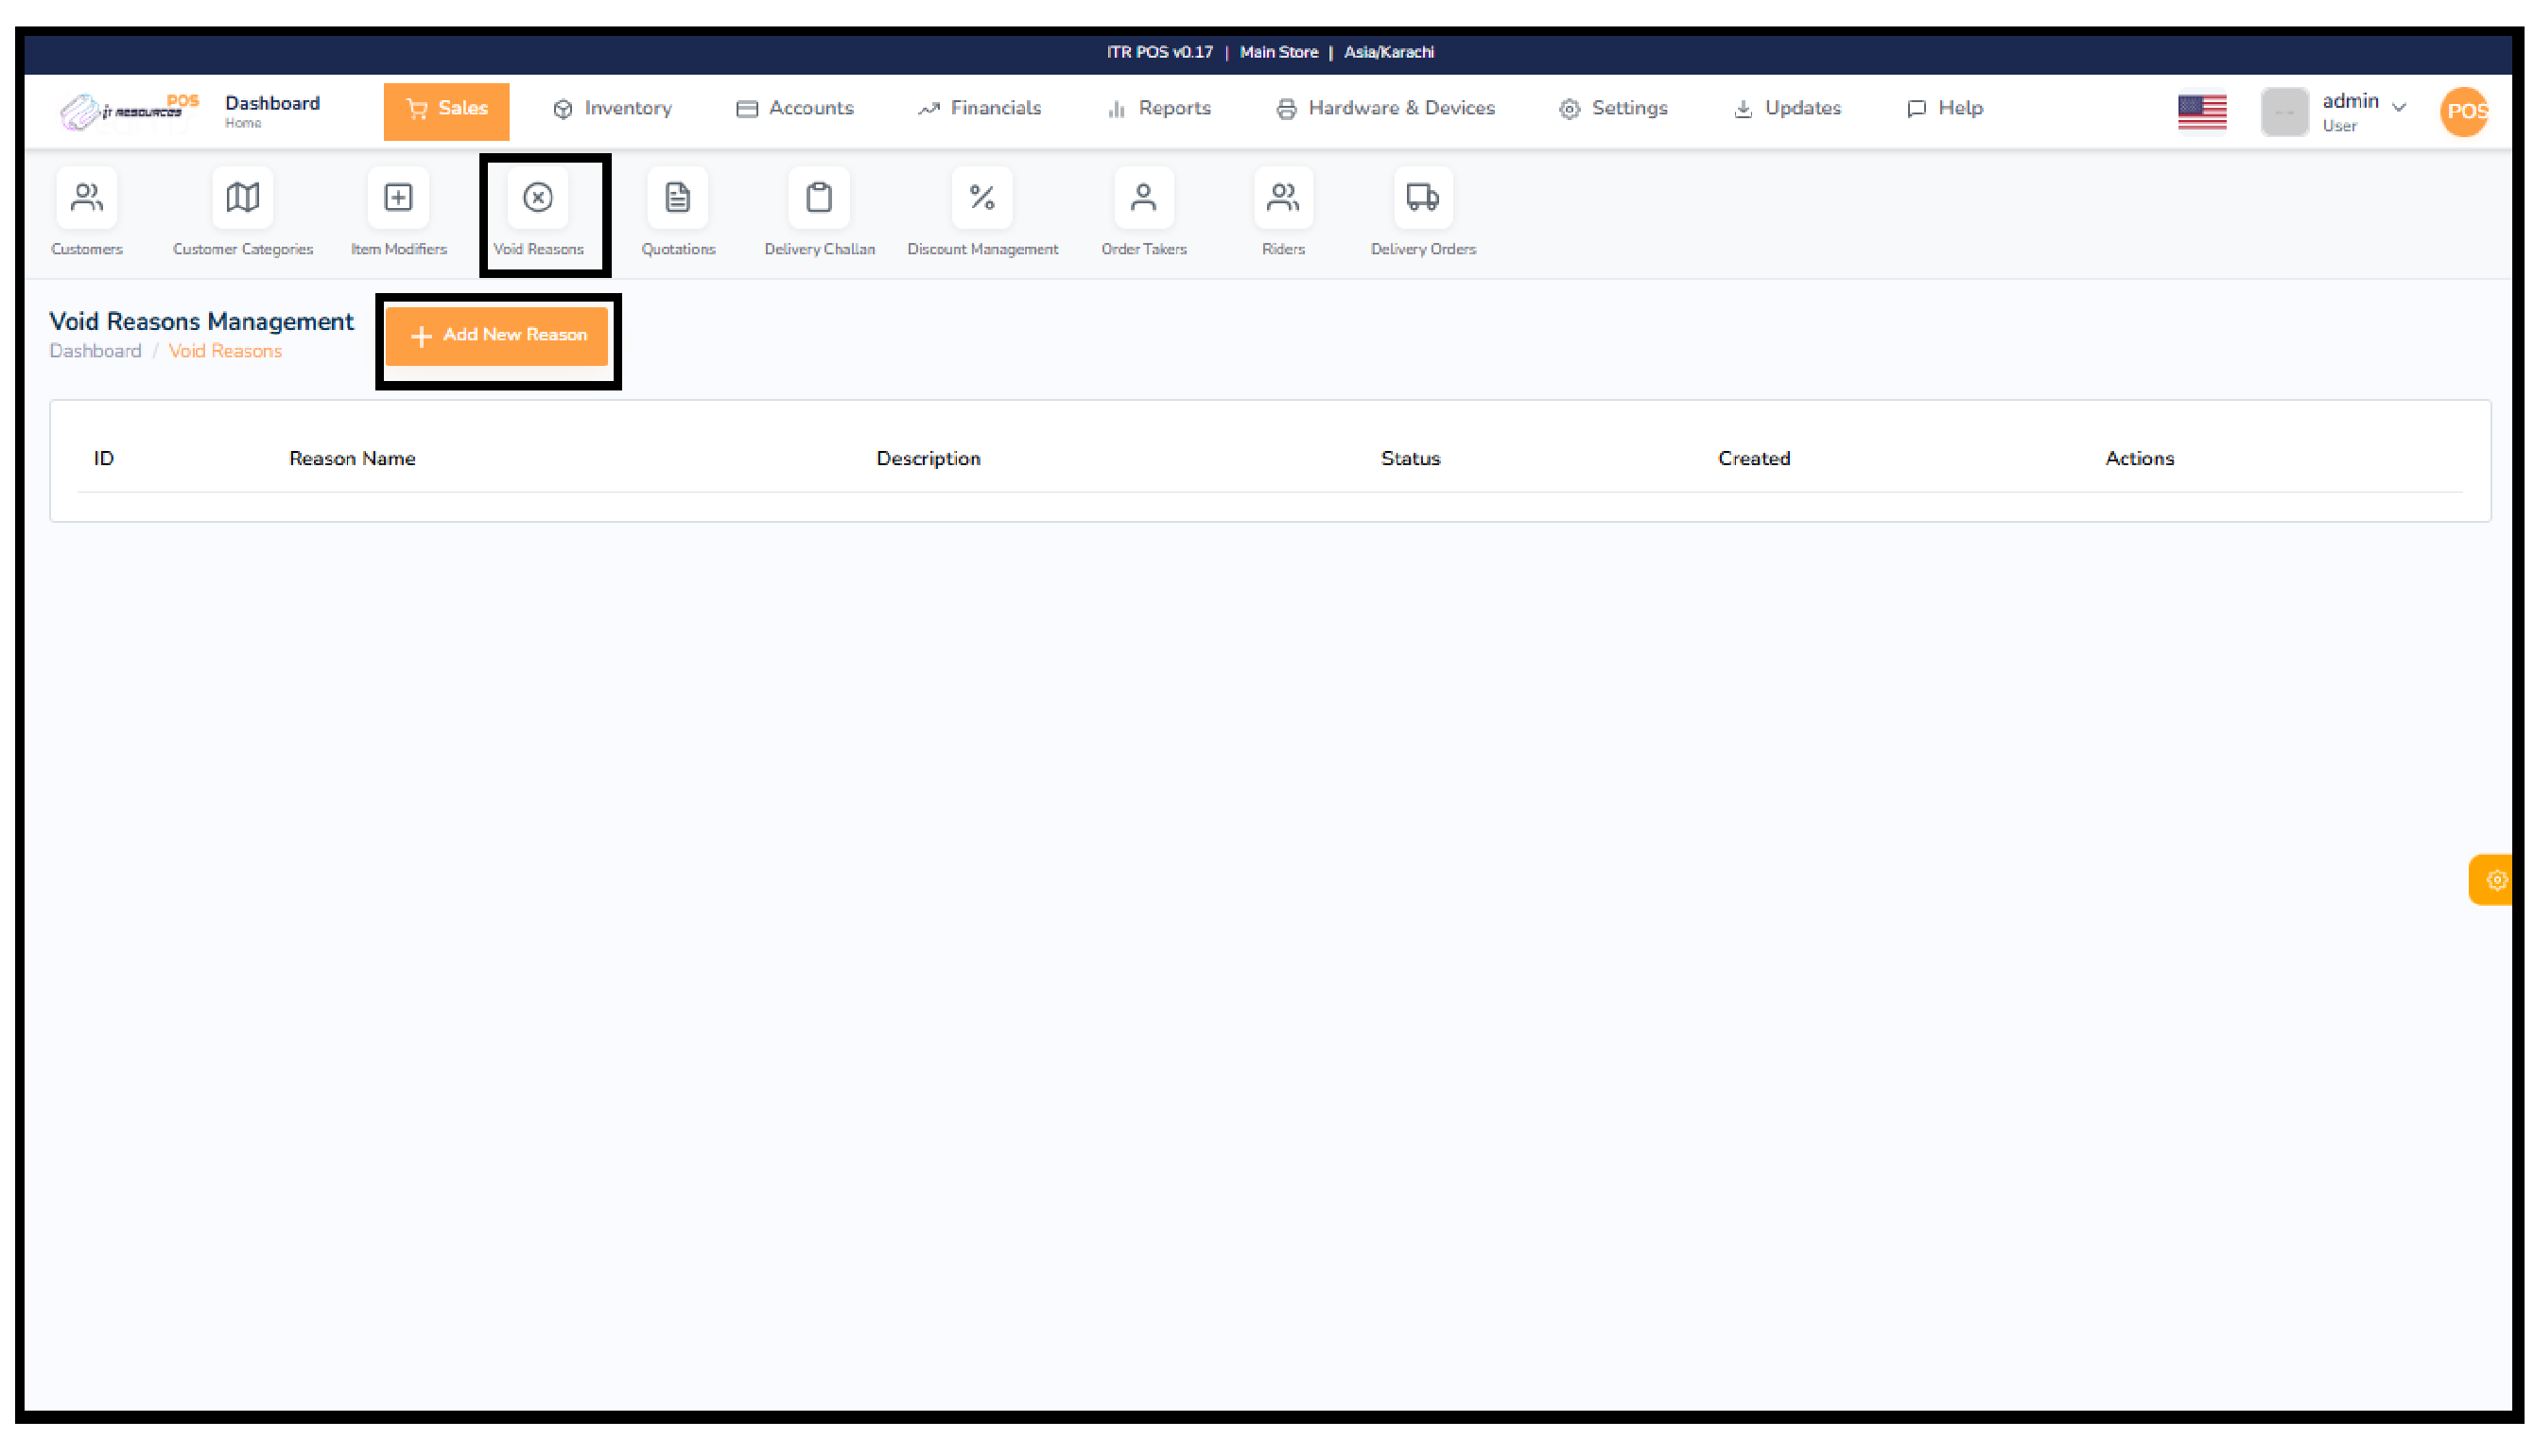
Void Reasons are used to define specific and predefined explanations for canceling or voiding a sales transaction. These reasons help record why an order was reversed—such as customer cancellation, wrong item selection, duplicate entries, pricing mistakes, or system-related issues. Clearly maintained void reasons improve transparency, support accurate sales reporting, prevent misuse, and provide better control and accountability over staff activity.
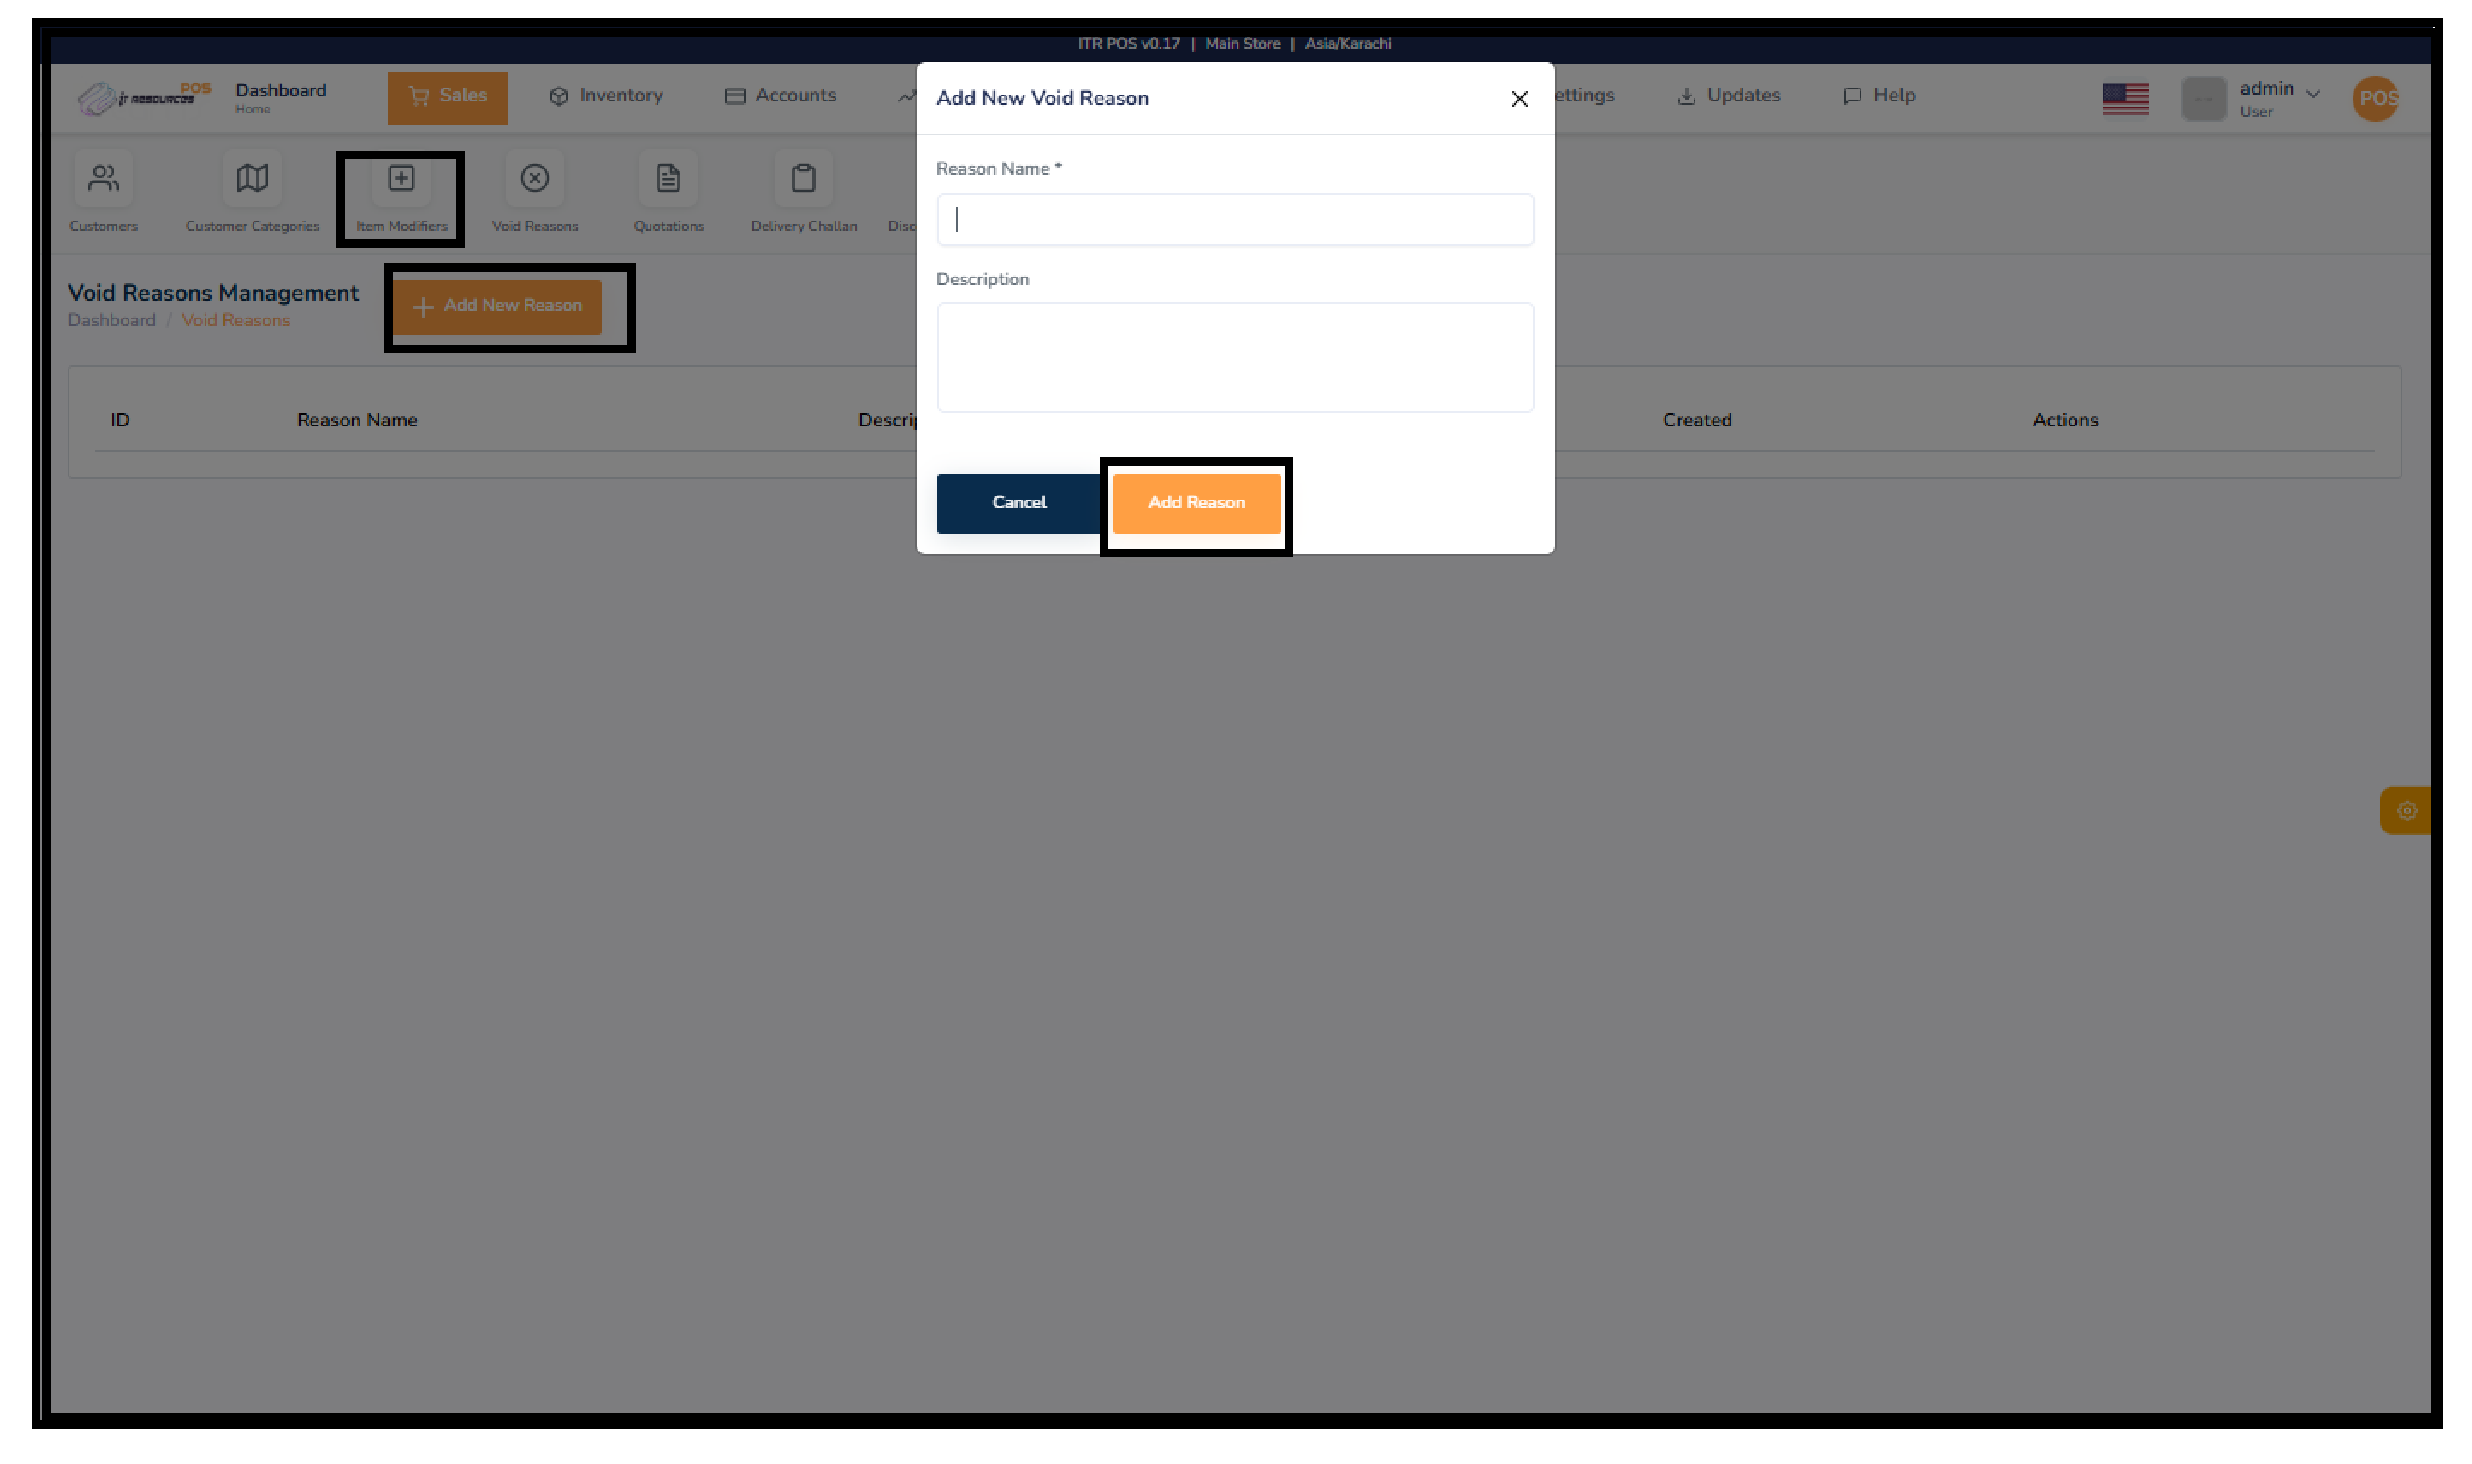
To create a new void reason, click "Add New Reason" and a popup will appear. Enter the Reason Name (required) and optionally add a detailed Description to specify when this reason should be used. After filling the fields, click "Add Reason" to save it. The new reason will now appear in the list and can be used during voided sales transactions.
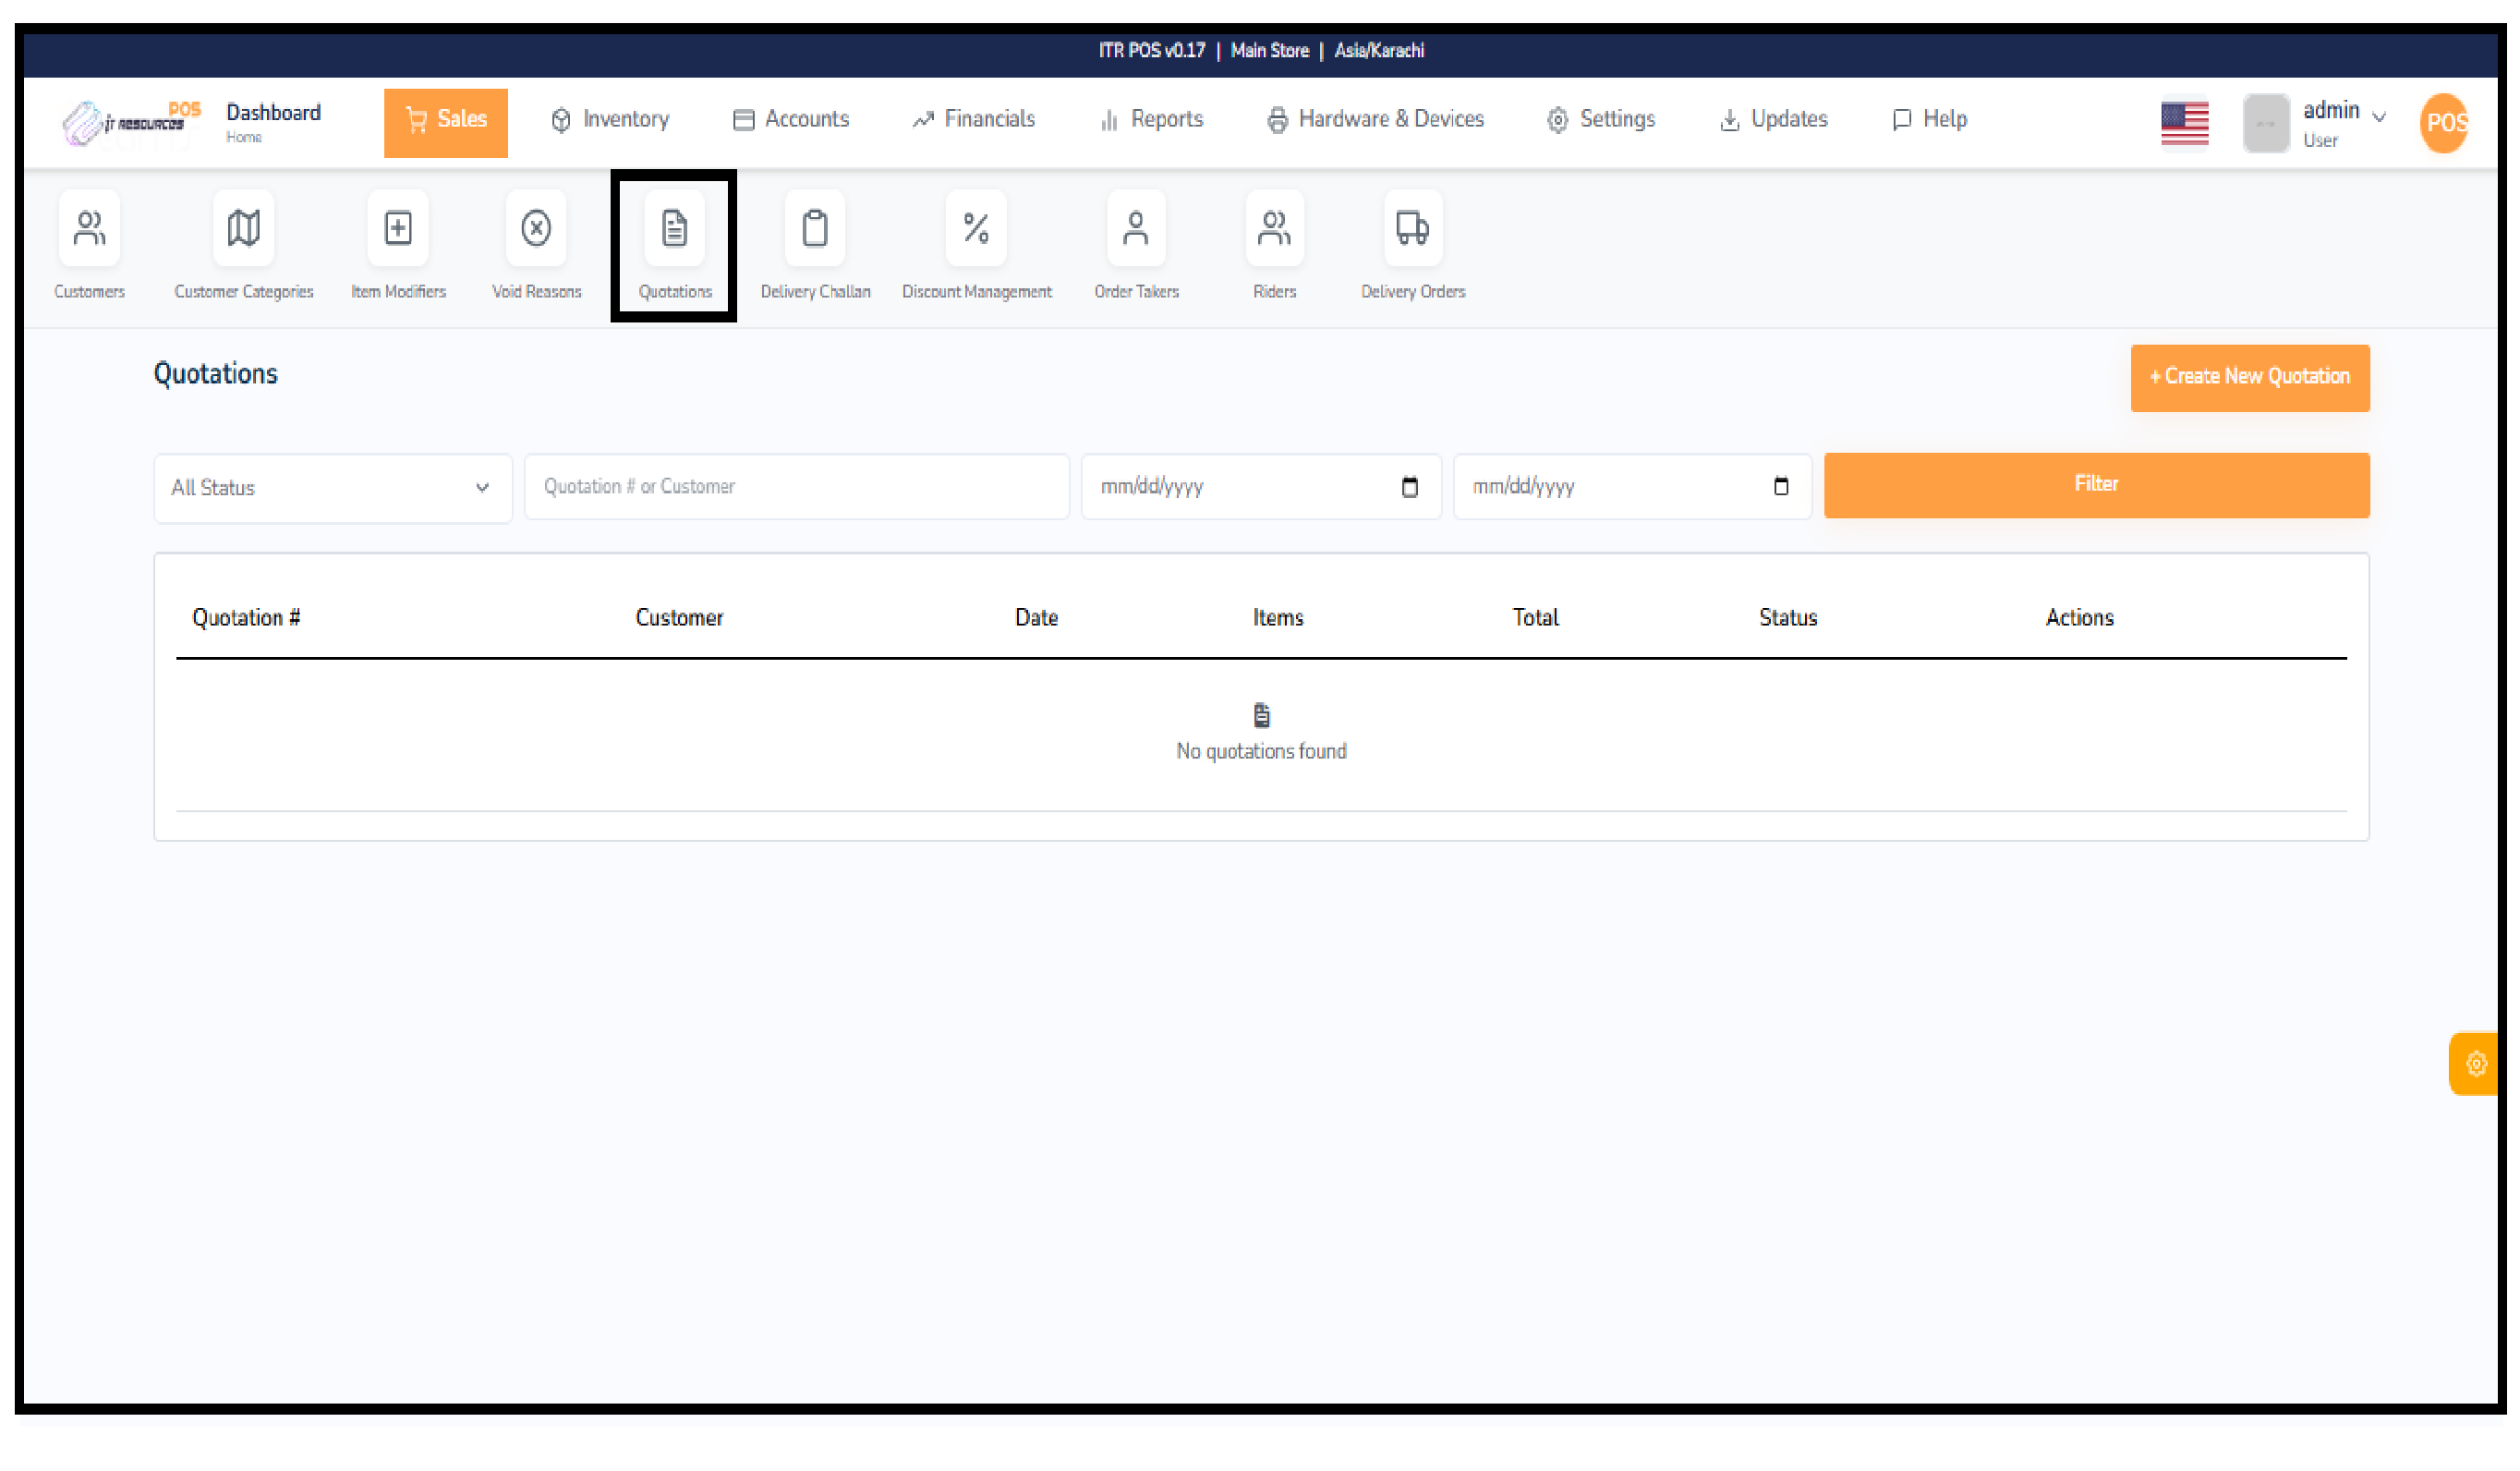
Quotations are used to provide customers with a detailed estimate of products and prices without immediately affecting sales records or reports. At the initial stage, a quotation is created and shared with the customer, allowing them to review the details before making a final decision.
Each quotation can be managed through its status in the quotations section. Once a quotation is approved, it can be easily converted into a sale by navigating to the Sales module and selecting the “Load Quotation” option. This process automatically transfers all customer and product details into the sales transaction, ensuring accuracy and saving time.
Additionally, the system updates the quotation status accordingly. For example, when a quotation is converted into a sale, its status changes to reflect completion. If a quotation is not accepted, it can also be marked as rejected or cancelled. Multiple status options help businesses effectively track and manage quotations.
Overall, the quotation system improves workflow efficiency, maintains data accuracy, and supports better business decision-making.
To create a new quotation, go to the Sales tab and open the Quotation section. All previous quotations will be displayed. Click on the "Create New Quotation" button, then select or search for a customer.
Next, search and add items, and make any necessary adjustments to prices, discounts, or other fields according to your requirements. Once all details are entered and reviewed, click on "Save Quotation".
To change the quotation status, go to the Sales tab and open the Quotation section. All quotations will be listed. In the Action column, click on the flag icon to update the status as needed.
To print a quotation, go to the Sales tab and open the Quotation section. All quotations will be listed. Click on the Print button next to the desired quotation to generate a print-ready version.
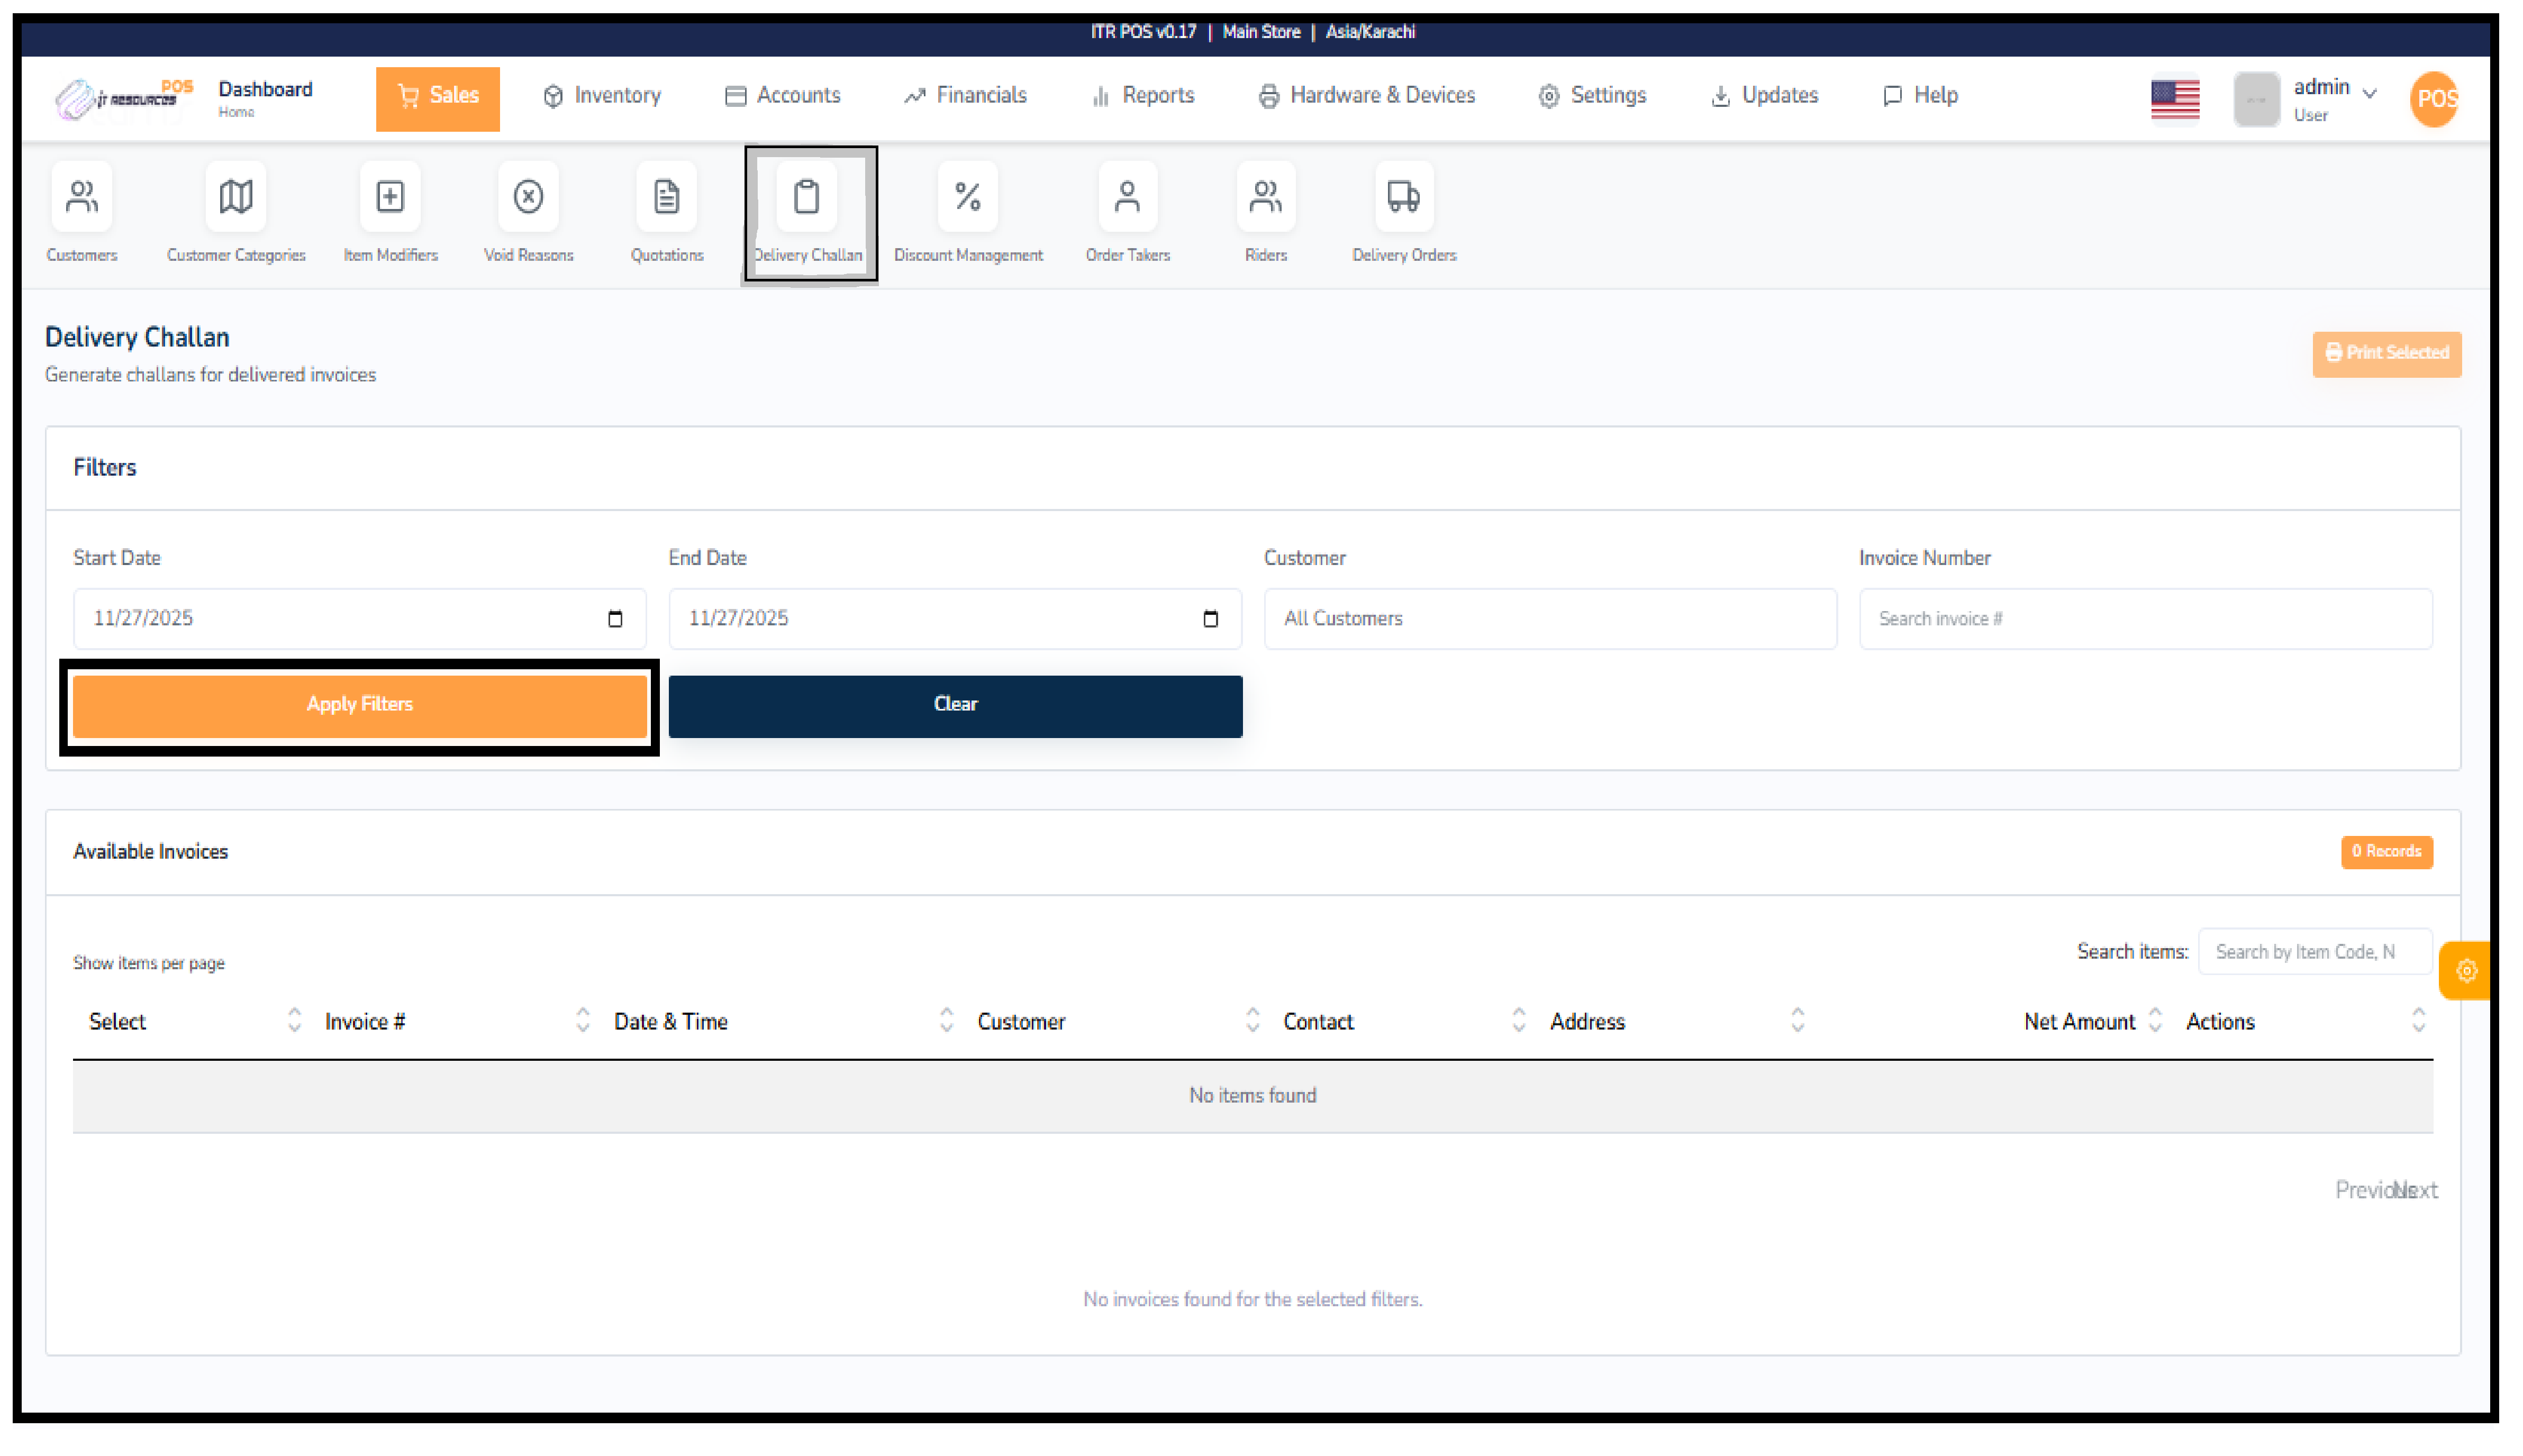
A delivery challan is an official document used to confirm and record the delivery of goods to a customer. It serves as proof that the ordered items have been dispatched or handed over, even if the invoice has already been generated. Delivery challans help businesses maintain accurate records of which items were delivered, to whom, at what time, and by which invoice reference. This ensures proper tracking, prevents disputes, and improves communication between the sales, accounts, and delivery teams. It is especially useful in businesses where items are sent out for delivery, partial deliveries occur, or customers request physical proof of dispatch.
To generate a delivery challan, start by selecting the date range in the filters so the system can display all invoices created within that period. You may further narrow the results by choosing a specific customer or entering an invoice number. After applying filters, the system will list all eligible invoices available for challan creation. Simply select the invoices you want to generate challans for and review customer details, delivery address, and item information. Once satisfied, click on the "Print Selected" button to generate and print the delivery challan. This document can then be given to the rider, the dispatch team, or the customer as proof of delivery.
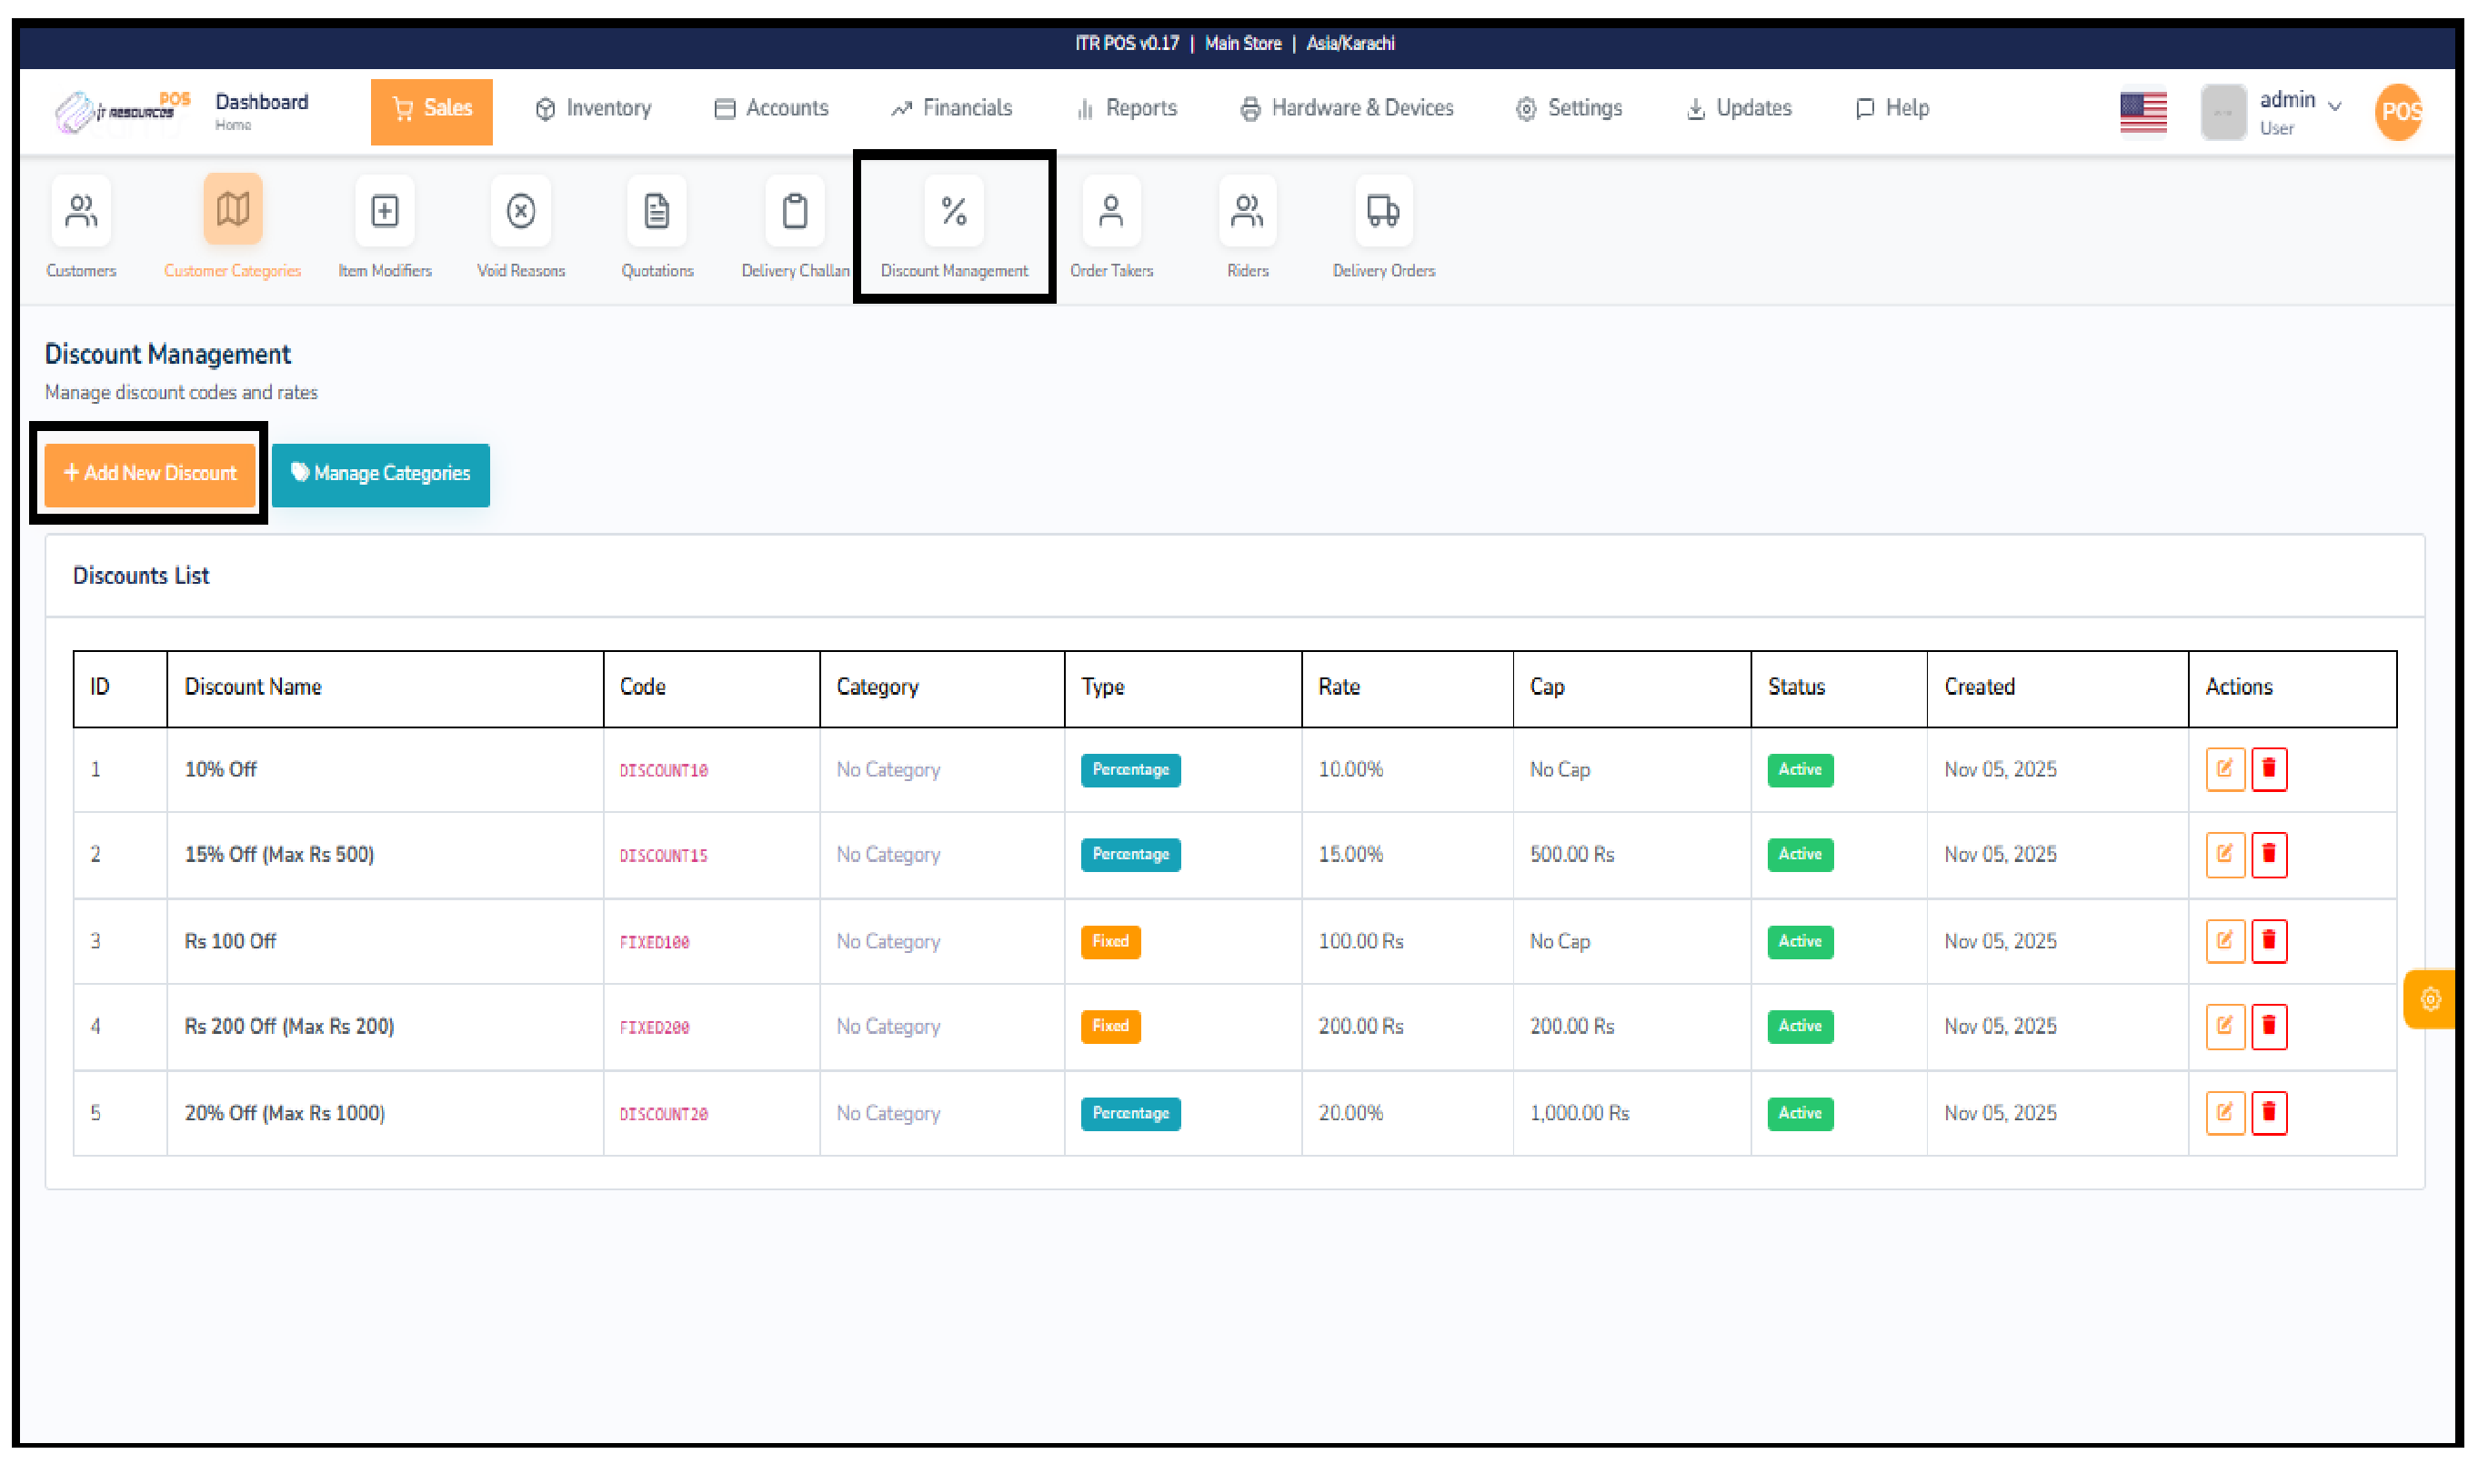
The Discount Management section allows you to create and organize different discount codes for your store. It helps you manage promotional offers by defining the discount name, code, type, rate, and an optional cap. You can also group discounts into categories for better organization. This feature ensures consistent pricing, easier promotion handling, and a smooth billing process.
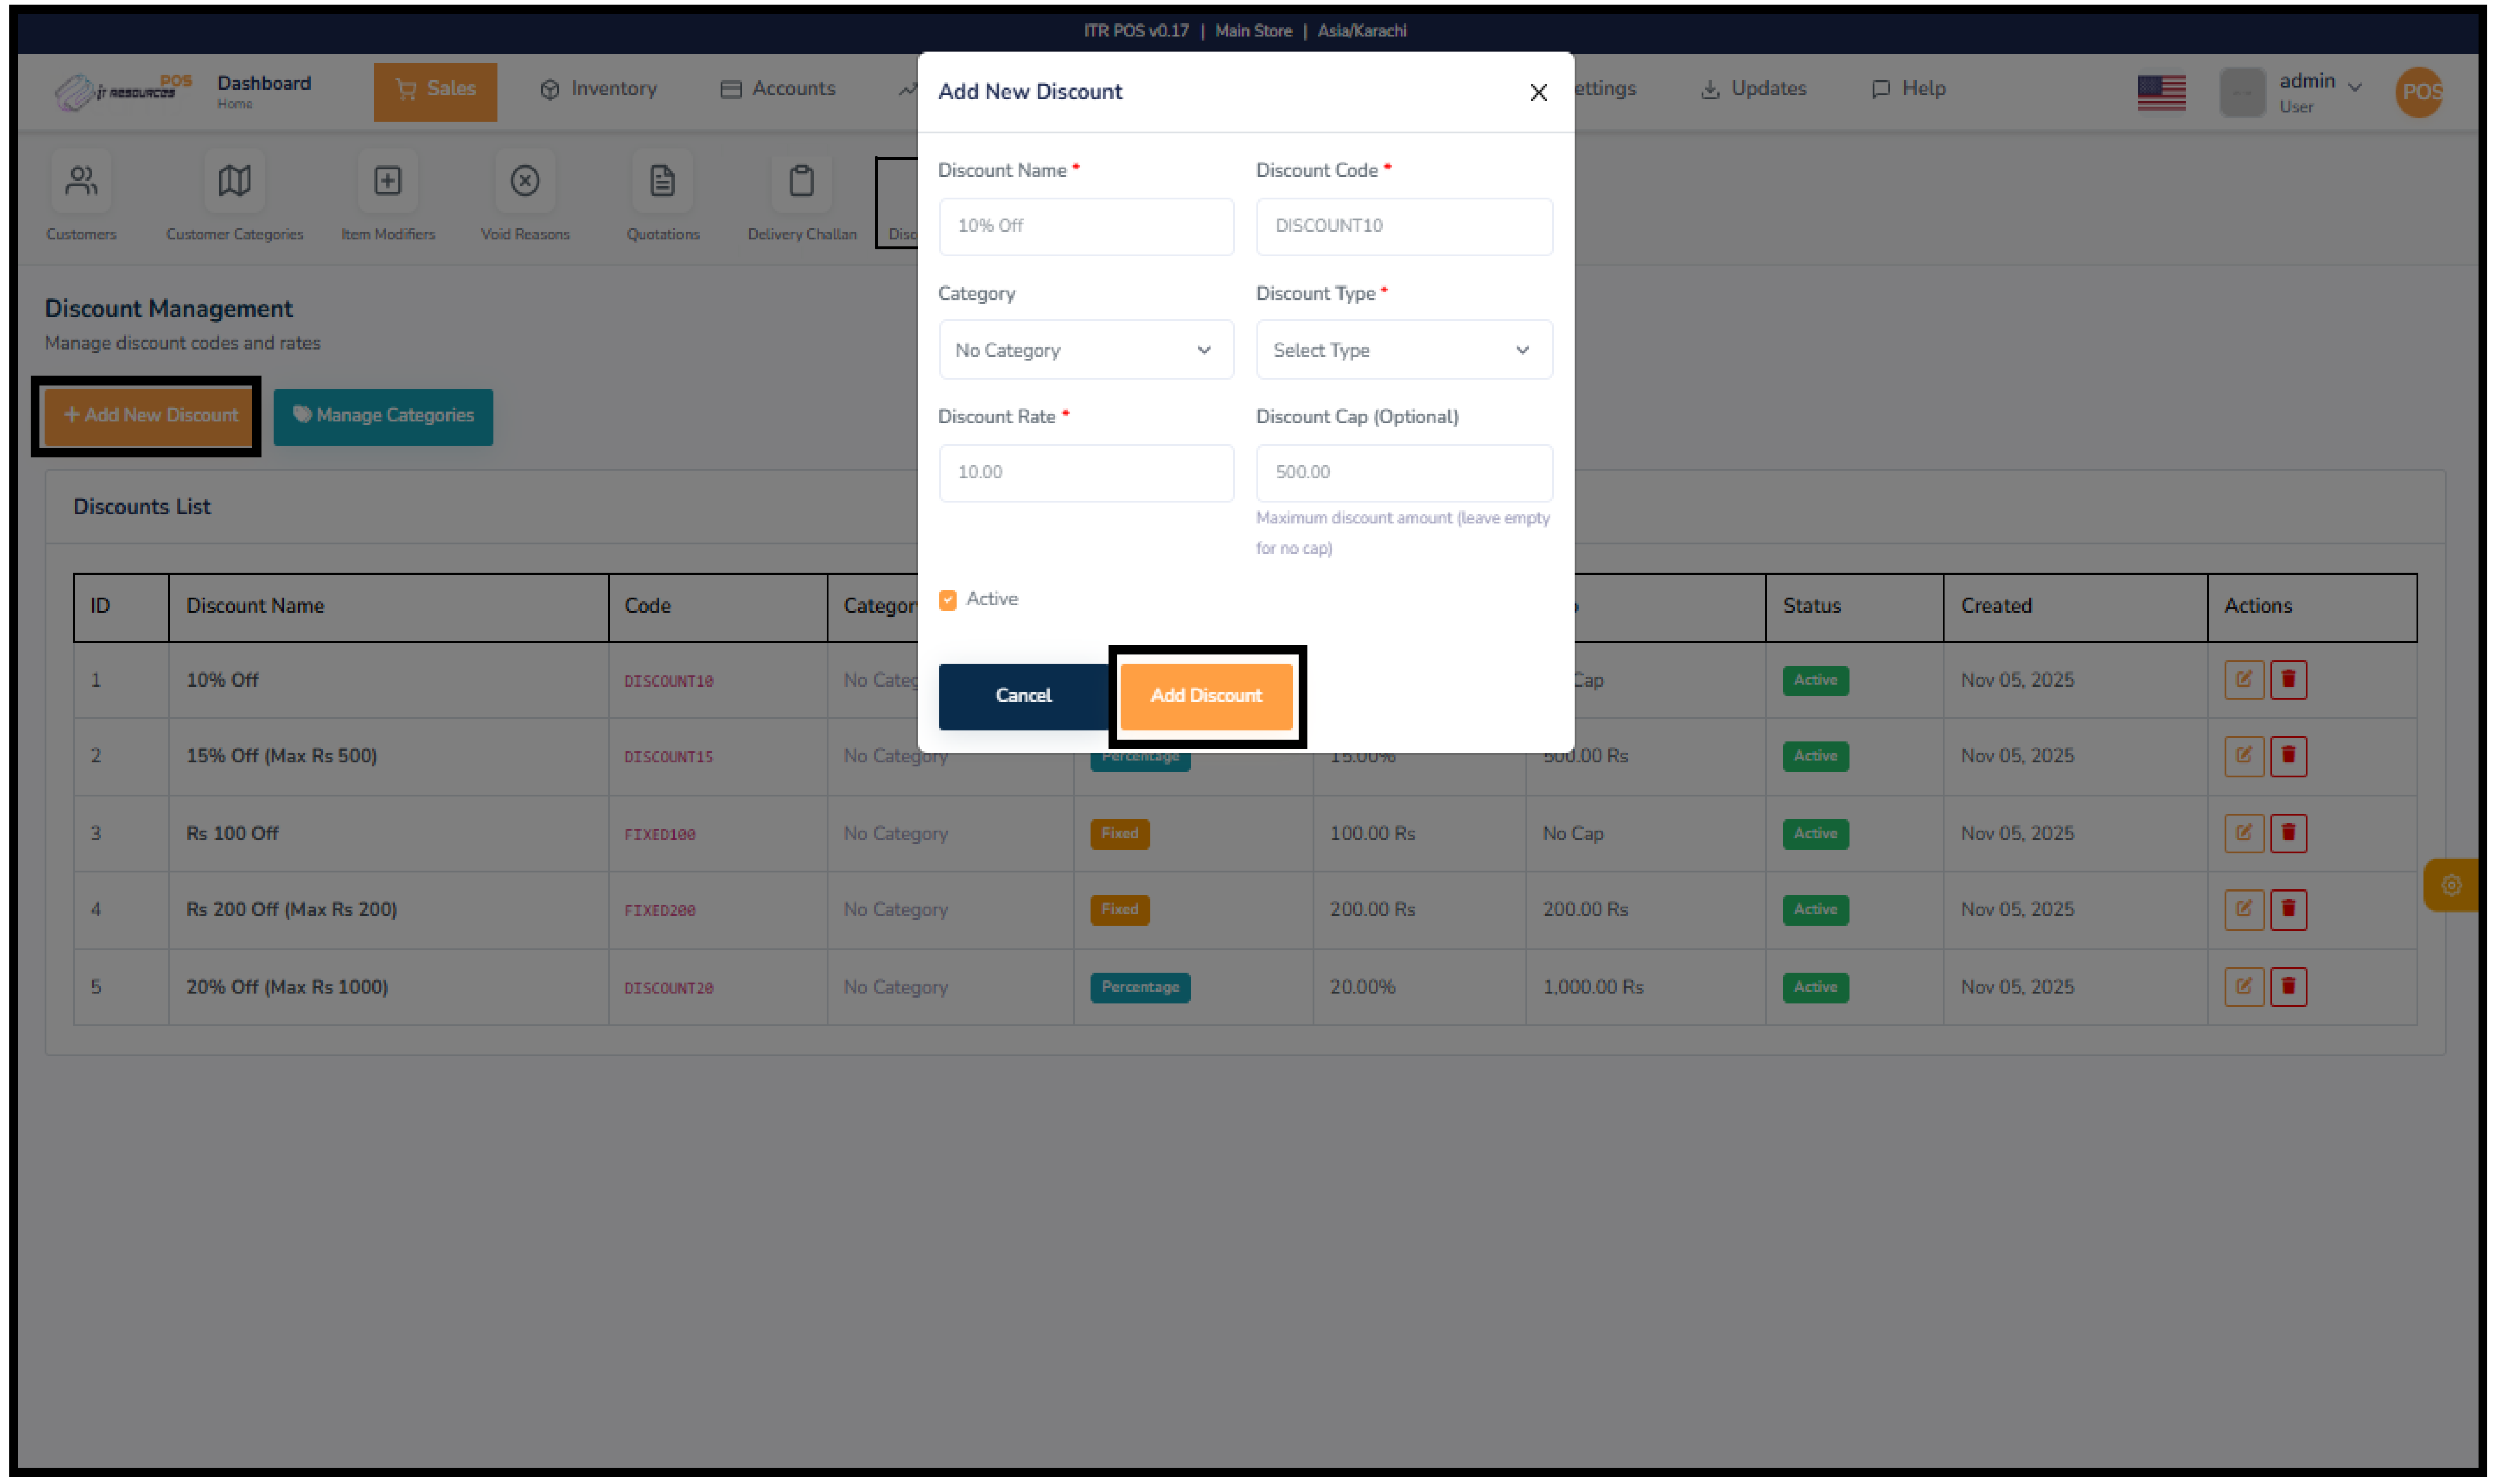
To create a new discount, click "Add New Discount" and fill in the discount name, select the type (Percentage or Fixed), enter the rate, and optionally add a maximum cap. Choose a category if available, keep the status active, and click Add Discount to save. The new discount will appear in the list and can be applied during sales.
To manage categories, click "Manage Categories" in the Discount Management section. You can add a new category by entering the category name, display order, and selecting its status. After saving, the category will be available to assign to your discounts for better organization.

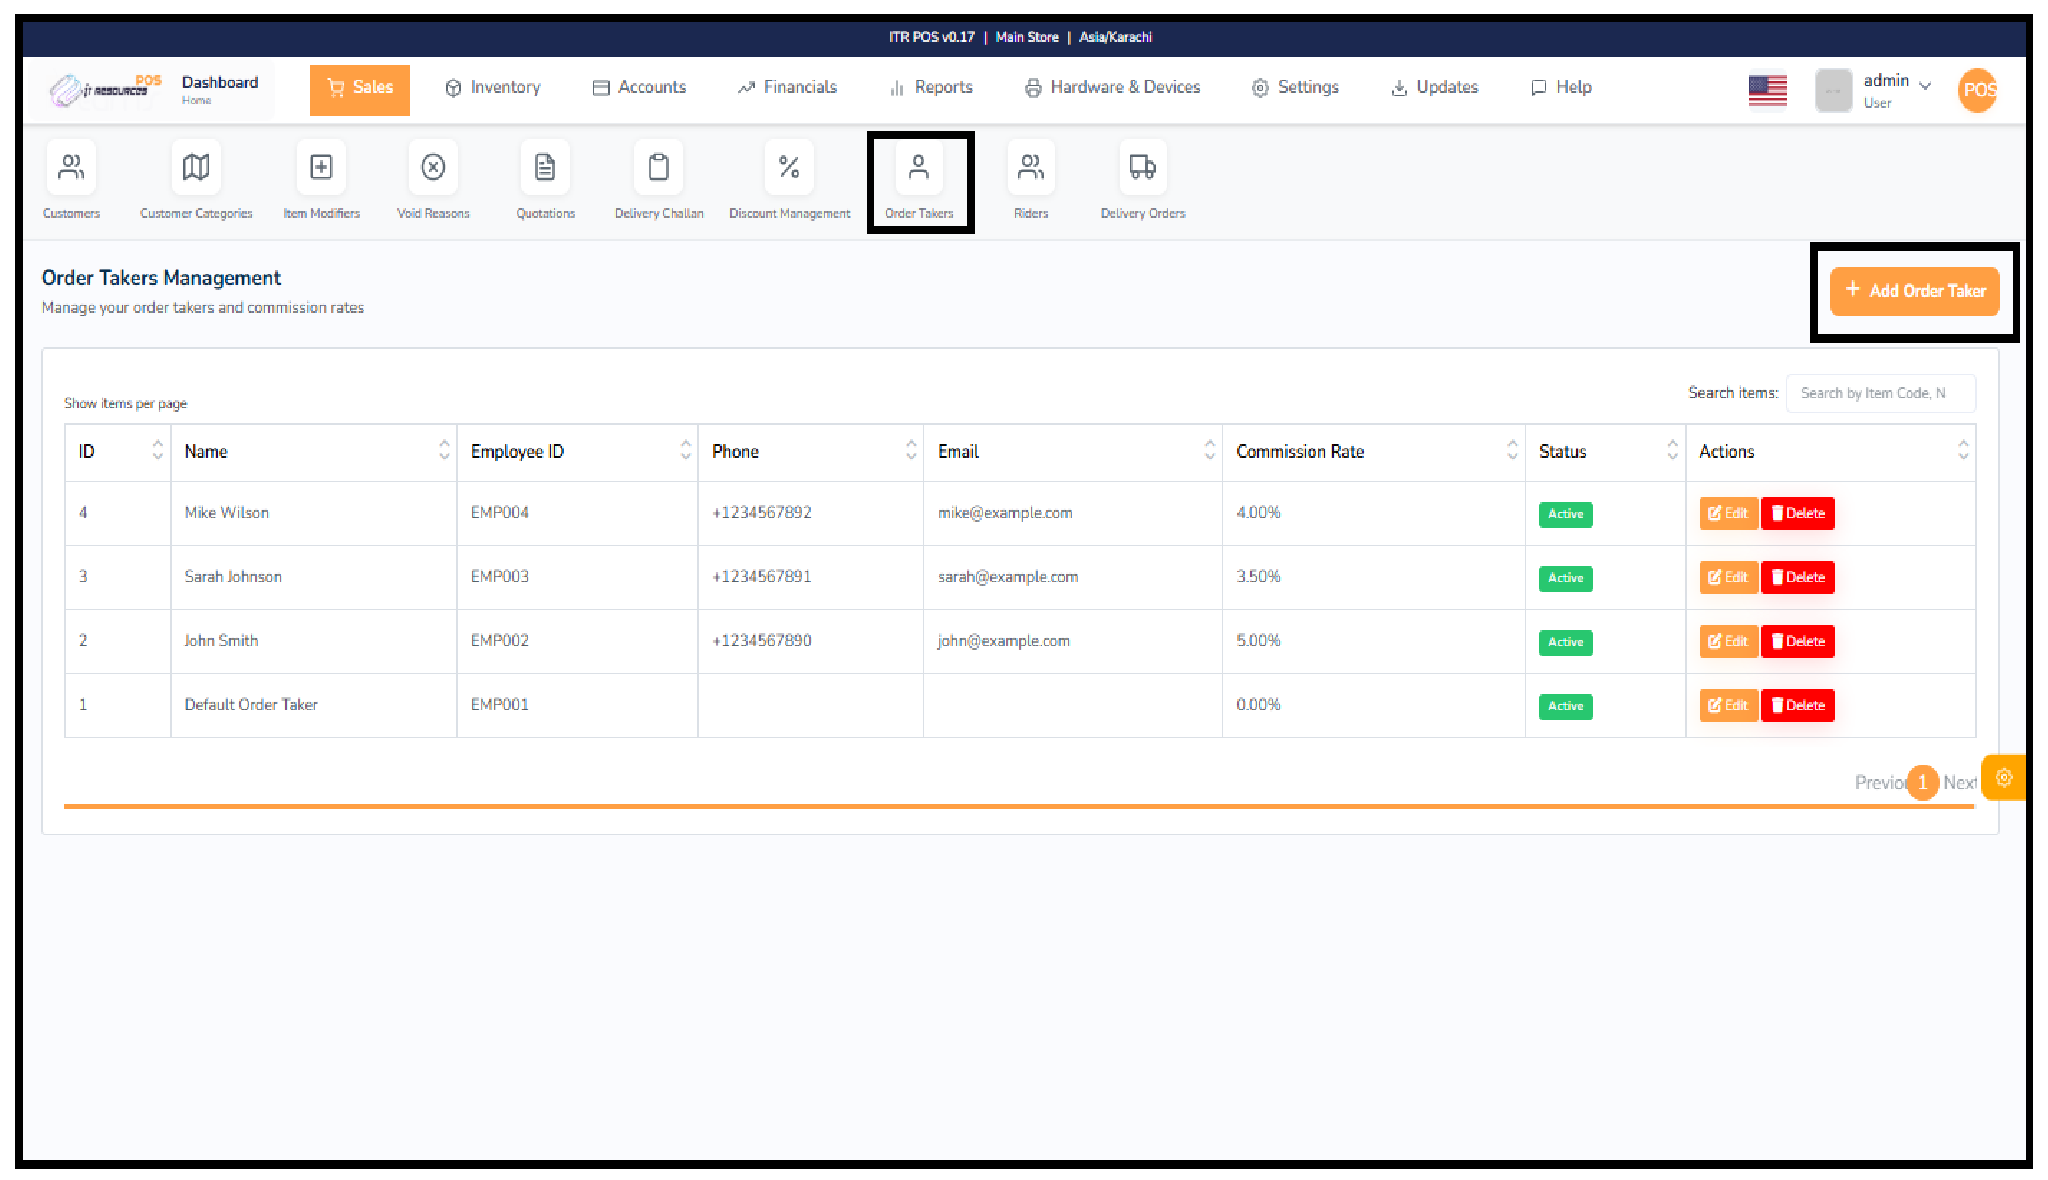
The Order Takers module helps you manage the employees responsible for taking customer orders. This screen displays a list of all order takers along with their essential details, including name, employee ID, phone number, email, commission rate, and current status. You can edit or delete any record directly from the table using the action buttons. This feature ensures that your sales process stays organized and that each order taker's commission is tracked properly.
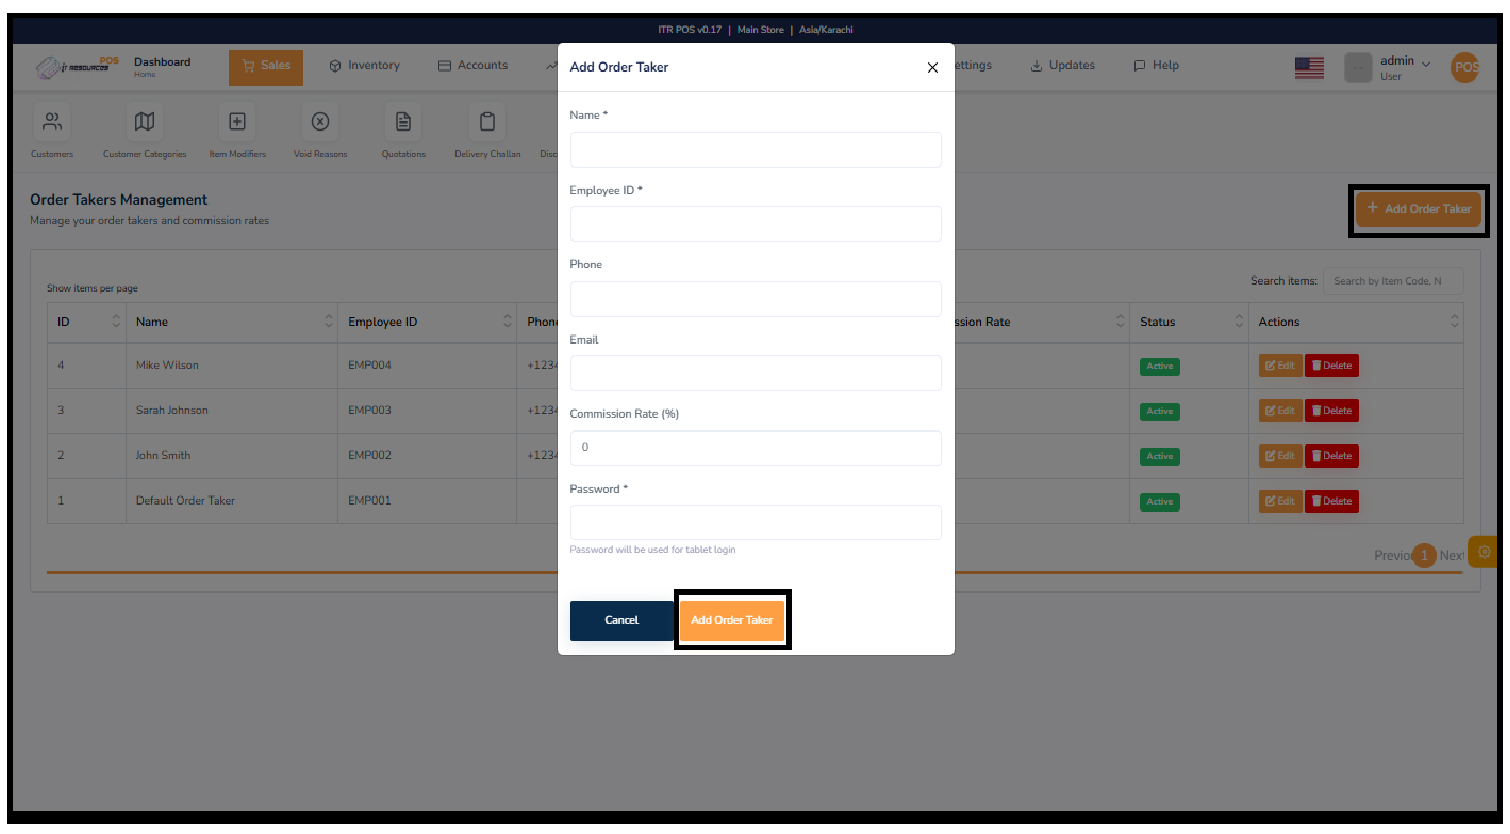
To add a new order taker, click the "Add Order Taker" button on the top right. A popup form will appear where you must enter the order taker's name, employee ID, phone number, email, commission rate, and password. After filling in all required fields, click the "Add Order Taker" button to save the new record. The new order taker will immediately appear in the list with their details and status.
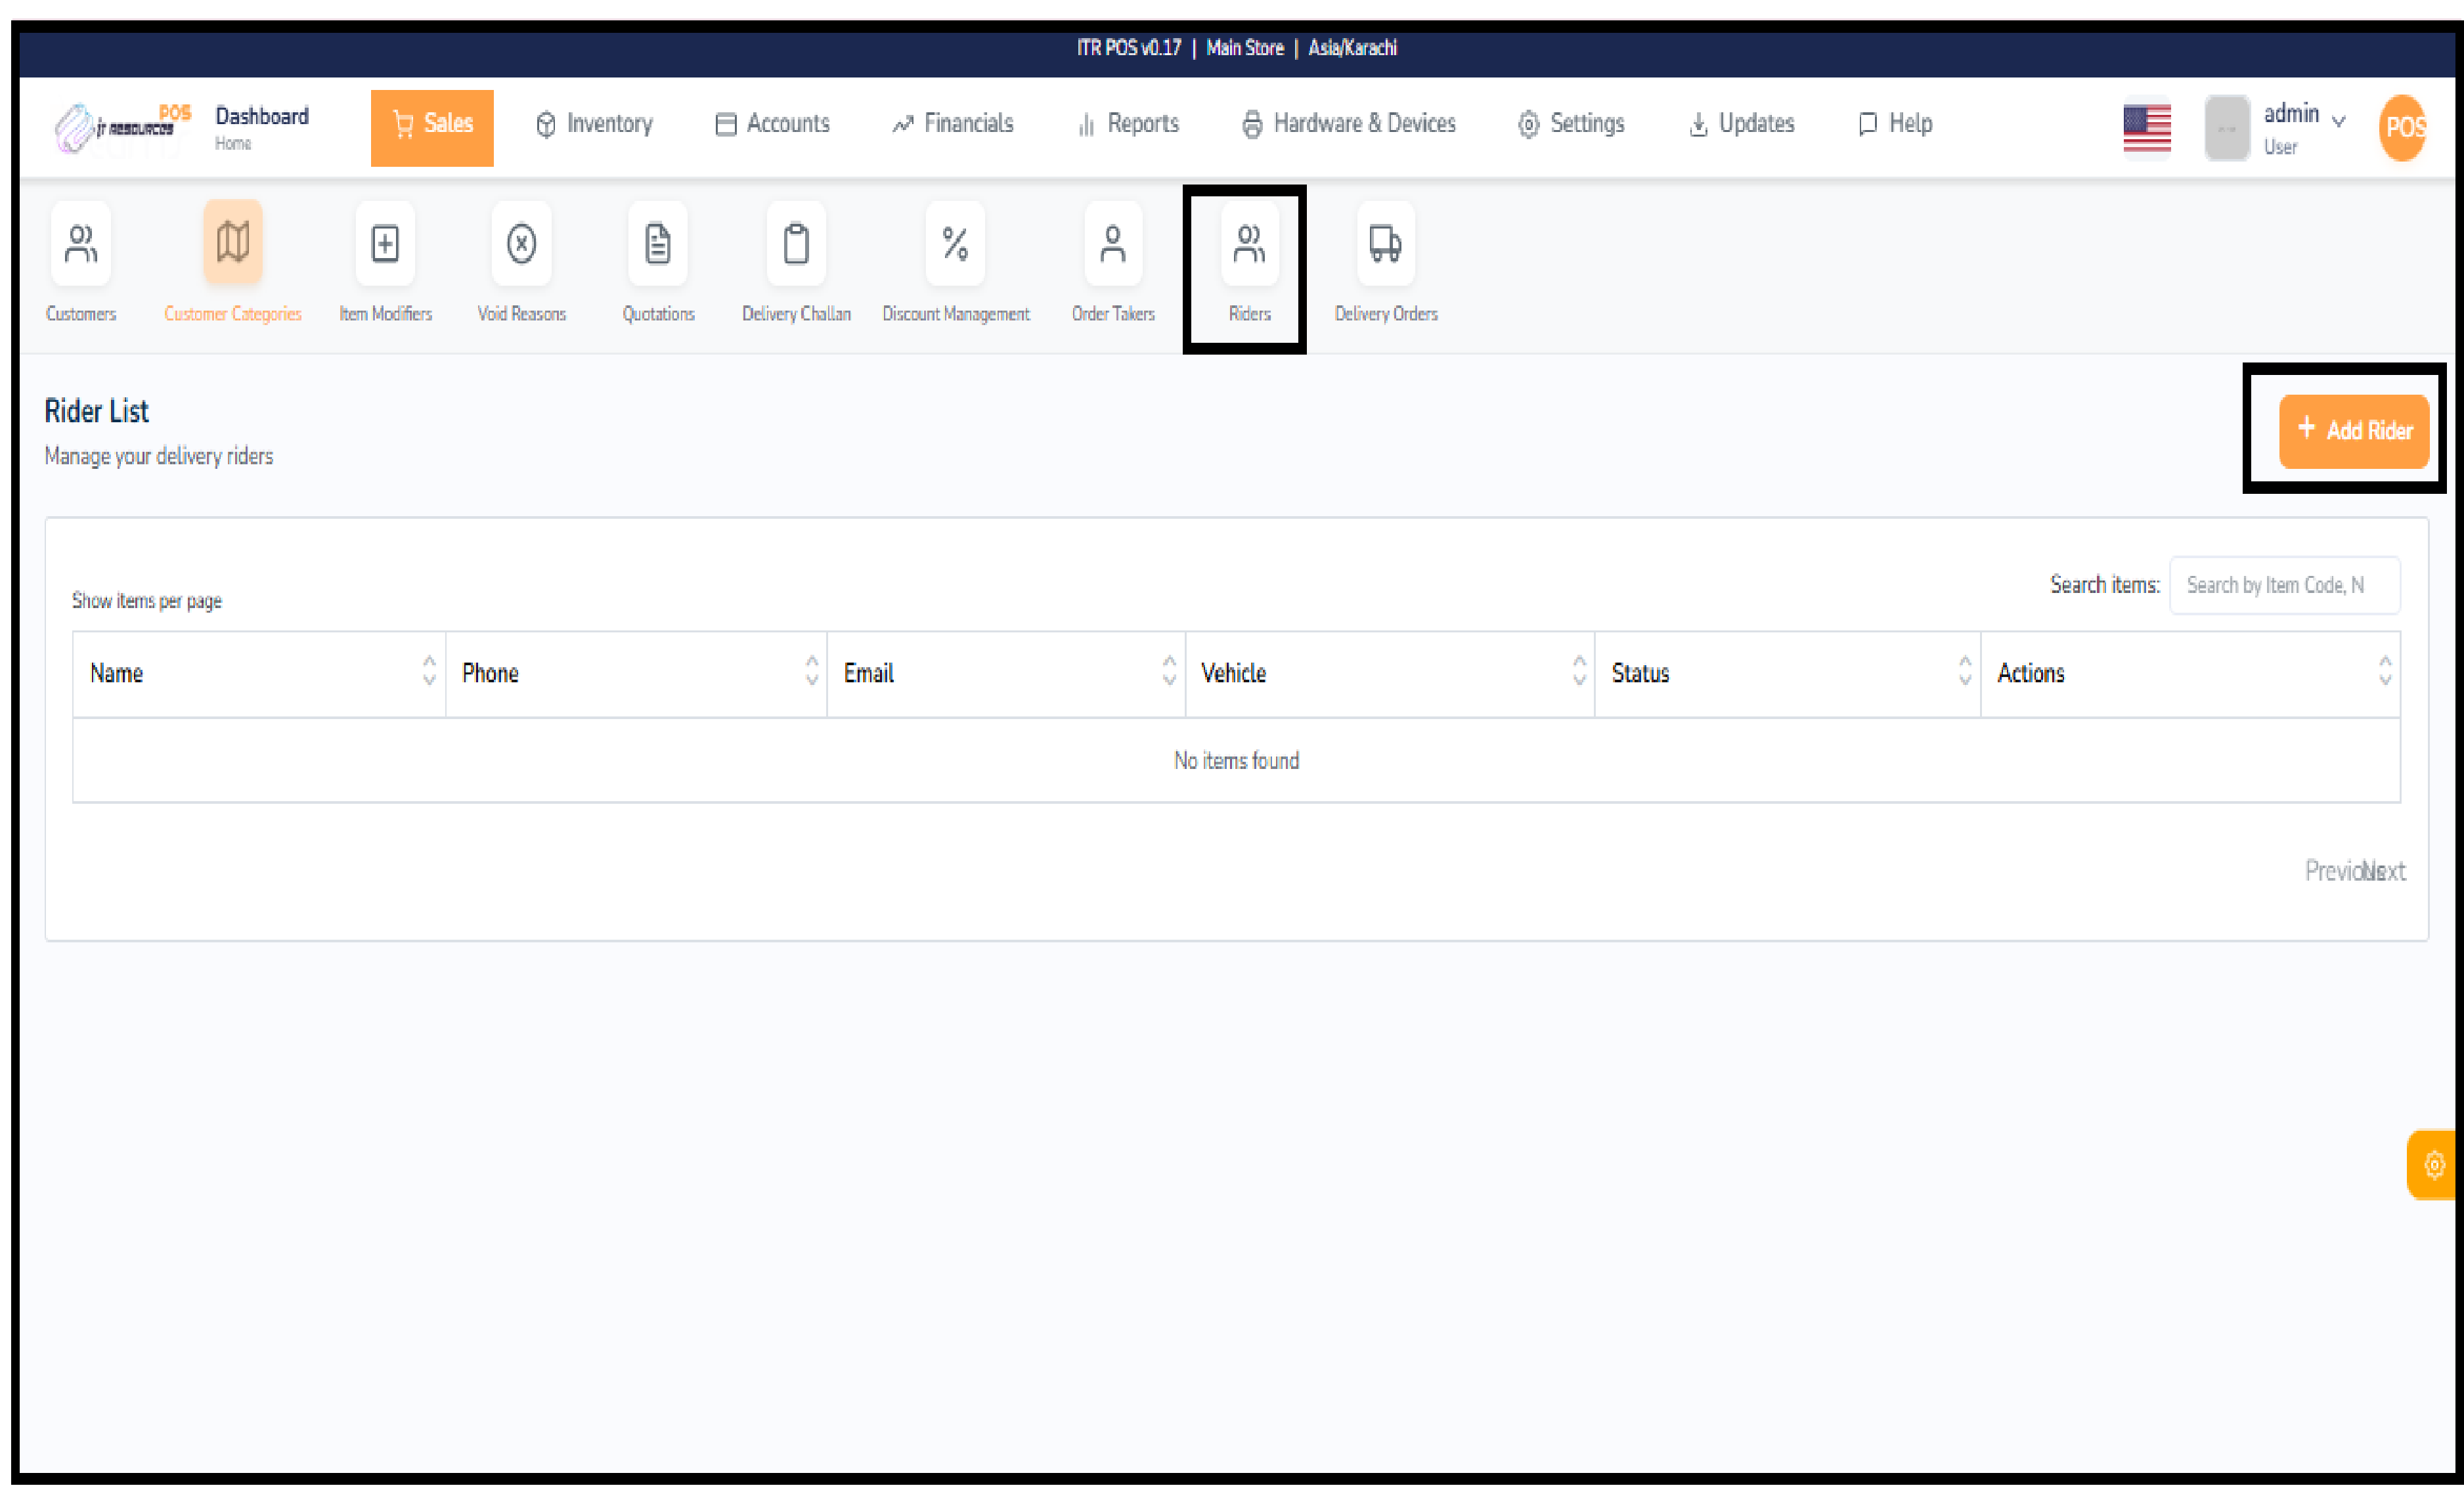
The Rider section allows you to manage all delivery riders connected to your store. From here, you can keep track of riders' names, contact information, vehicle details, and their active/inactive status. This helps you organize your delivery system by assigning orders to the right rider and ensuring that all rider information stays up to date.
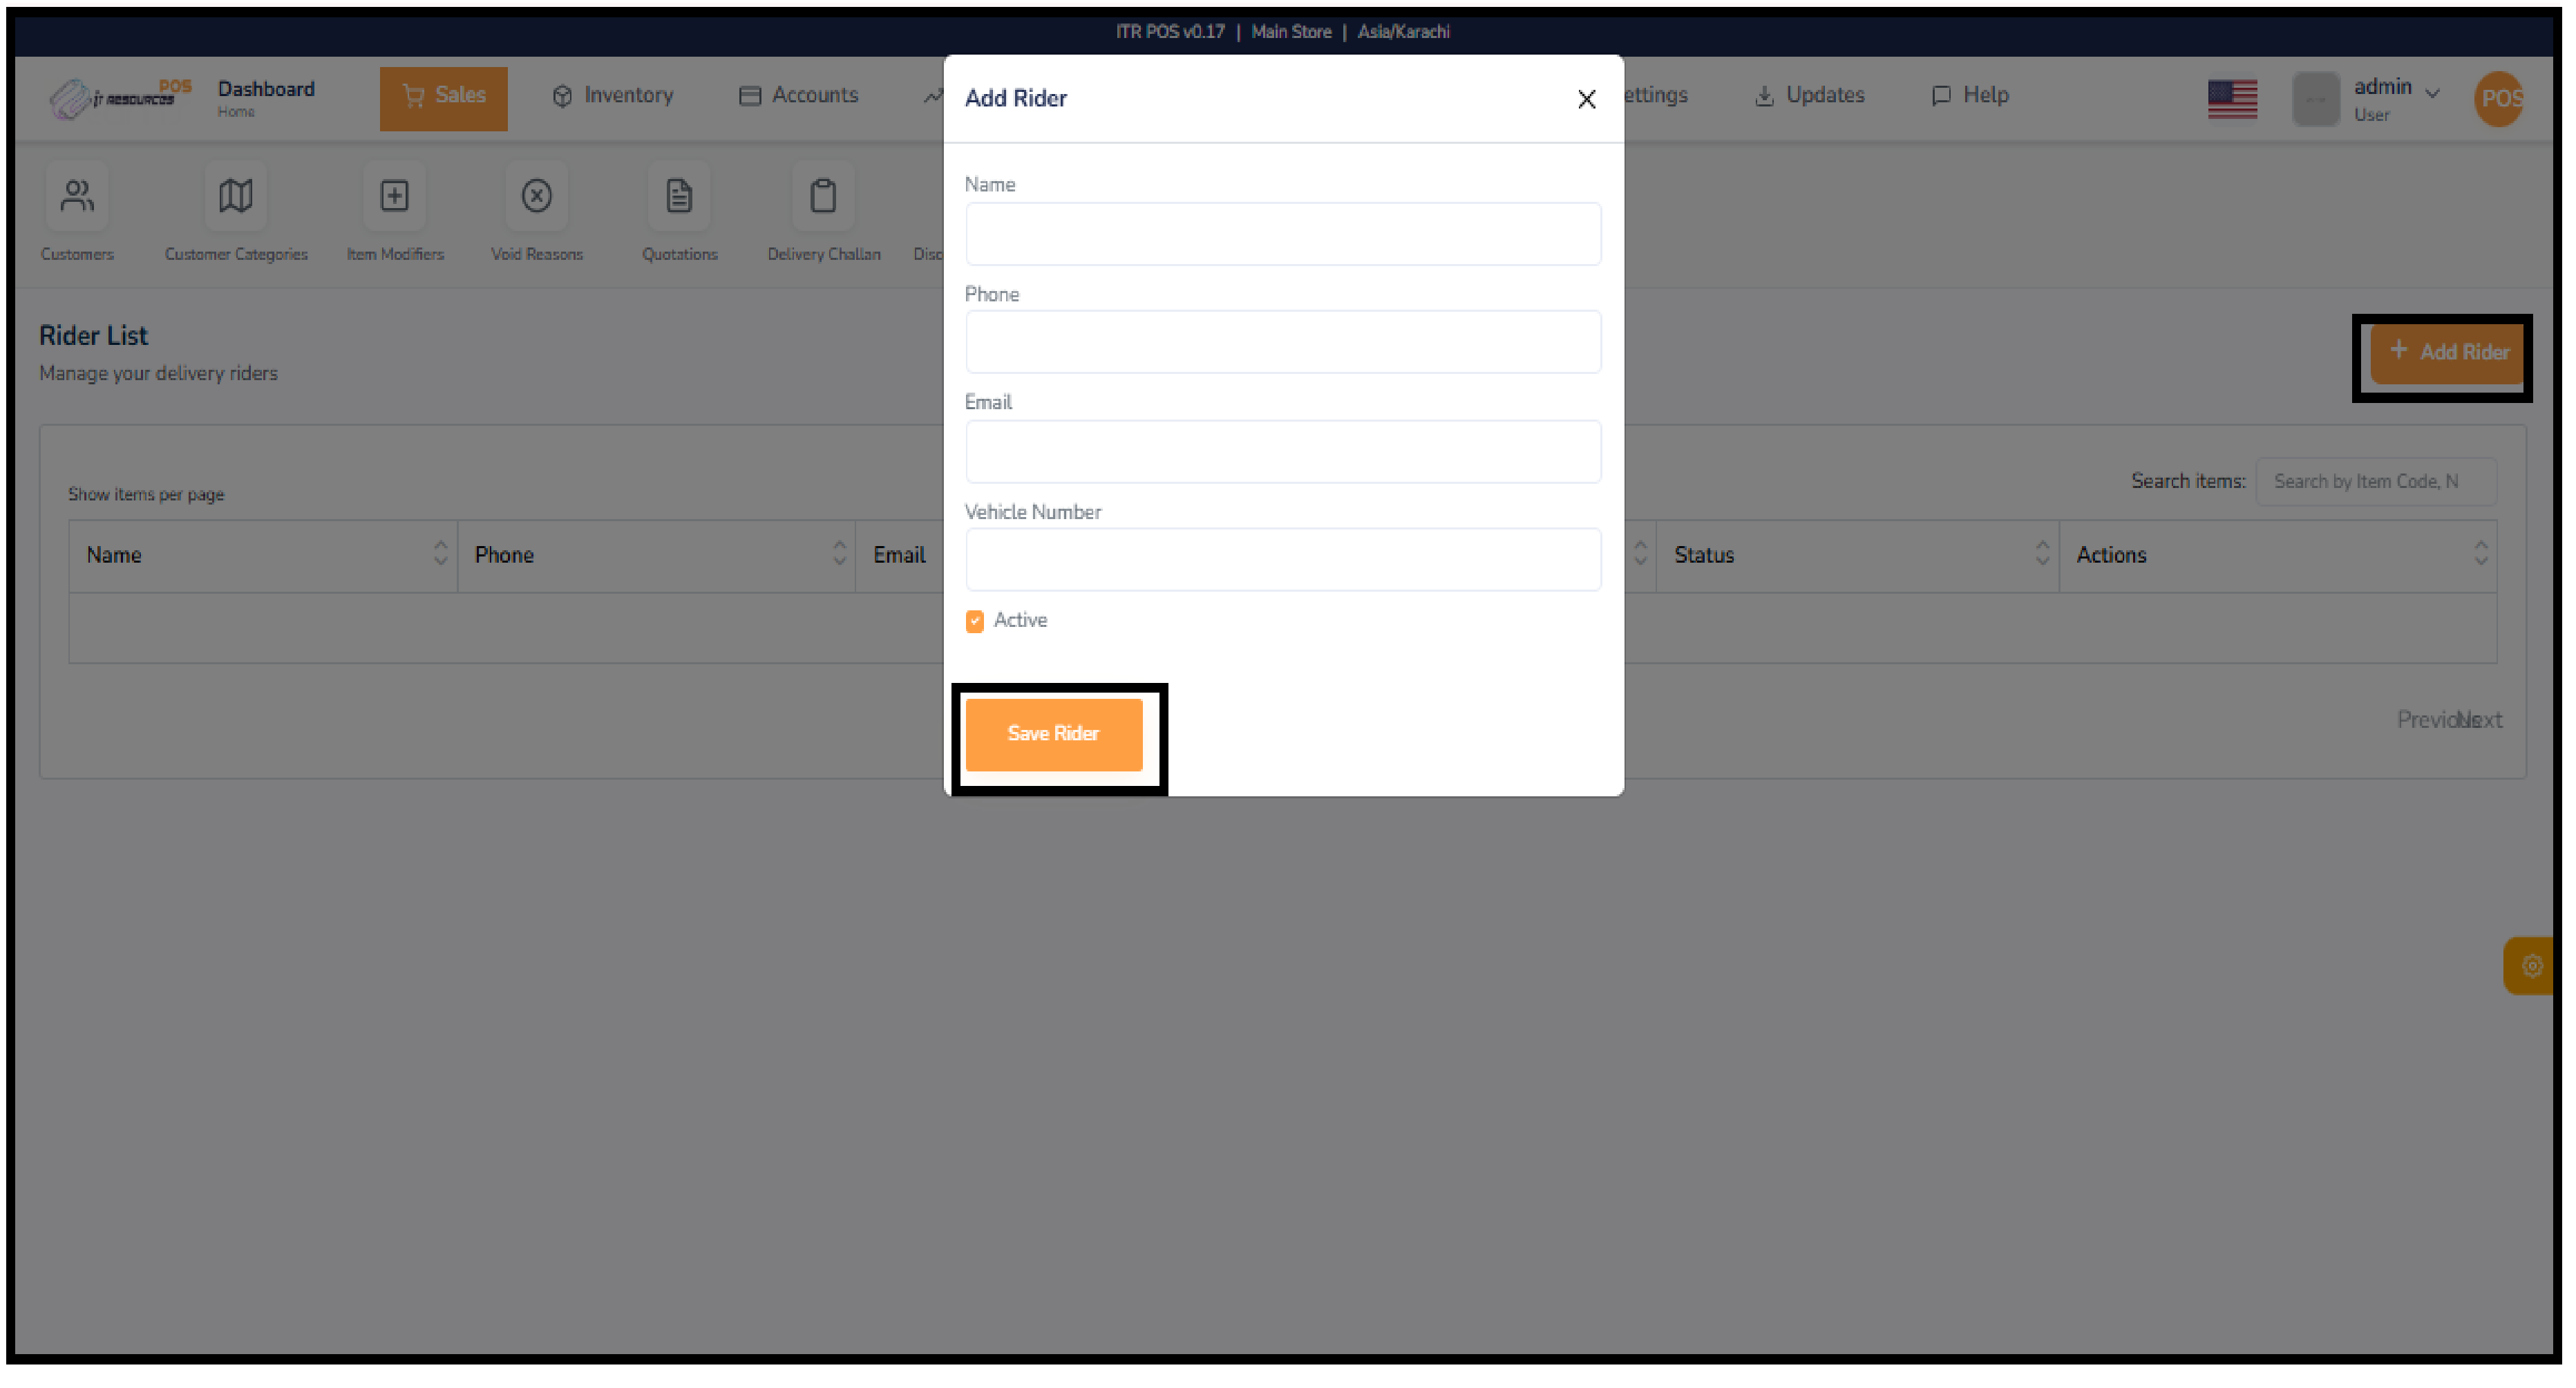
To add a new rider, click the "Add Rider" button on the top right. A form will open where you must enter the rider's name, phone number, email, and vehicle number. You can also choose whether the rider should be active or inactive. Once all details are filled, click "Save Rider" to add them to the rider list.
The Delivery Orders section helps you manage and track all orders that require home delivery. It displays important details such as the order number, customer name, contact information, assigned rider, delivery address, order amount, status, and delivery time. This feature allows you to monitor the entire delivery workflow, ensuring that every order is properly assigned and delivered on time.
The Manage Riders button on the top right provides a quick shortcut to the Rider List page. When you click this button, the system will redirect you back to the Rider List, where you can add, edit, or update rider information. This helps you manage delivery staff without leaving the delivery orders section.
To add a delivery order, first create a regular sales order or invoice inside the POS section. During checkout, select the Delivery option and choose a rider from the rider list. After saving the order, it will automatically appear in the Delivery Orders section with all relevant details such as customer, rider, address, and status. From here, you can track the order until it is delivered.

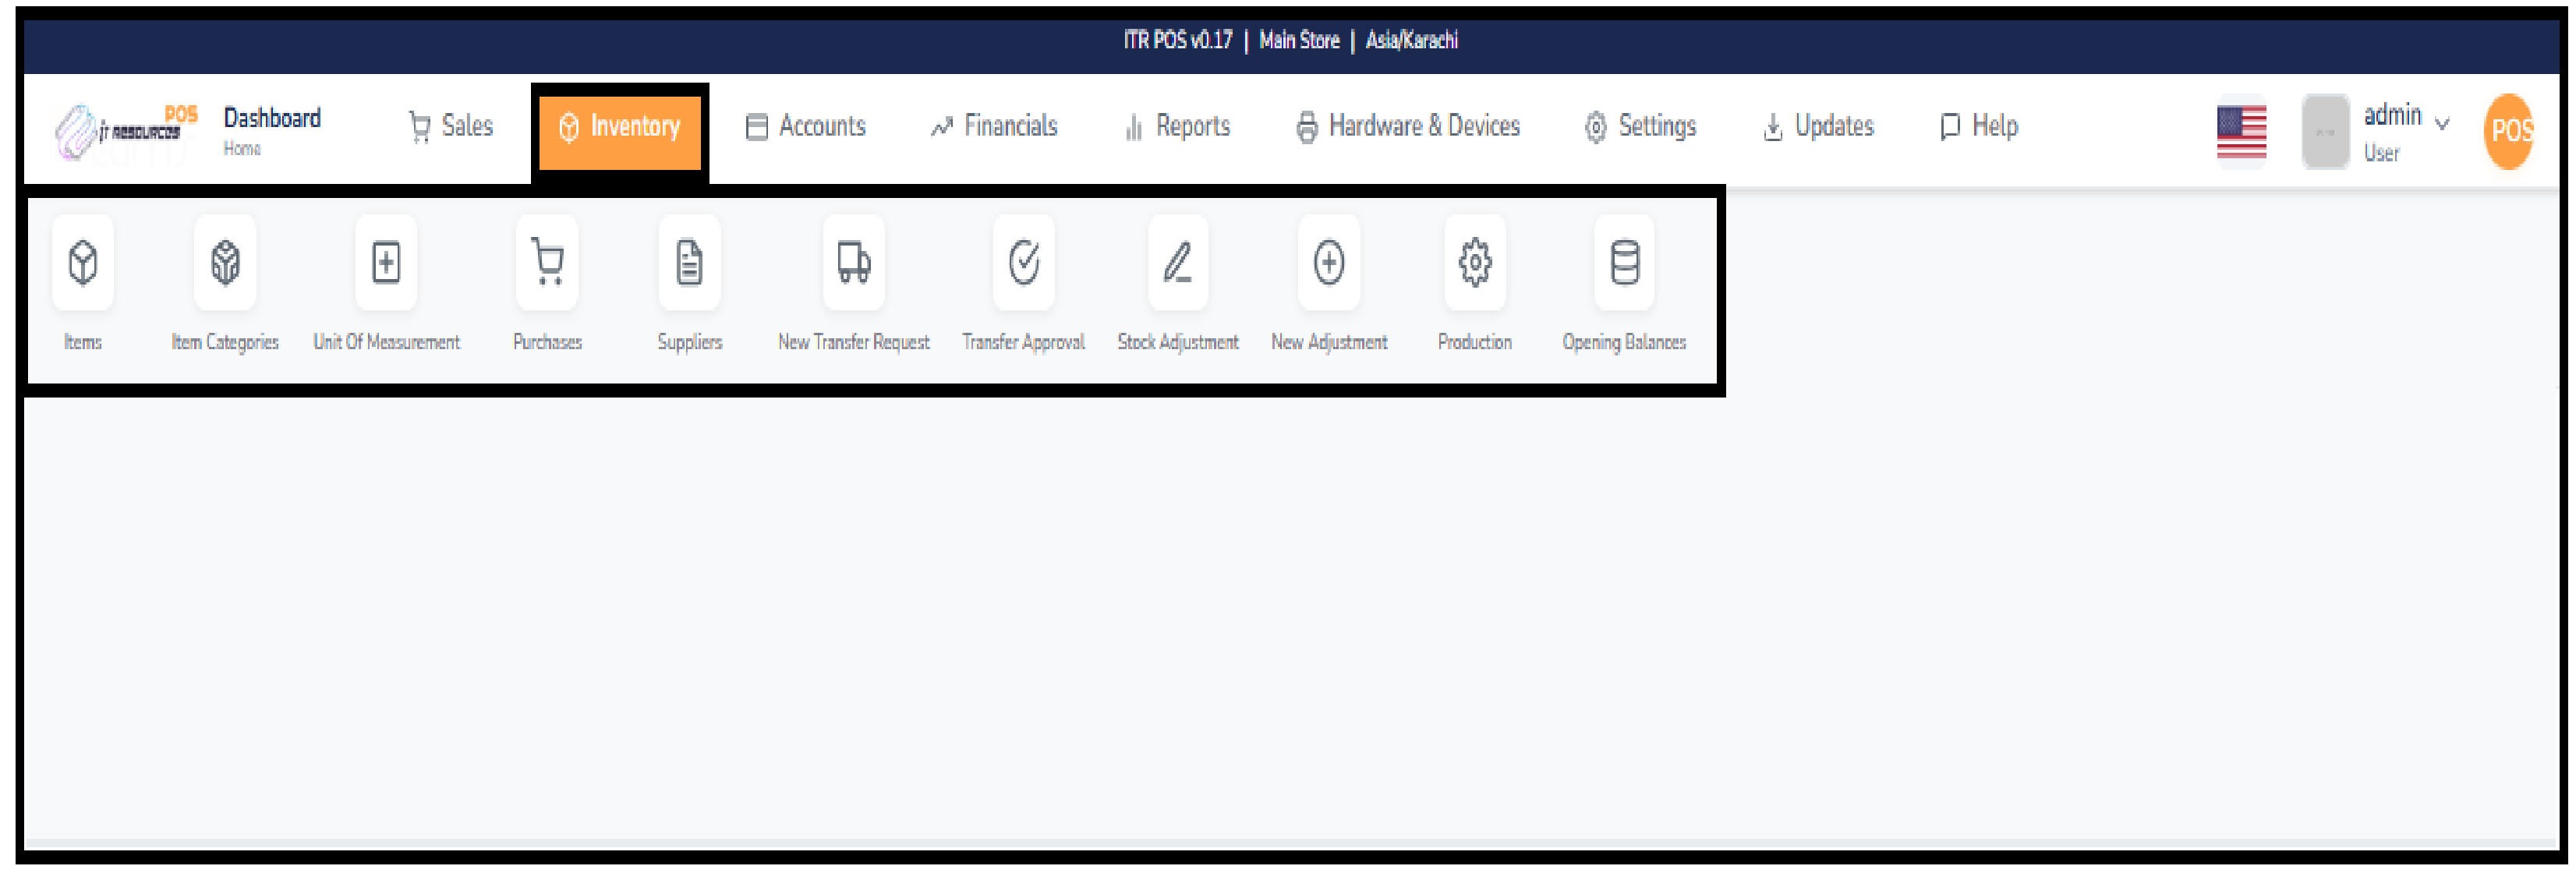
The Inventory section in the POS system is designed to help you efficiently manage all stock-related activities in one place. It provides a complete workflow for creating and organizing items, setting up item categories, defining units of measurement, recording purchases, and managing suppliers. You can also handle stock adjustments, transfer requests, approvals, production entries, and opening balances. This section ensures that your store maintains accurate stock levels, smooth item movement, and proper tracking from purchase to sale. In this module, we will explore each feature step by step so you can fully understand how inventory is controlled and updated throughout the system.
You can add items in two ways: Excel Import and Manual Entry. In both methods, keep your categories and sub-categories properly organized first so items are created in the correct structure.
Go to Inventory -> Items, click the Excel Operations button, and select Import Items. A modal will open. Click Download Template from the top-right side of the modal, fill item details in that template, then copy all rows from Excel and paste them into the modal. Cross-check everything in preview, and if all details are correct, click Import Products.
Go to Inventory -> Items. First create category and sub-category by clicking the Categories button. Then click Add Item, fill all required details, and save the item.
There are three item roles: Stock Item, Non-Stock Item, and Material Item.
Stock Item: Used for direct sale and purchase items.
Non-Stock Item: Used for prepared items/recipes like burger, pizza, etc.
Material Item: Used as ingredients in final items through BOM method (for example bread, sauce, spices). Materials can be linked in stock or non-stock products.
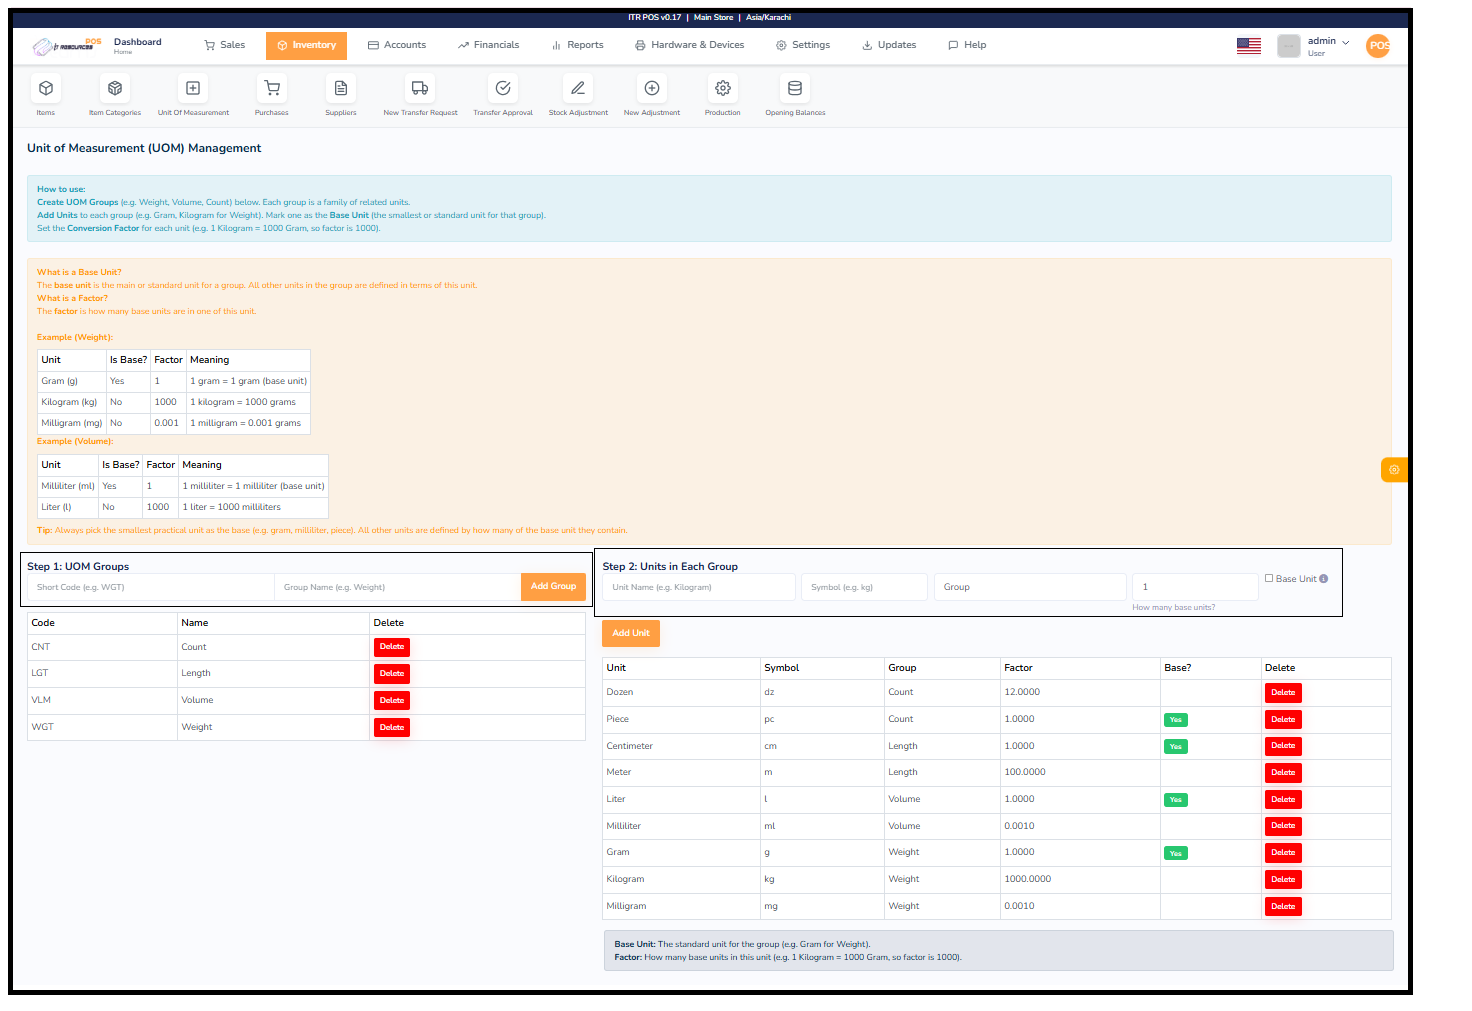
The Unit of Measurement (UOM) section helps you define how products will be measured inside the system. Different items require different measurement methods—some are measured by weight, some by volume, some by length, and some simply by count. To manage this properly, the system groups similar units together and allows you to create accurate conversions between them.
Enter a short code (e.g., WGT for Weight) and a group name (e.g., Weight), then click Add Group.
For every unit, enter:
Click Add Unit to save it.
Whether you buy an item in KG and sell it in grams, or receive items in cartons and sell in pieces — the system handles all conversions automatically.
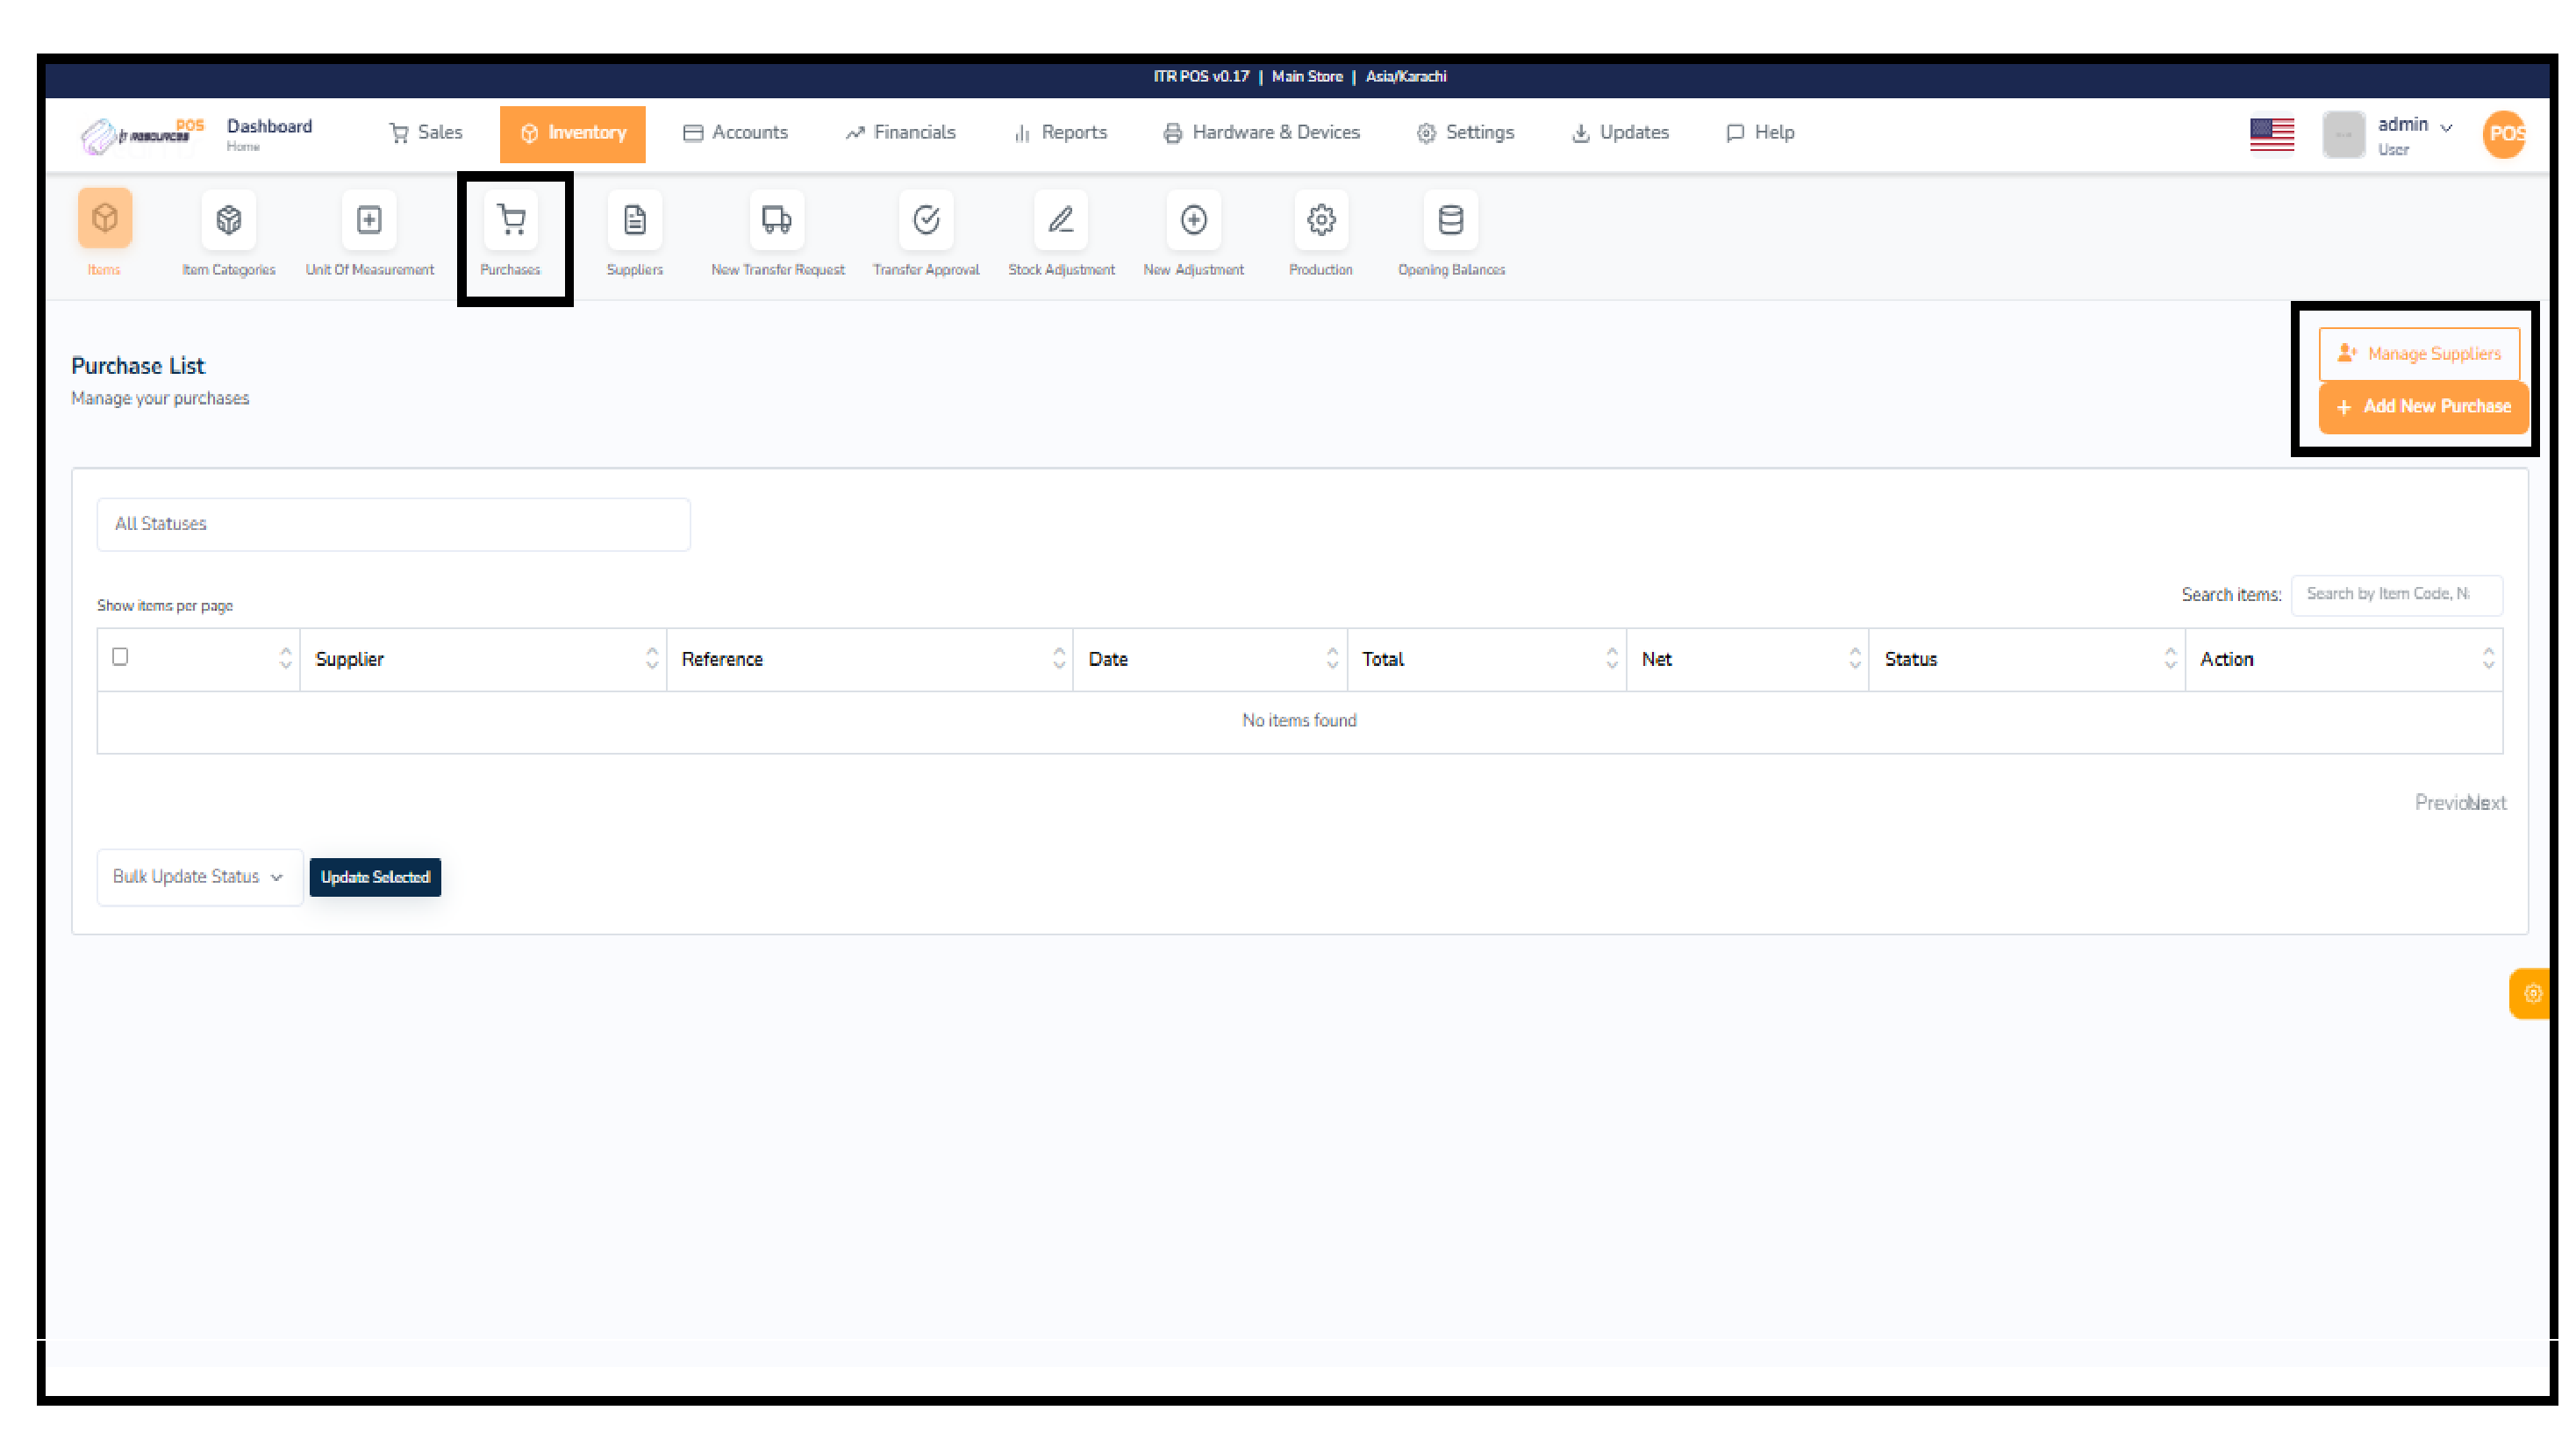
The Purchases section lets you manage all items bought from suppliers. You can view purchase history, filter by supplier or status, and quickly search any record. From the top-right, you can open Manage Suppliers or add a new purchase using Add New Purchase.
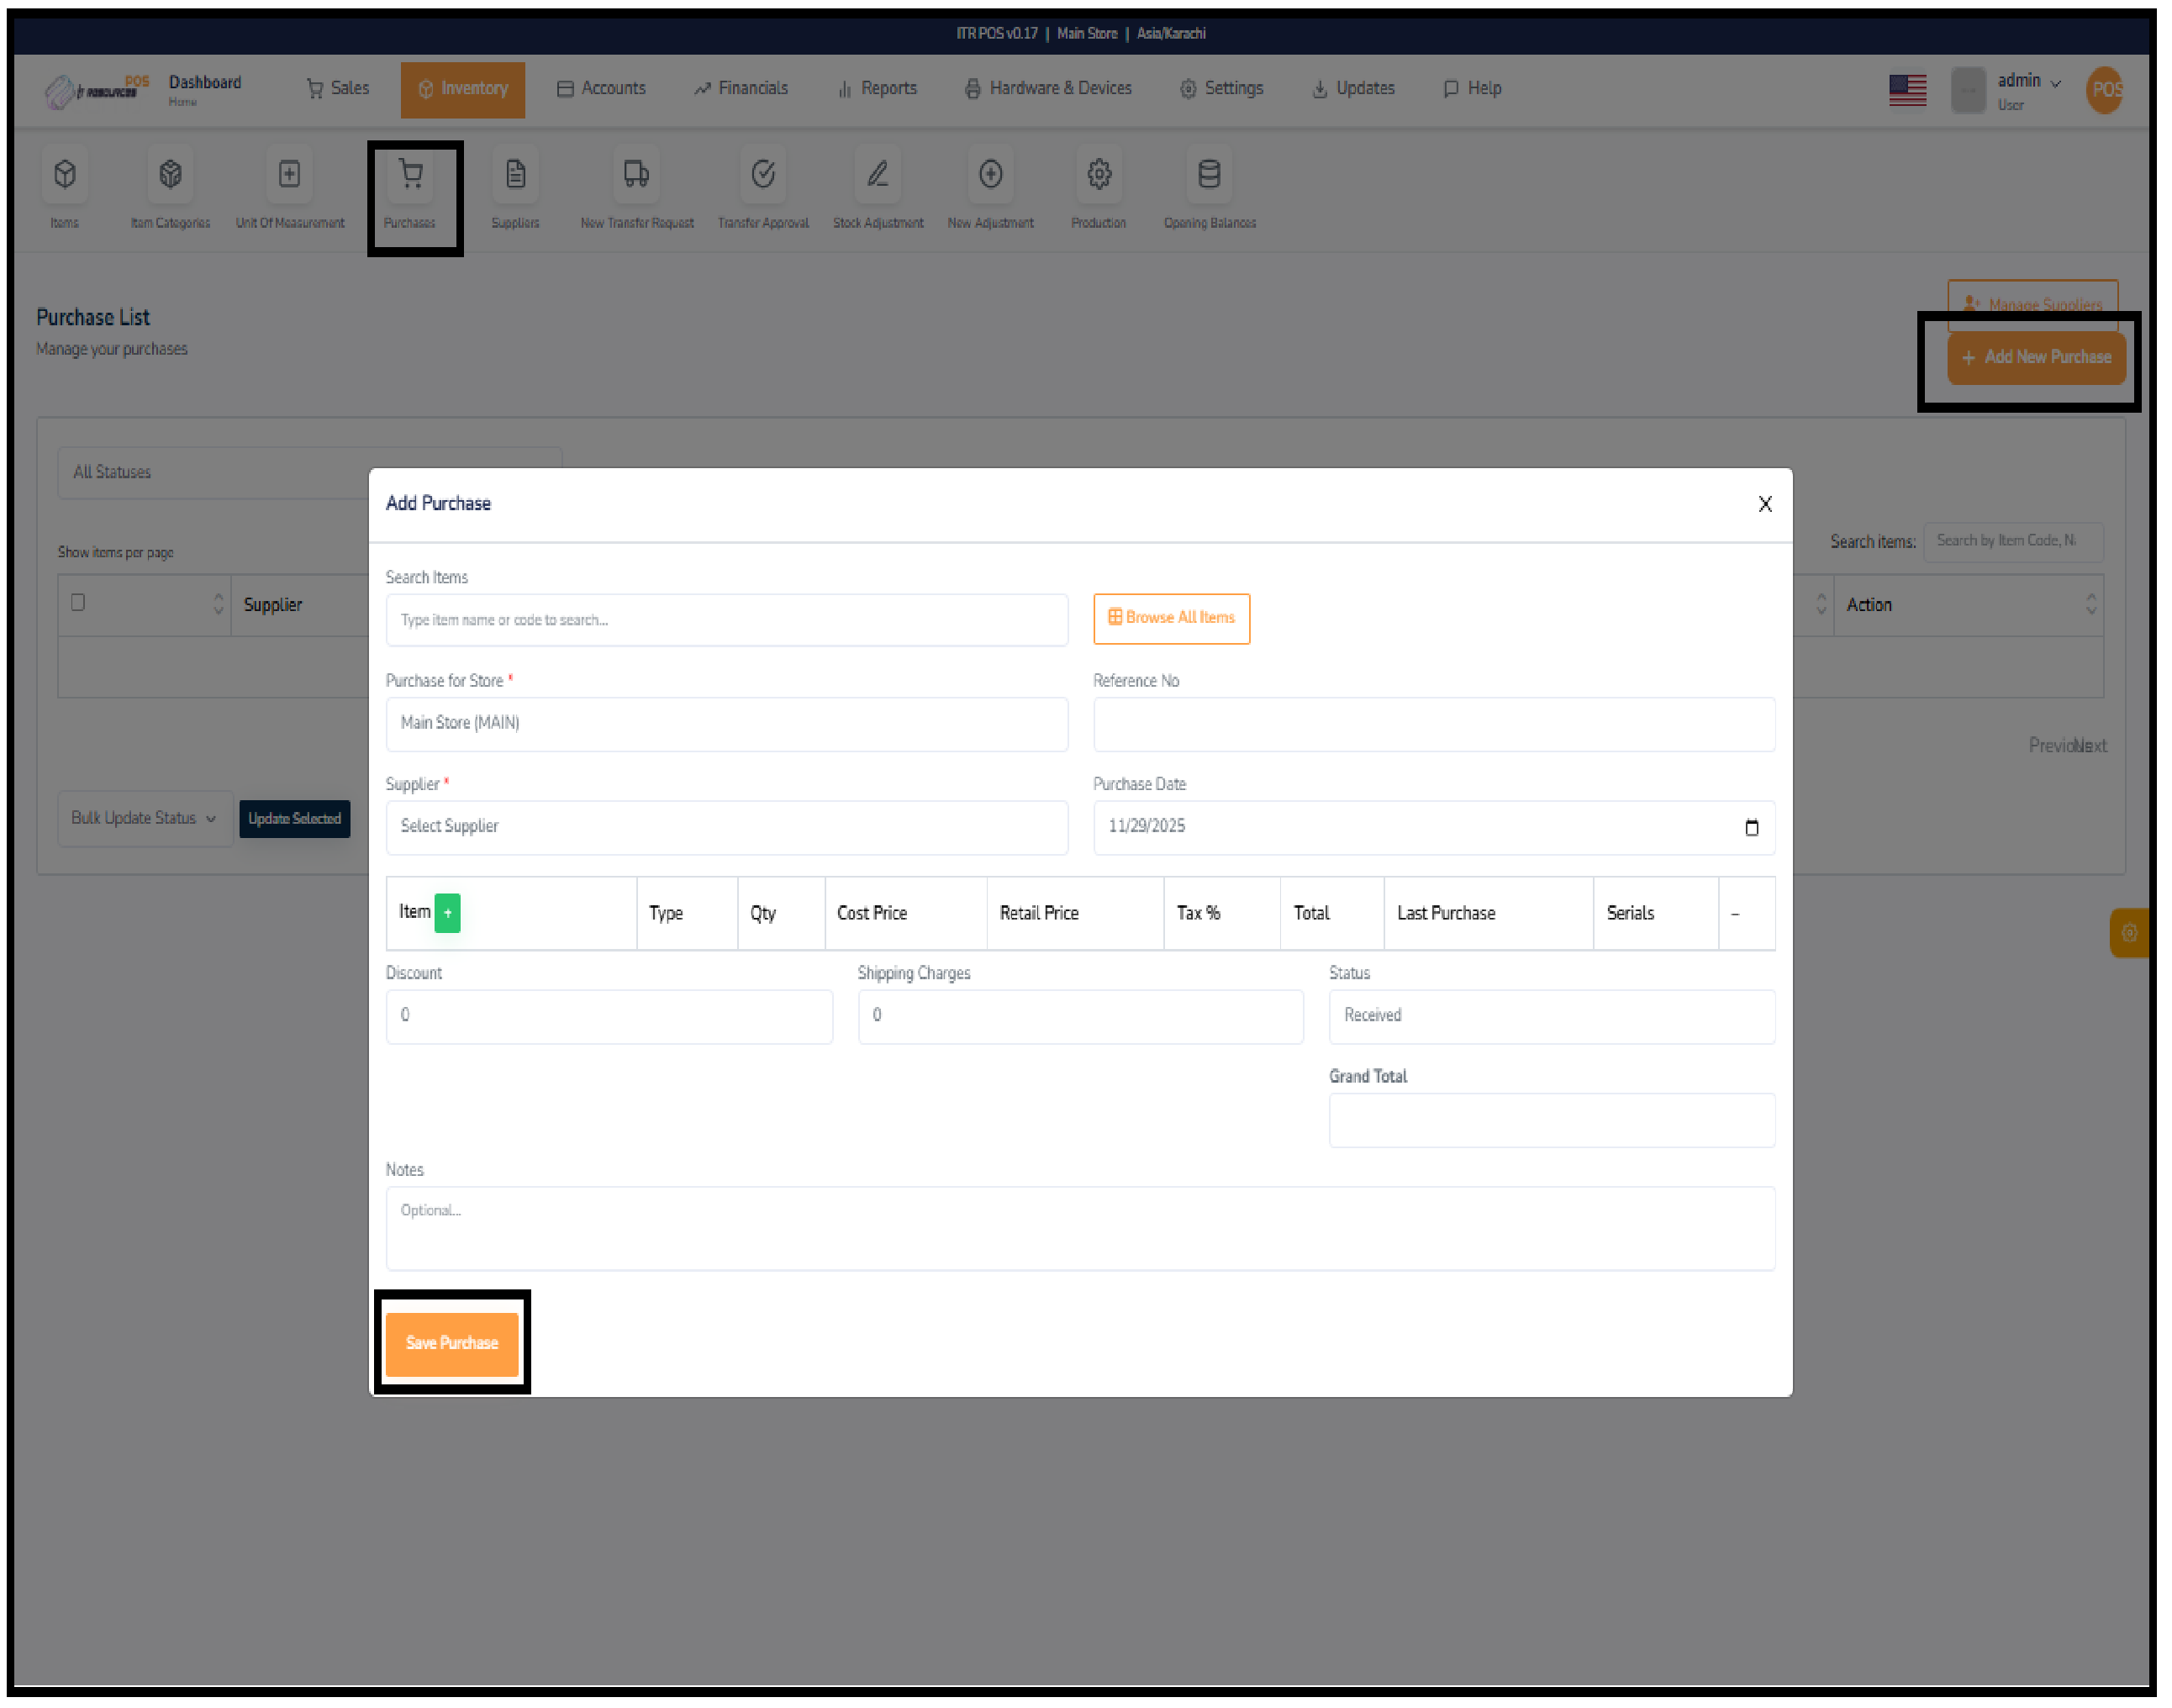
Click Add New Purchase to open the form. Select the store, choose a supplier, enter a reference number, and pick the purchase date. Add items using search or browse, then enter quantity, cost price, retail price, and tax. The system calculates totals automatically. Add discount or shipping if needed, then click Save Purchase.
Update Selected lets you change the status of multiple purchases at once. Select the checkboxes next to the records you want to update, choose a new status, and apply it in one click.
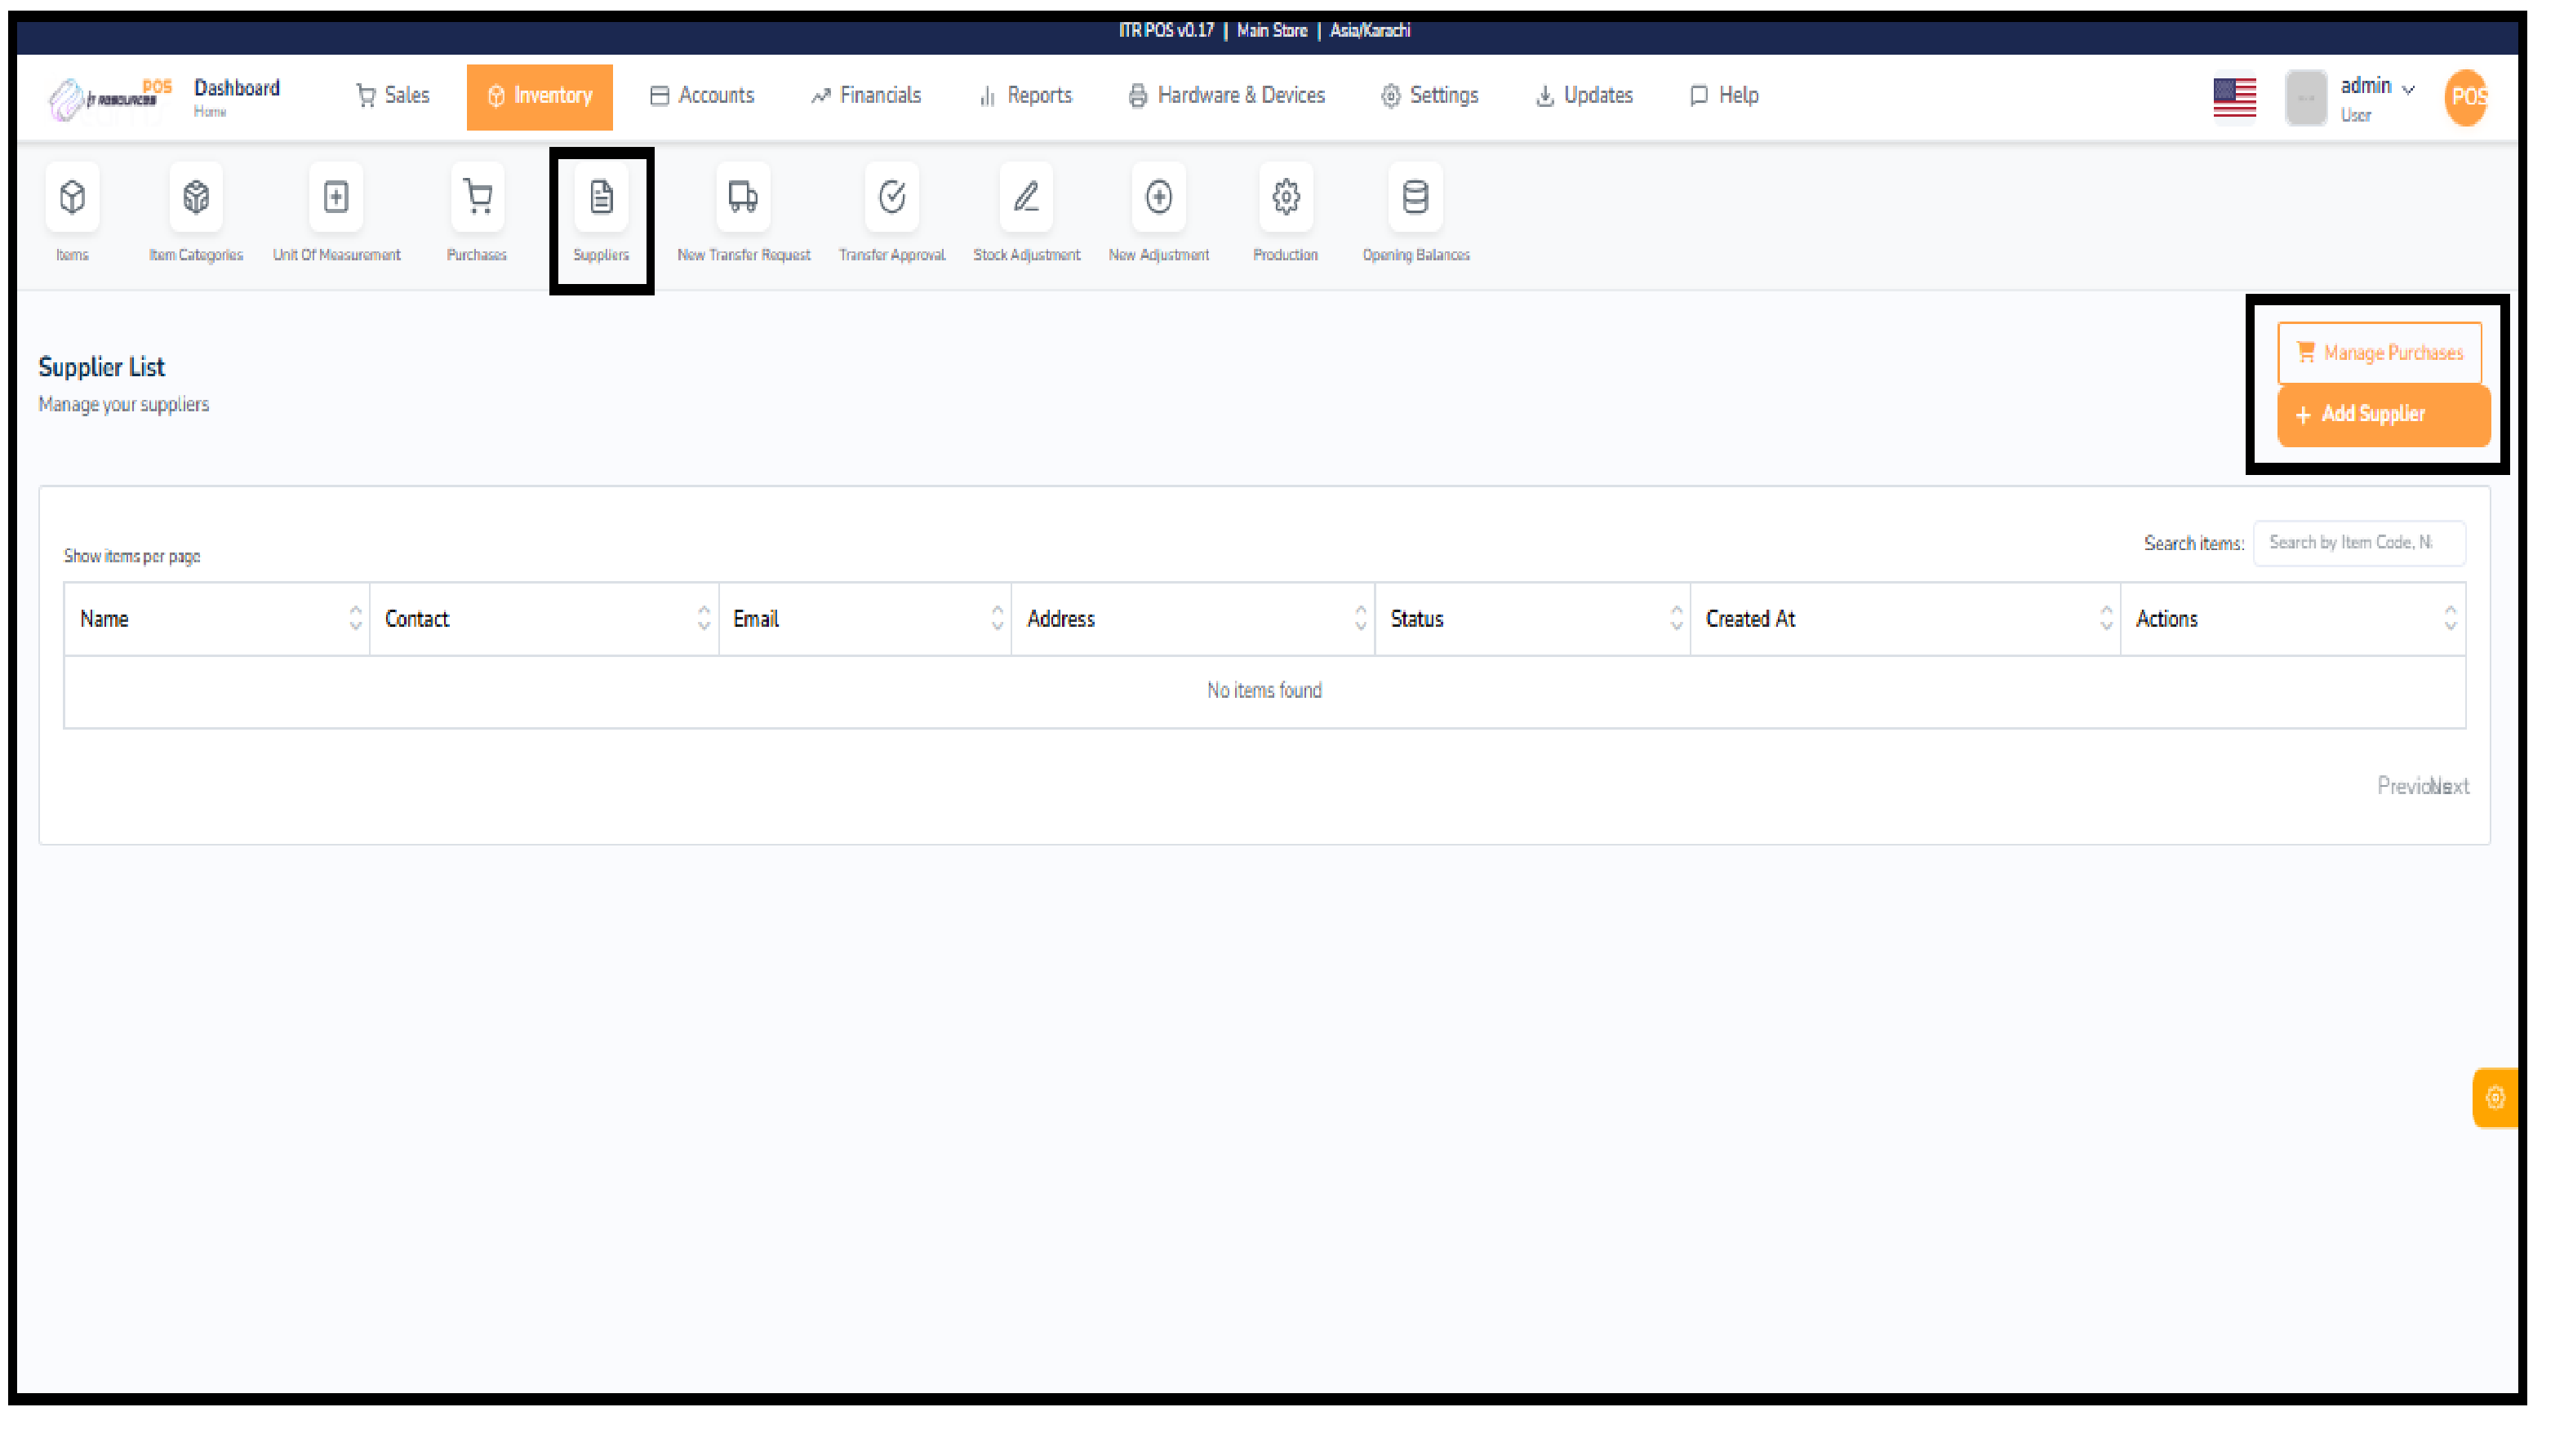
The Suppliers section helps you manage all vendors from whom you purchase inventory. It provides a simple list showing each supplier's name, contact information, email, address, status, and creation date, making it easy to keep supplier records organized. From this page, you can quickly add new suppliers, edit existing ones, or search through the list.
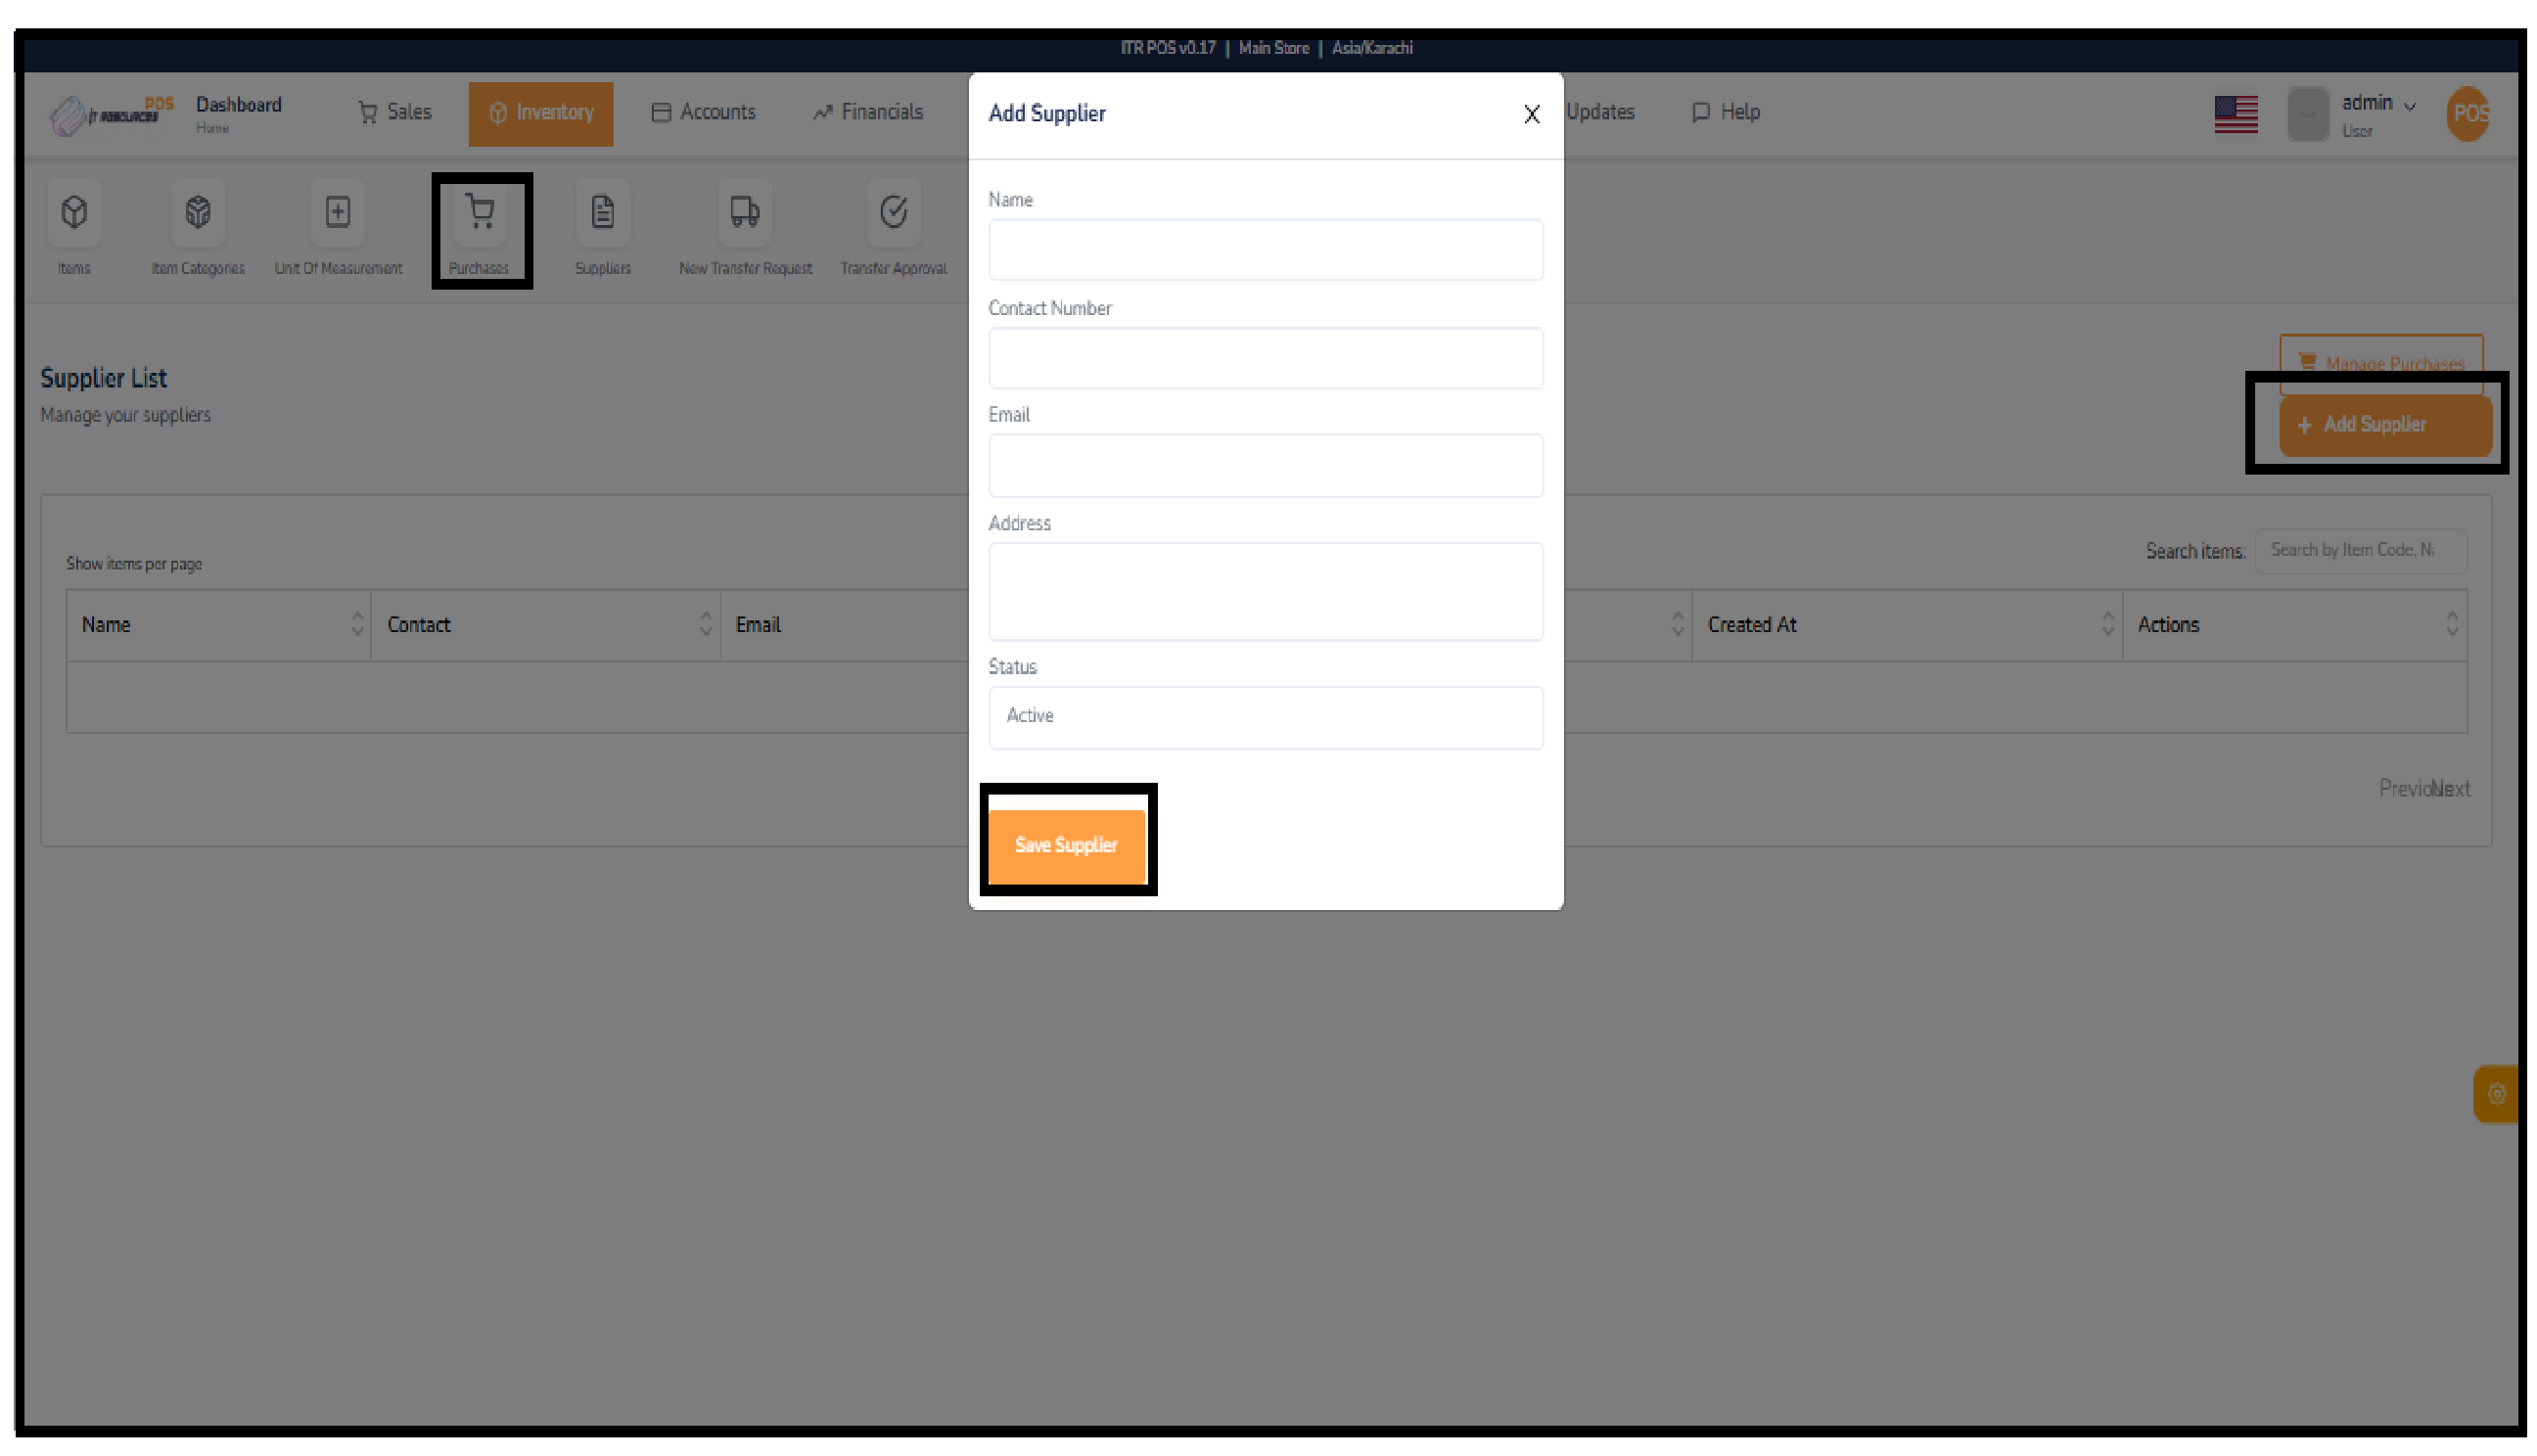
To add a supplier, you simply click the "Add Supplier" button and enter basic details such as name, phone number, email, and address, then save it. Once added, the supplier becomes available to use while creating purchases, ensuring smooth and accurate purchase entry in the system.
The New Transfer Request section is used to move stock from one store to another. At the top, select the source store and the destination store, and add any important notes for the transfer. The page shows the number of items selected for transfer. In the Add Items to Transfer area you can search items, filter by category, or filter by stock type. Each item displays its name, code, category, and available stock — click Add to Transfer to include it. After choosing all items, review the details and click Submit Transfer Request to complete the transfer. This feature ensures smooth stock movement between branches and keeps inventory levels accurate.

The Transfer Approval feature allows you to review, verify, and manage all stock transfer requests between stores. This screen displays every transfer along with important details such as the transfer number, source store, destination store, items included, status, and date. You can use the filters at the top to narrow results by store or status, making it easier to locate pending or completed transfers. From the actions column, you can open any transfer, check its details, and approve or reject it. This ensures full control over stock movements and prevents unauthorized transfers.
If you want to create a new transfer from this page, simply click on the "New Transfer Request" button shown on the top right. This will redirect you to the same New Transfer Request form where you can select stores, add items, and submit a fresh transfer request. This shortcut helps you quickly create new transfers without going back to the main inventory menu.

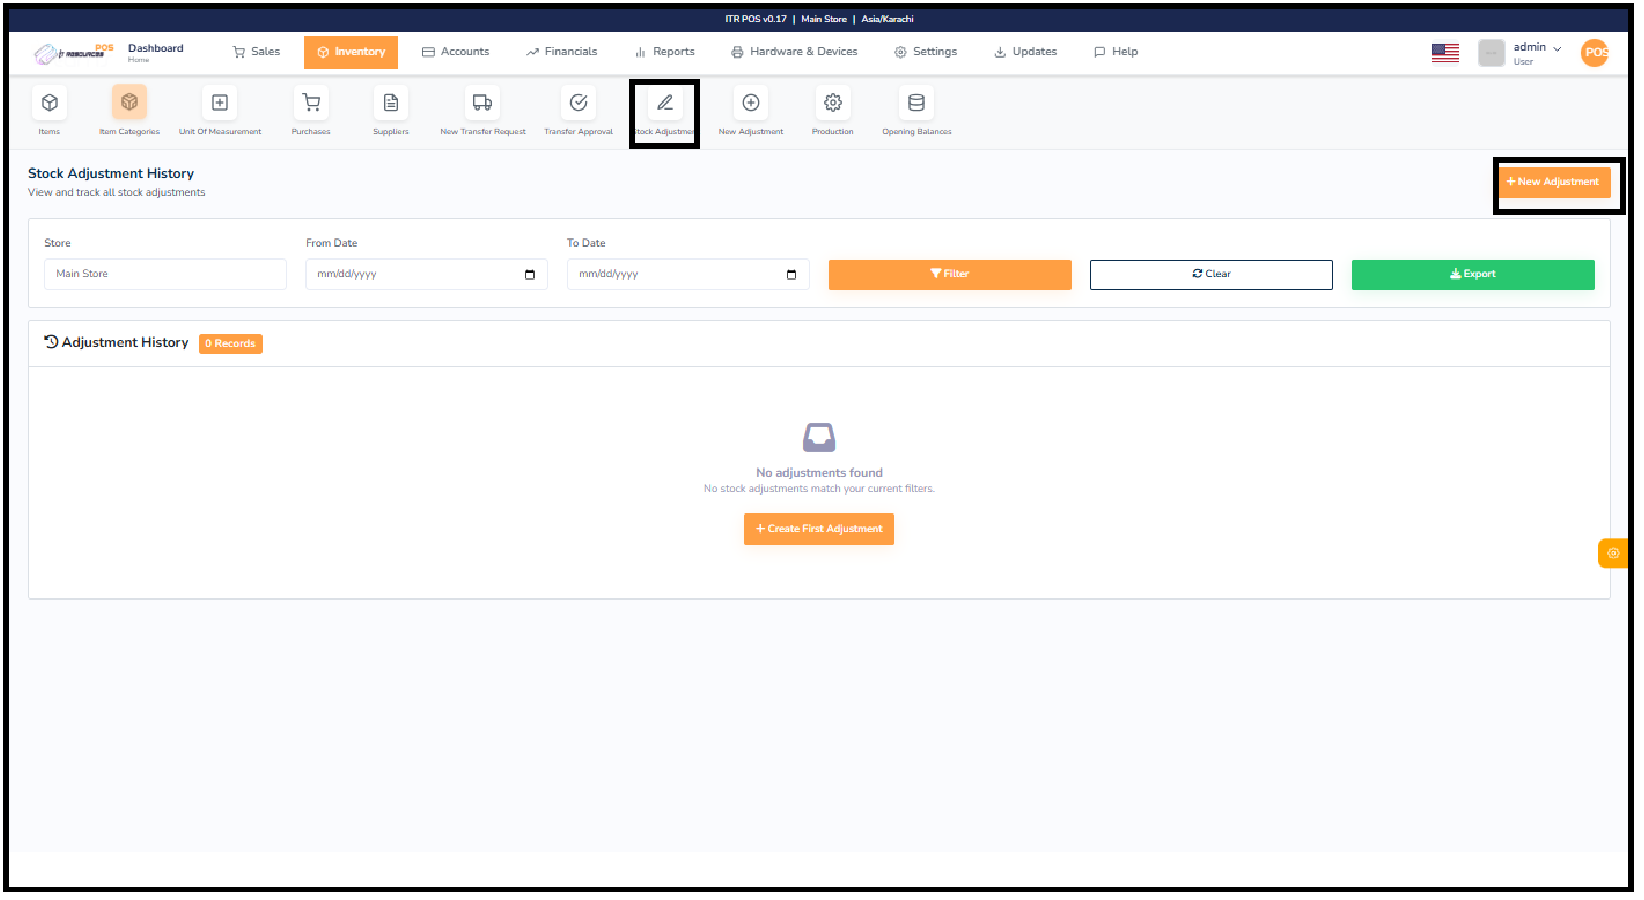
The Stock Adjustment History section helps you track and review all adjustments made to your inventory. It allows you to filter adjustments by store and date range, making it easier to locate specific entries. This section displays important information such as adjustment type, items affected, quantities increased or decreased, and the date the adjustment was created. It ensures accurate inventory records by showing every correction made to stock levels.
The New Adjustment button on the top right lets you create a fresh stock adjustment. When you click it, the system redirects you to the New Adjustment form where you can add or reduce stock, select the store, provide notes, and save the adjustment. This shortcut allows you to update your inventory instantly without navigating away from the history page.
To create a stock adjustment, click the New Adjustment button and fill out the required details. Select the store, choose the adjustment type (increase or decrease), add the items, enter quantity, and include any notes if needed. After saving, the adjustment will appear in the Stock Adjustment History section where you can review it anytime.
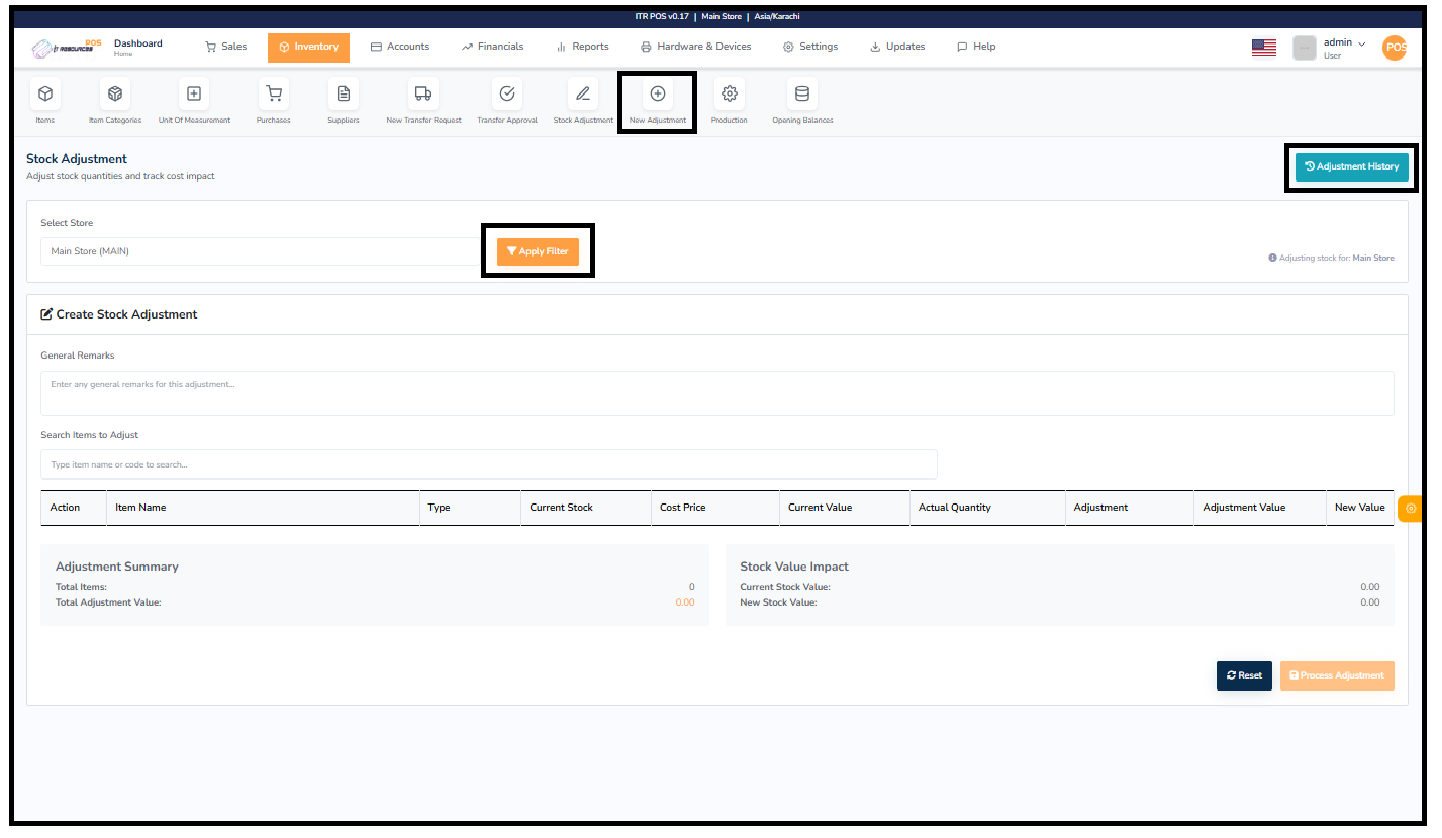
The New Adjustment screen allows you to manually correct stock quantities in your inventory. You can select the store and apply filters to ensure you are adjusting the correct location. The screen provides fields to enter general remarks, search for specific items, and view their current stock, cost price, and current value. After selecting items, you can enter the actual quantity, and the system will automatically calculate the adjustment value and the new stock value. At the bottom, summary sections show the total items adjusted and the total adjustment value. Once everything is verified, you can process the adjustment to update the inventory.
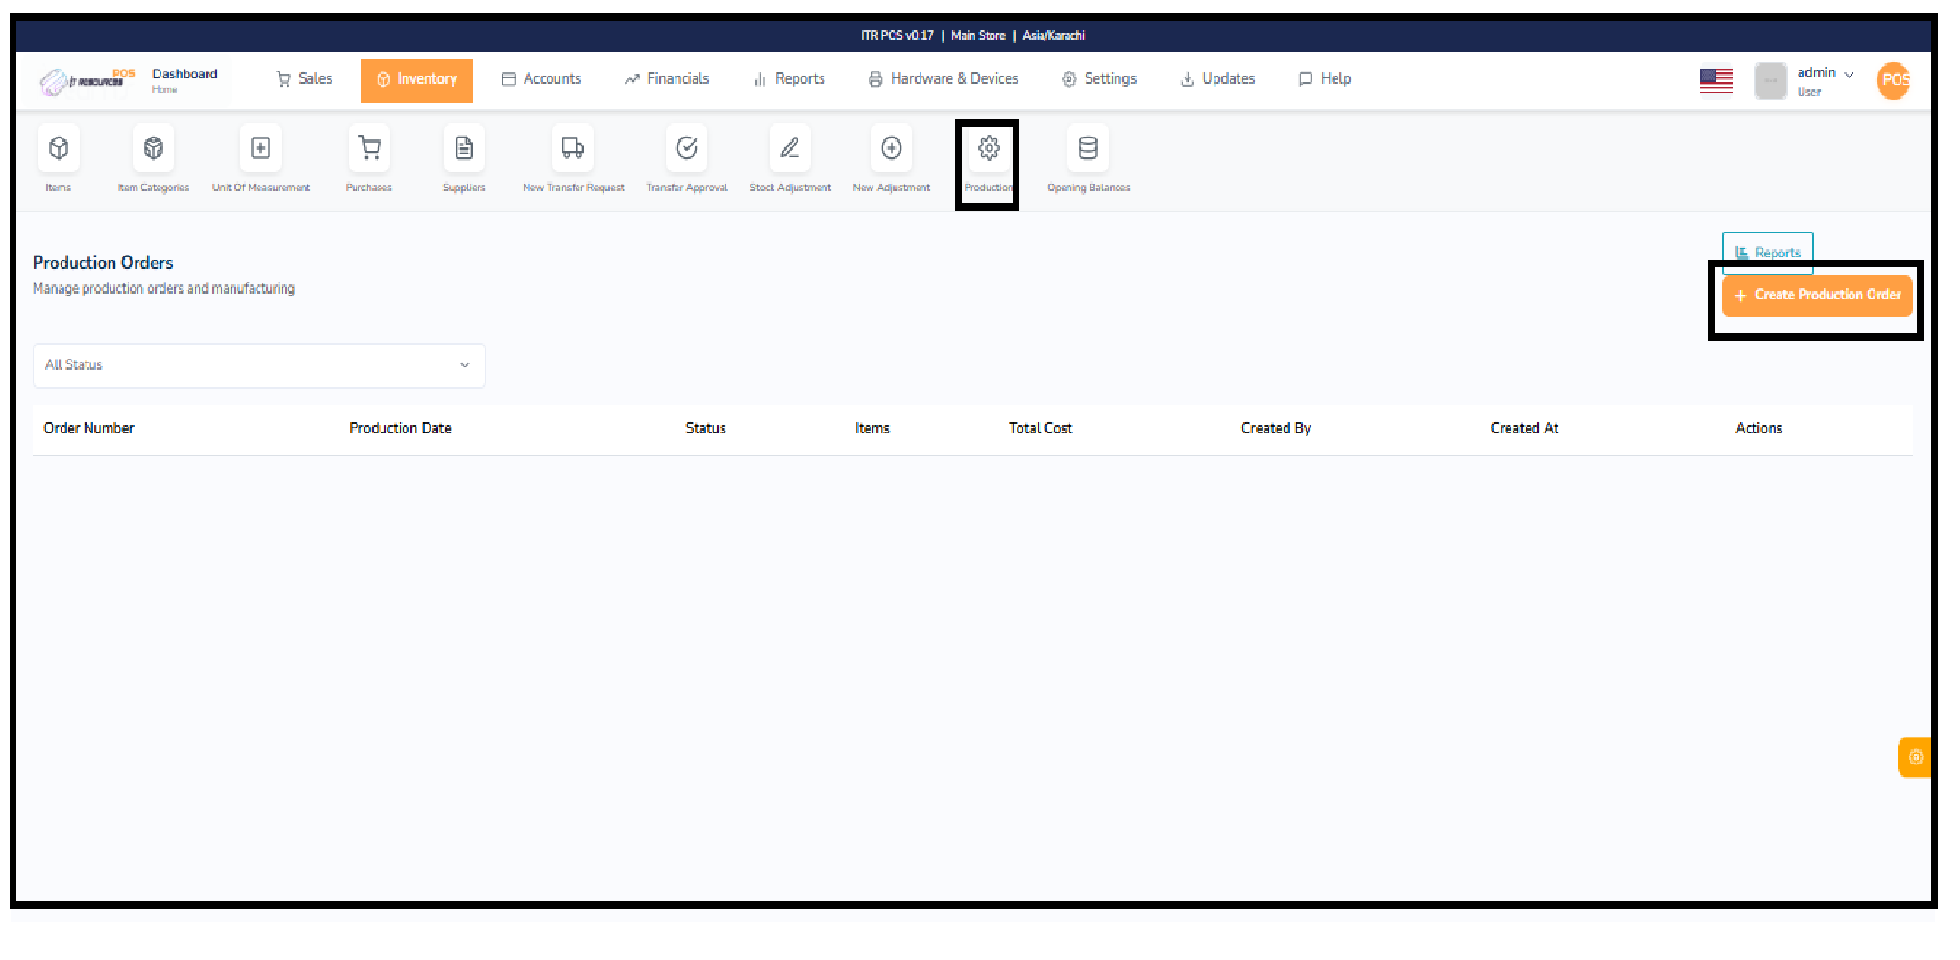
The Production screen is used for managing manufacturing or assembling items. On this page, you can filter production orders by status and view details such as order number, production date, total cost, and items included in the production batch. The Create Production Order button allows you to start a new manufacturing process by selecting items that need to be produced and entering the required quantities. This section helps you track ongoing and completed production batches for better inventory control.
The Opening Balance screen is used to enter the initial stock quantities when starting the system or adding new items. After selecting the store, you can add remarks and search for items to assign their opening quantity, cost price, and total value. This ensures the system correctly reflects the starting stock of each item. The summary section shows total items and total opening value. Once completed, you can save the opening balance so the inventory begins with accurate starting quantities.

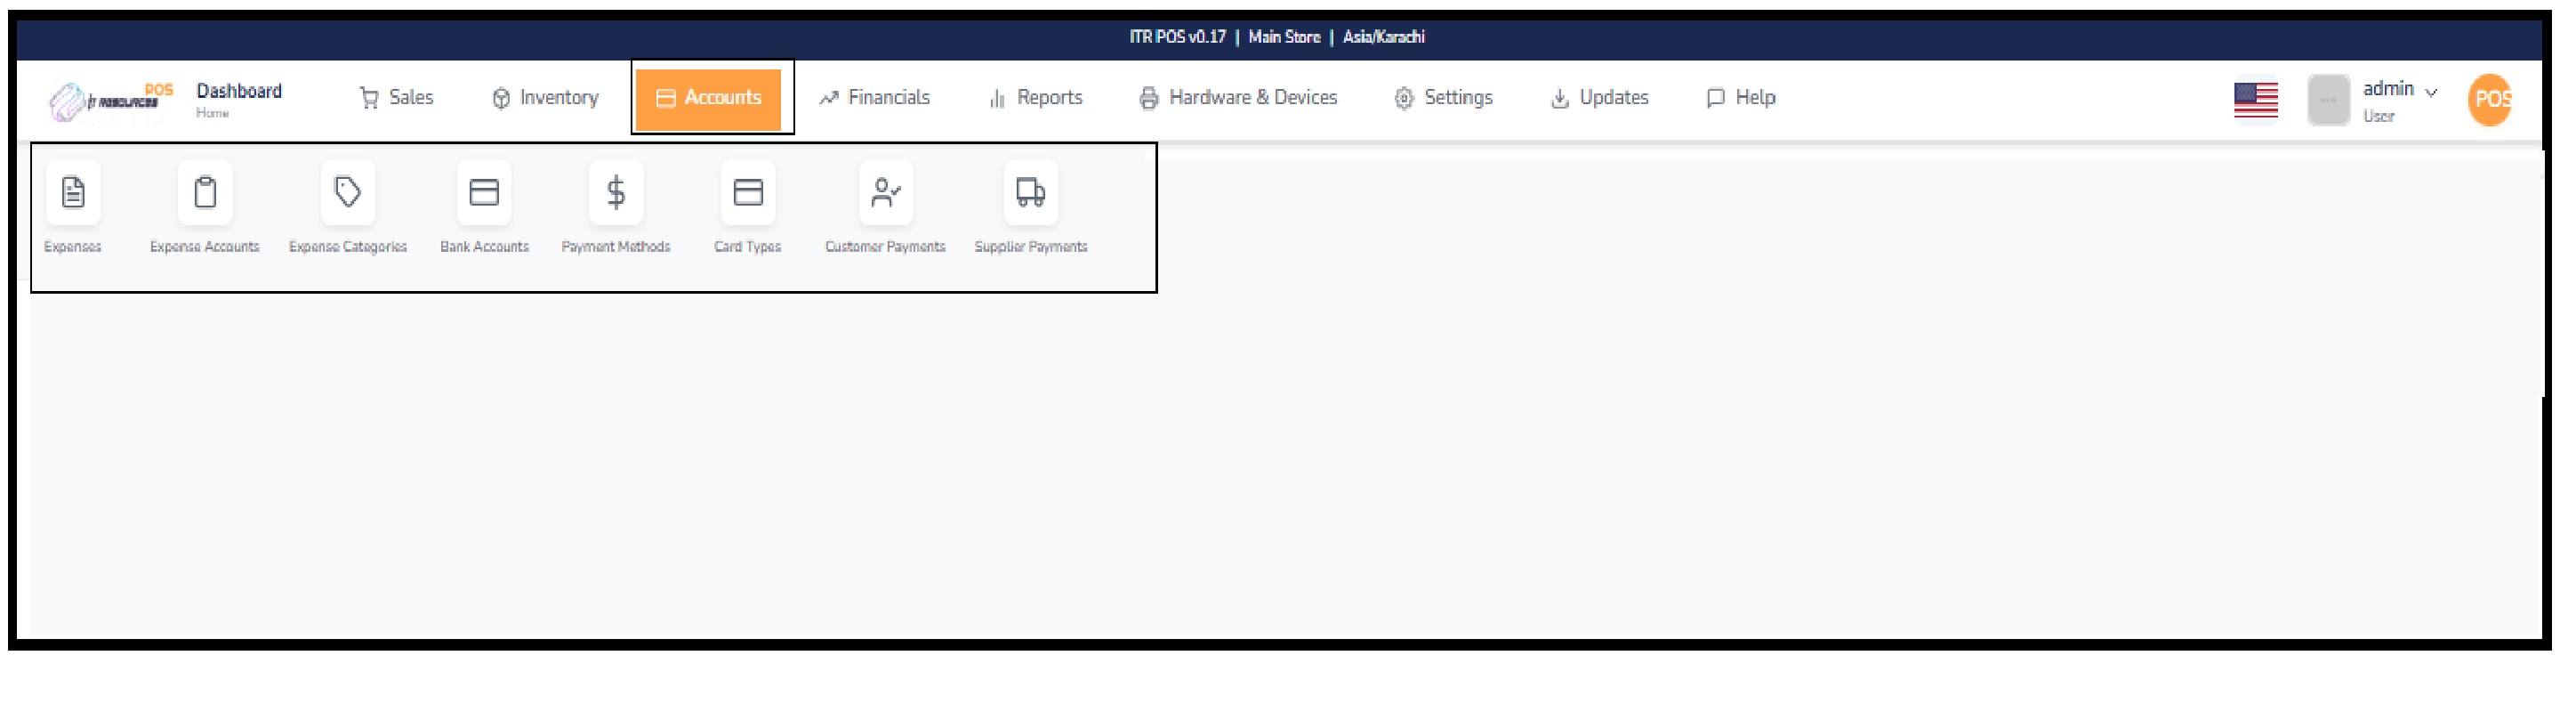
The Accounts section is designed to help you manage all financial activities of your business in one place. It provides essential tools such as Expenses, Expense Accounts, Expense Categories, Bank Accounts, Payment Methods, and Card Types. You can also record Customer Payments and Supplier Payments directly from this module. These features help you track where your money is coming from, where it is being spent, and how much you owe or need to collect. By organizing all financial records neatly, the Accounts section ensures better budgeting, easier reporting, and smooth financial control for your business.
The Expenses workflow is managed in three connected steps. First, create an Expense Category (for example, Utilities) and then create its Subcategory (for example, Bills). Second, create an Expense Account and assign it to the correct category and subcategory. Third, add the actual Expense entry by selecting the expense account, payment method, and amount.
Open Expense Categories and create a main category such as Utilities. Then add a subcategory such as Bills under that category. This gives your expenses a clear structure.
Open Expense Accounts and click Add Expense Account. Enter the account name, select the category and subcategory you created in Step 1, and save the account.
Click Add New Expense and select the expense account from Step 2. Then choose payment method, enter amount and remarks, and save the expense. You can review records later with date, category, and status filters.
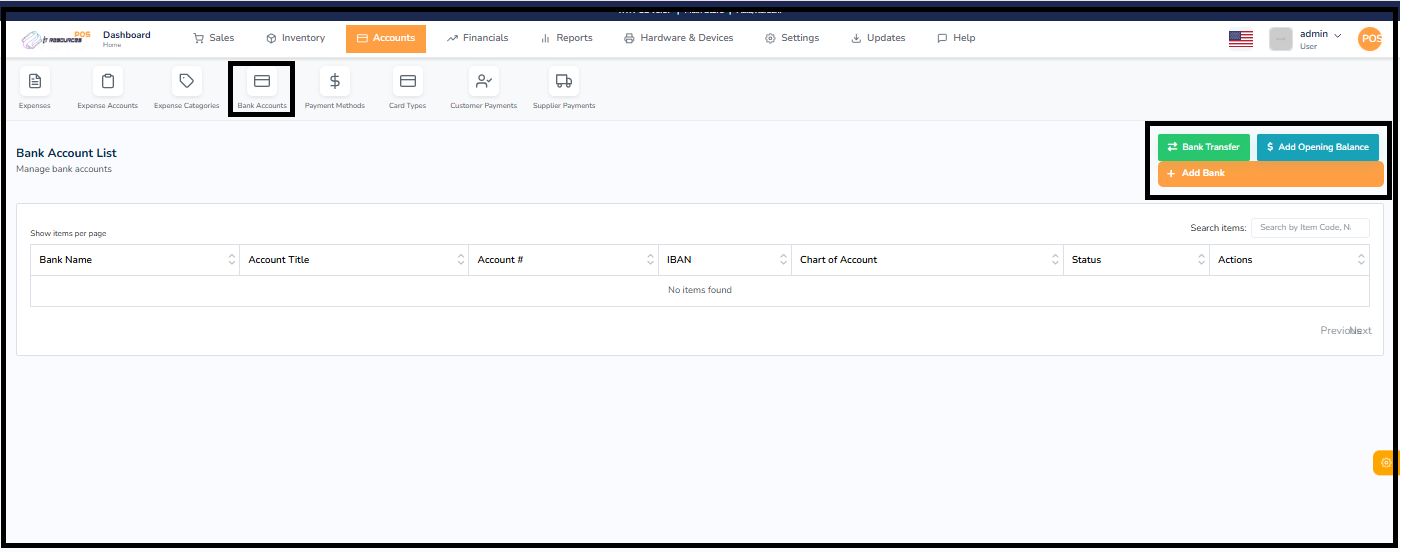
The Bank Accounts section lets you manage all your business bank accounts in one place. You can add new bank accounts, record opening balances, and transfer funds between accounts. This helps maintain accurate financial records inside the system.
Click the Add Bank button, then fill in details such as bank name, account title, account number, IBAN, branch info, and address. You can also map this bank account to your Chart of Accounts for accounting purposes. After entering the required fields, click Save Bank.
The Add Opening Balance option allows you to enter the starting balance of a bank account at the time of beginning system usage. Select the bank account, enter the balance amount and date, add remarks if needed, and click Save Opening Balance.
The Bank Transfer feature is used to move funds between your bank accounts. Select the source and destination account, enter the transfer amount, date, and optional reference details, then click Process Transfer. This automatically creates proper accounting entries for the transfer.

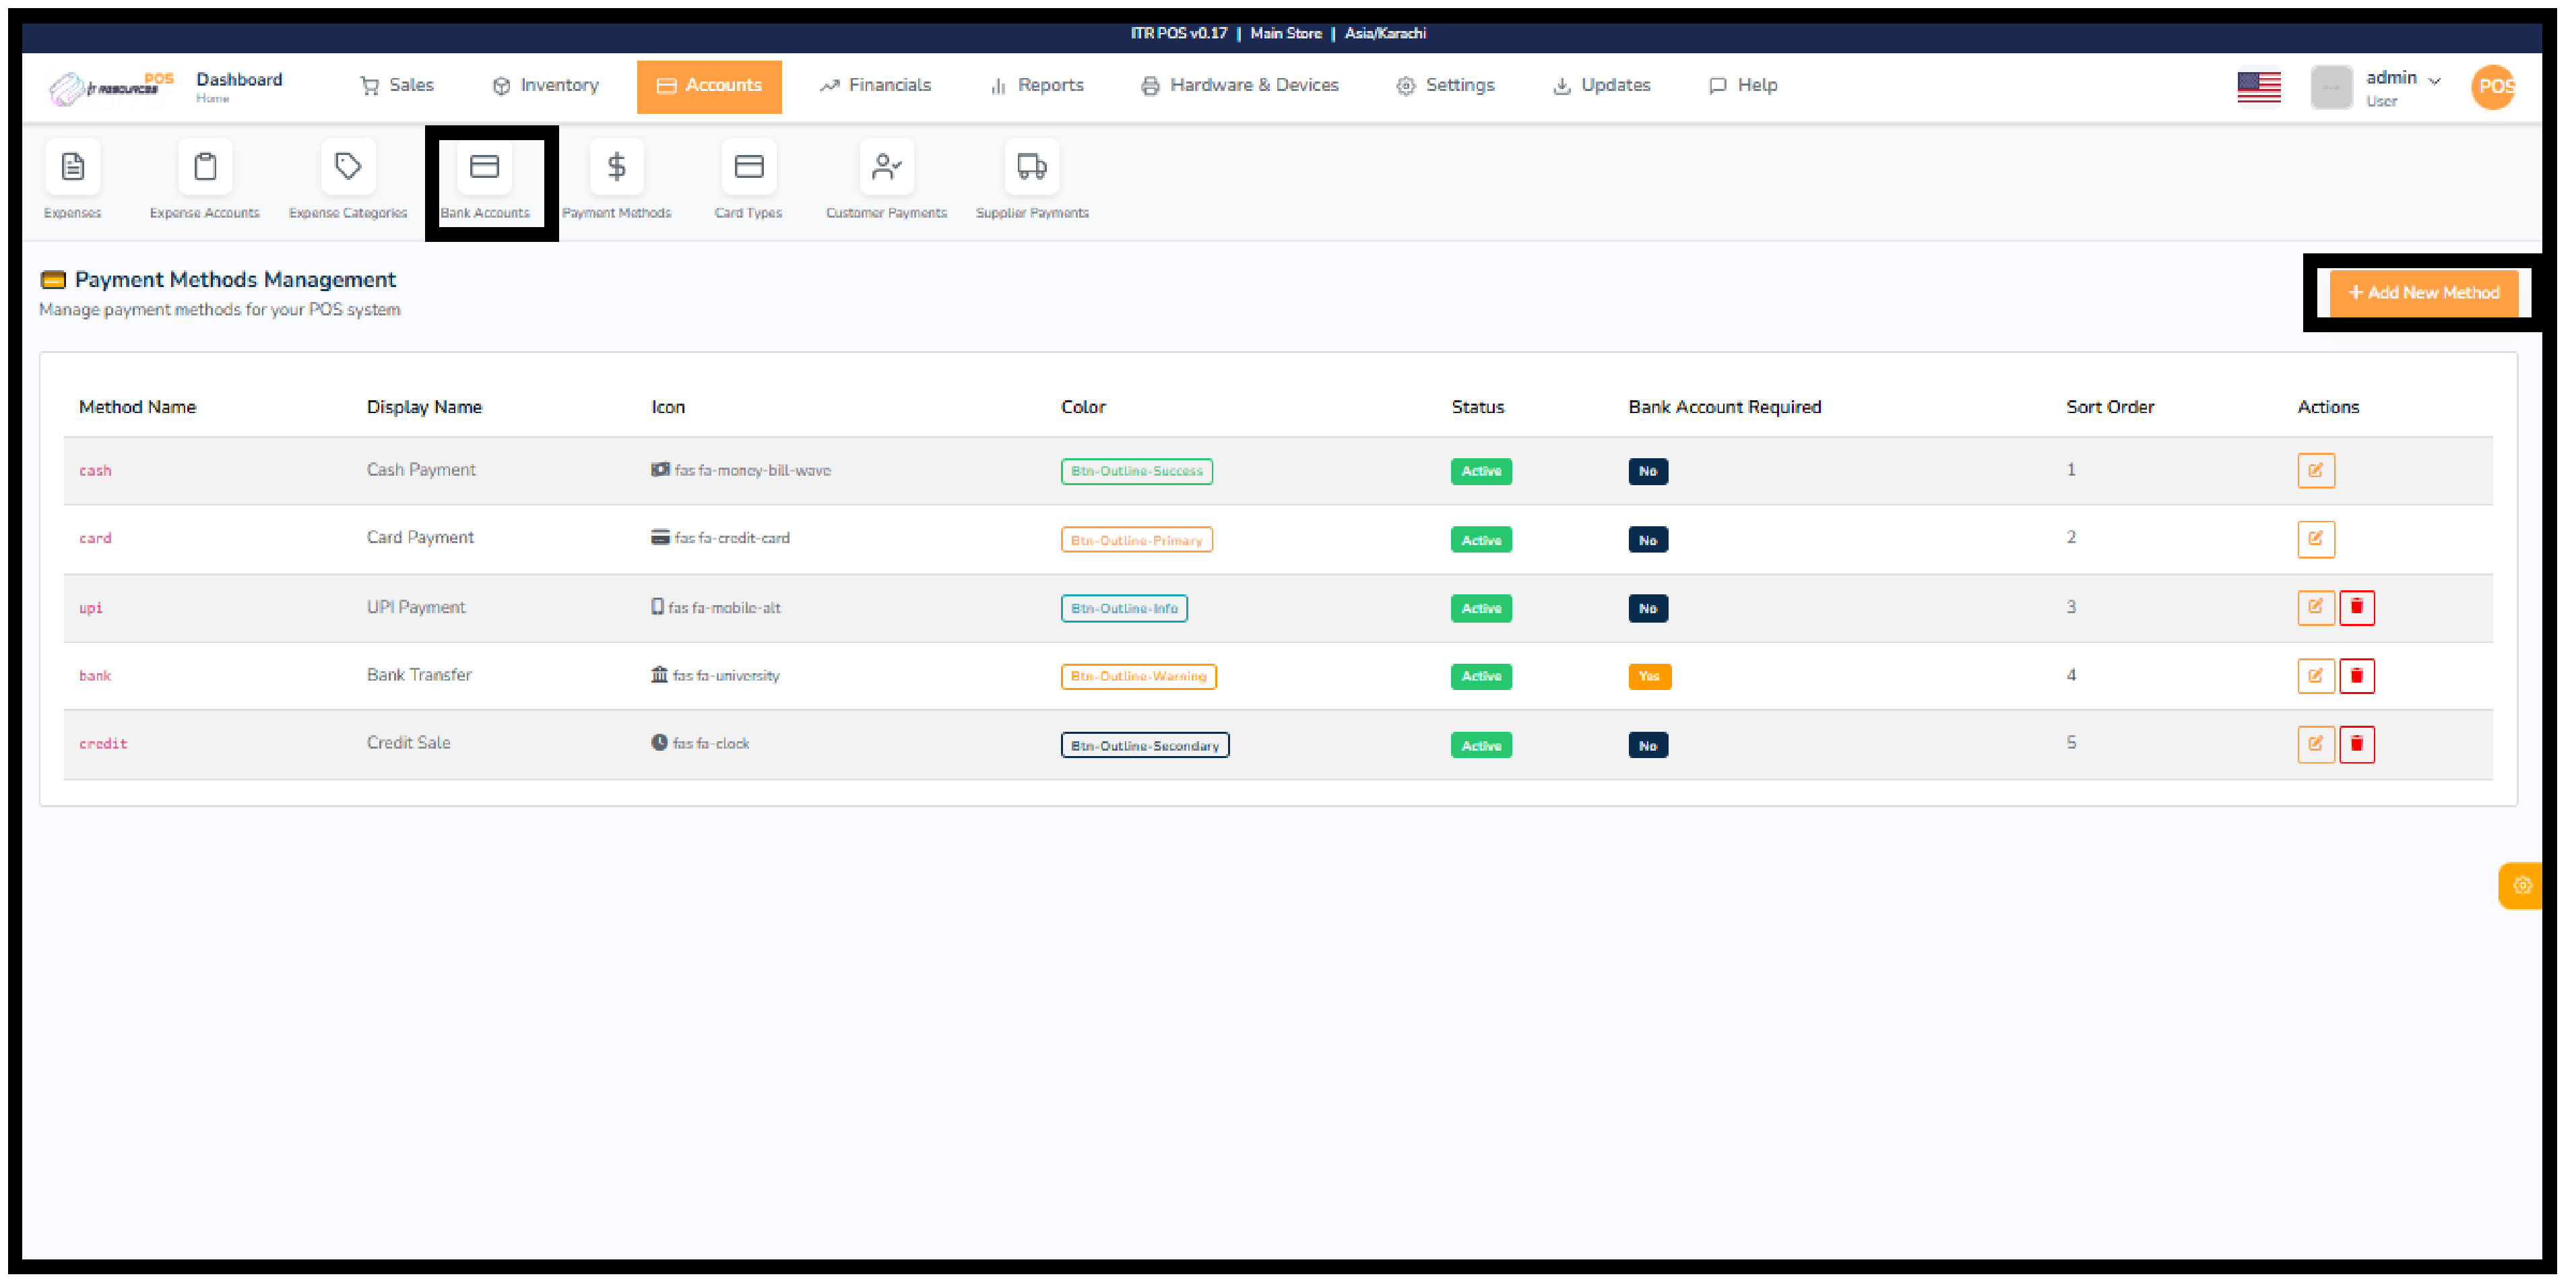
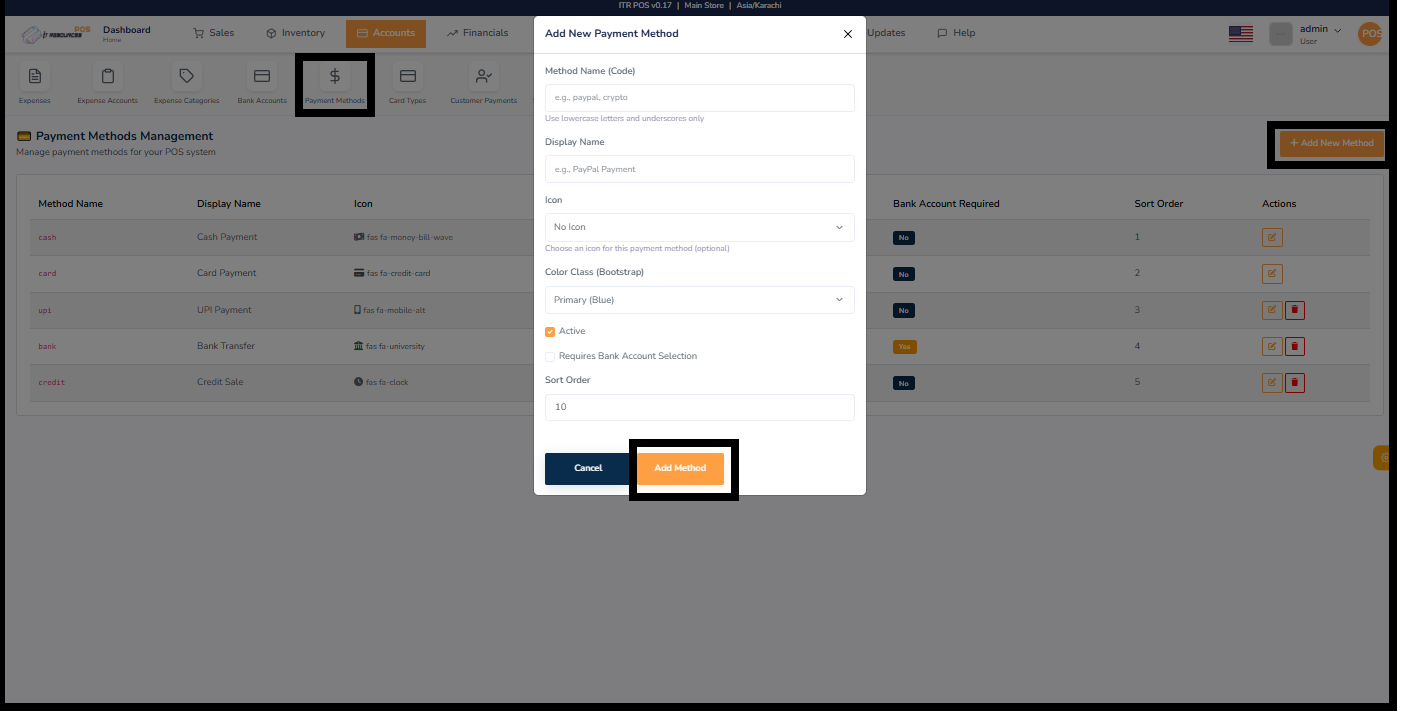
The Payment Methods Management section allows you to manage how customers can pay in your POS system. You can add new payment methods, set icons, assign colors, adjust sort order, enable/disable status, and choose whether a bank account is required for a particular method.
Click on the Add New Method button to create a new payment method. Enter the method code, display name, choose an icon, set the color class, and define whether it requires bank account selection. You can also set the sort order and choose to keep the method active or inactive.
Each payment method listed includes action buttons for editing or deleting. You can update its name, color, icon, or status anytime or remove it permanently if no longer needed.
Some payment types (e.g., bank transfer) may require selecting a bank account. You can enable the Requires Bank Account Selection option while adding or editing the payment method.
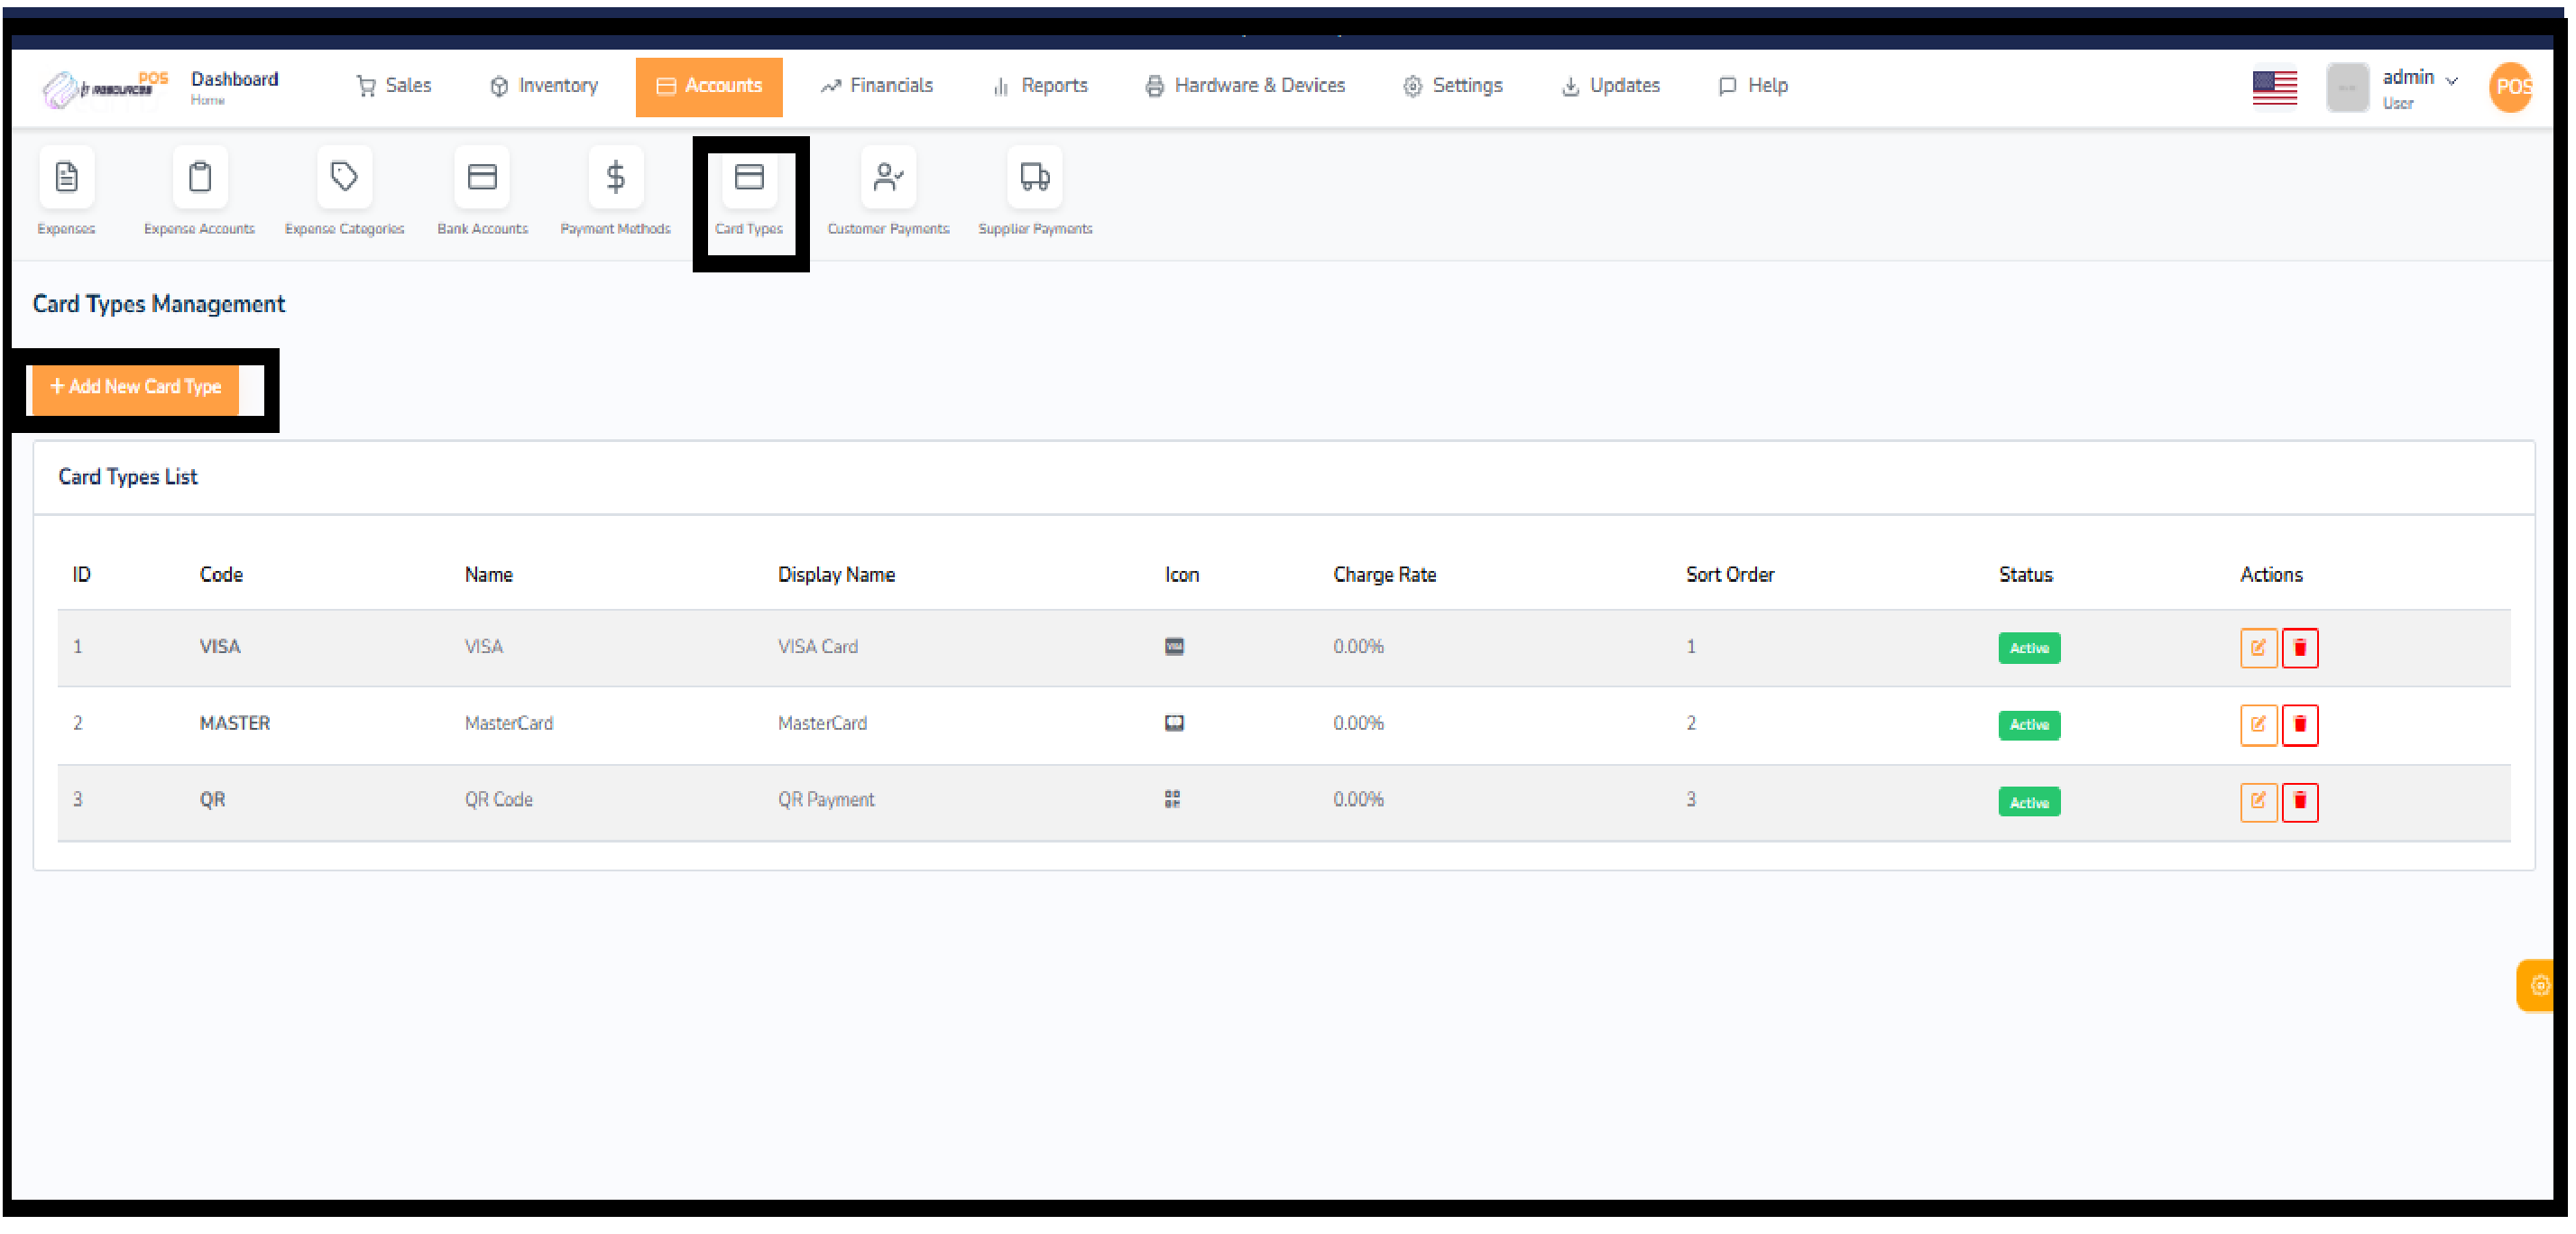
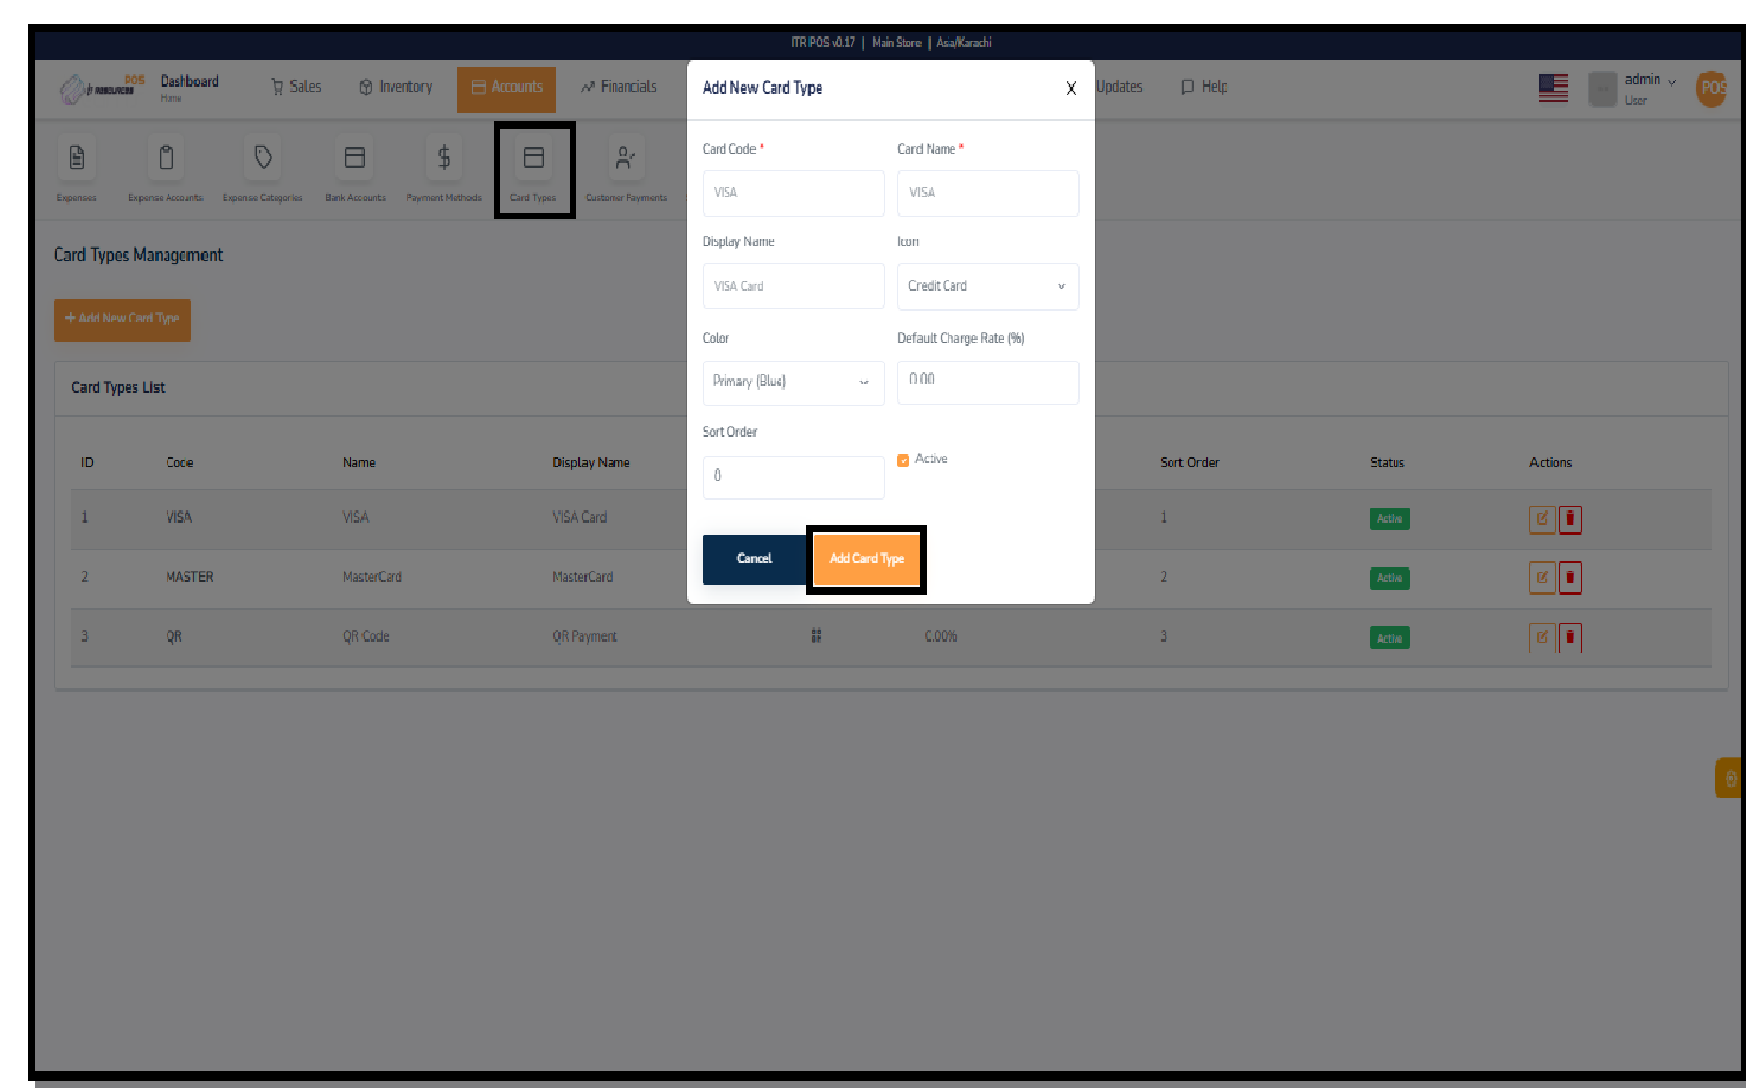
The Card Types Management section allows you to create, edit, and manage different card types used for customer payments. This includes setting card codes, display names, icons, charge rates, and sort order. It helps maintain organized and structured payment options within your POS system.
To add a new card type, click the Add New Card Type button. A form will appear where you can enter essential details such as the card code, card name, display name, icon type, color, and default charge rate. You can also set the sort order and activate or deactivate the card type before saving.
The Card Types List displays all existing card types with details including code, name, display name, icon, charge rate, sort order, and status. Each card type also comes with action buttons to edit or delete the card type whenever needed.
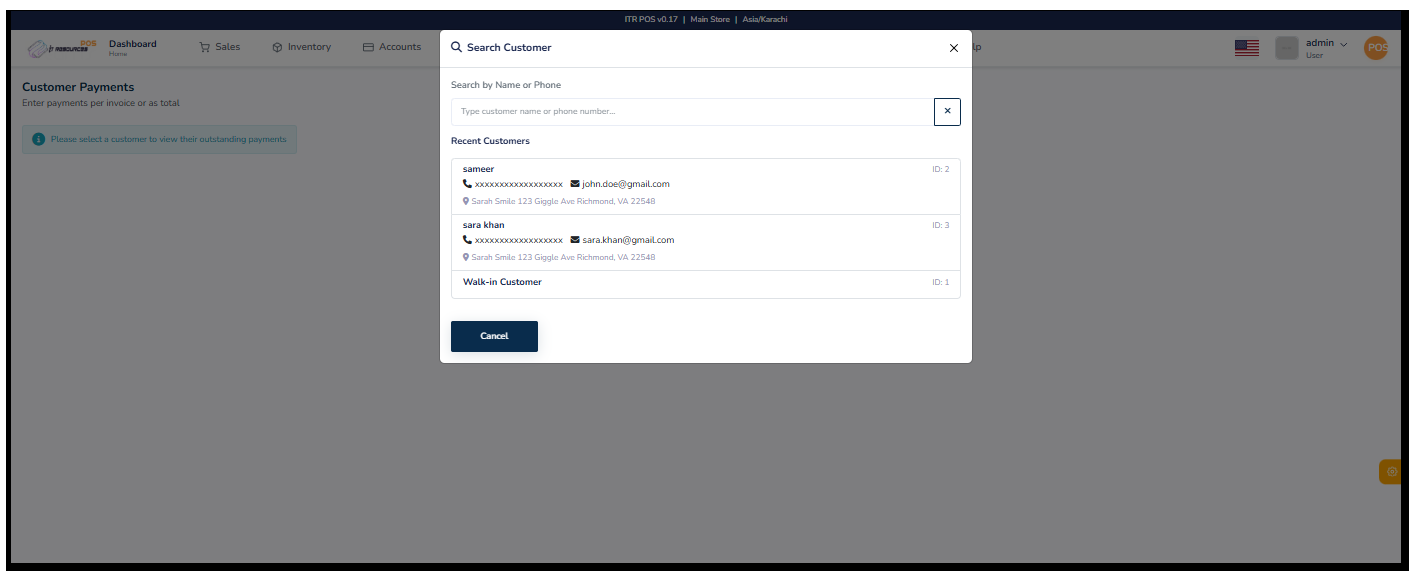
The Customer Payments section allows you to record payments made by customers against their invoices or outstanding balances. You can select a customer, view their pending amounts, and enter partial or full payments. This helps keep all receivables organized and ensures accurate payment tracking in the POS system.
Click on the customer search option to open the customer selection window. You can search by customer name or phone number. The system also shows a list of recent customers for quick access. If needed, you can also choose the Walk-in Customer option to continue without selecting a registered customer.
Once a customer is selected, their outstanding invoices or total pending amount will be displayed. You can enter the payment amount, choose the payment method, and record the transaction. This ensures smooth and accurate handling of customer dues.
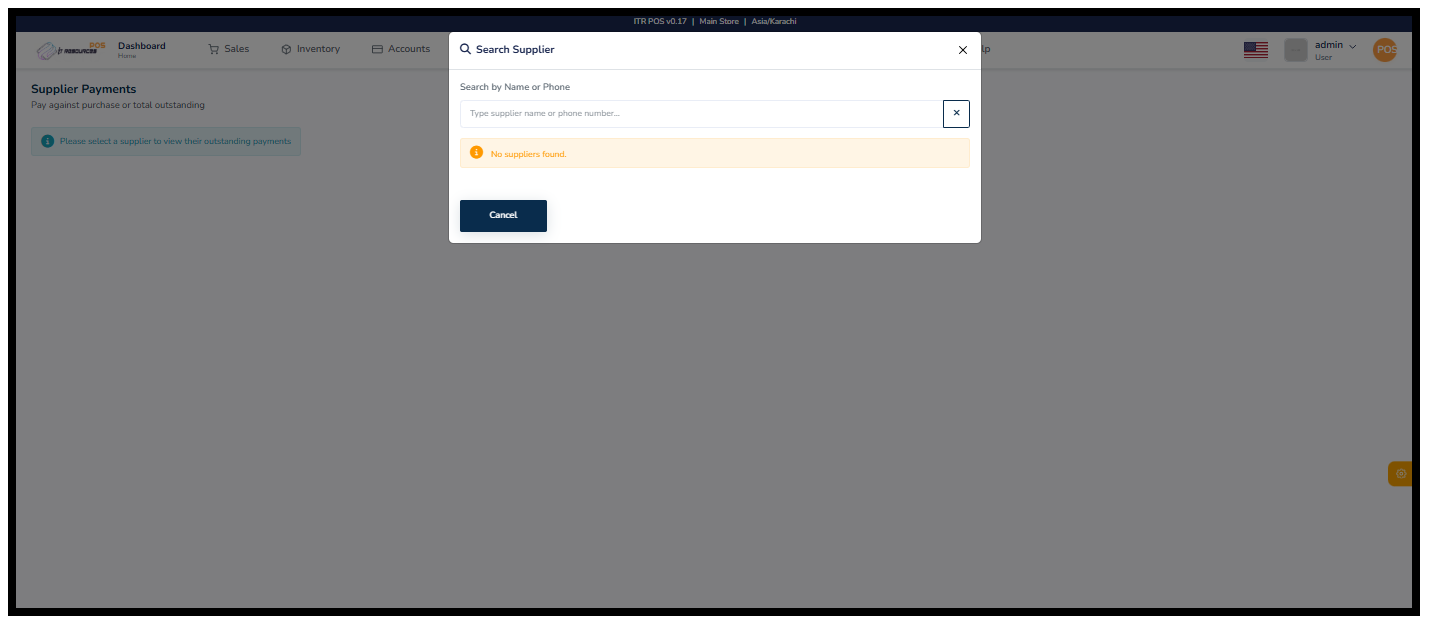
The Supplier Payments section allows you to record payments made to suppliers against their purchase invoices or total outstanding balance. This section helps you manage your business payables by keeping track of what amount is due and what has already been paid.
Click on the supplier search option to open the supplier selection window. You can search using the supplier's name or phone number. If no suppliers match the search, the system will show the "No suppliers found" alert. After selecting a supplier, you will be able to view their outstanding payments.
Once a supplier is selected, the system will display their unpaid invoices or total due amount. You can enter the payment amount, choose the payment method, and submit the transaction. This ensures accurate tracking of supplier dues and smooth management of business expenses.
The Financials section helps you manage all your business accounting activities in one place. Here you can record financial transactions, create journal entries, manage your chart of accounts, track account balances, and organize financial periods. This section gives you better control over your business finances, helps maintain accurate records, and improves reporting and decision-making. It ensures that your POS data and accounting data stay connected — making your business more organized and financially transparent.

The Quick Transaction feature allows you to record a simple financial entry between two accounts without creating a complete journal entry manually. It helps you quickly transfer amounts from one account to another with just a few fields.
To add a quick transaction, select the transaction date, choose the source account (from where money will be deducted), and the destination account (where money will be added). Enter the amount and an optional description, then click Record Transaction.
All recorded quick transactions for the current day appear in the Recent Quick Transactions table below the form. From there, you can view or manage previously added entries.

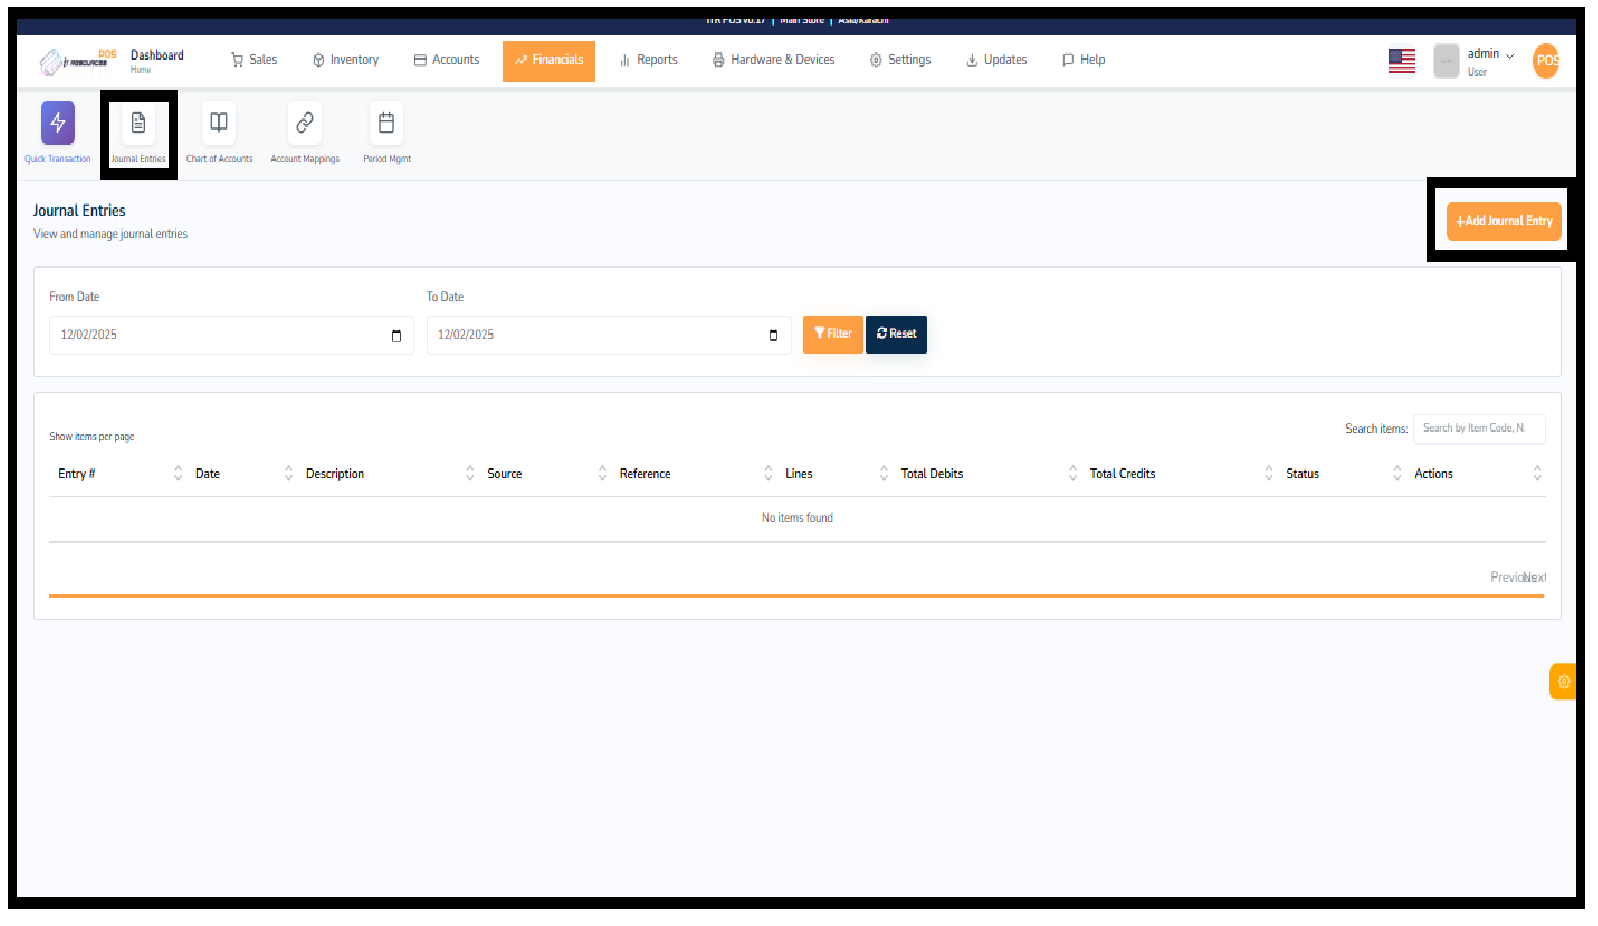
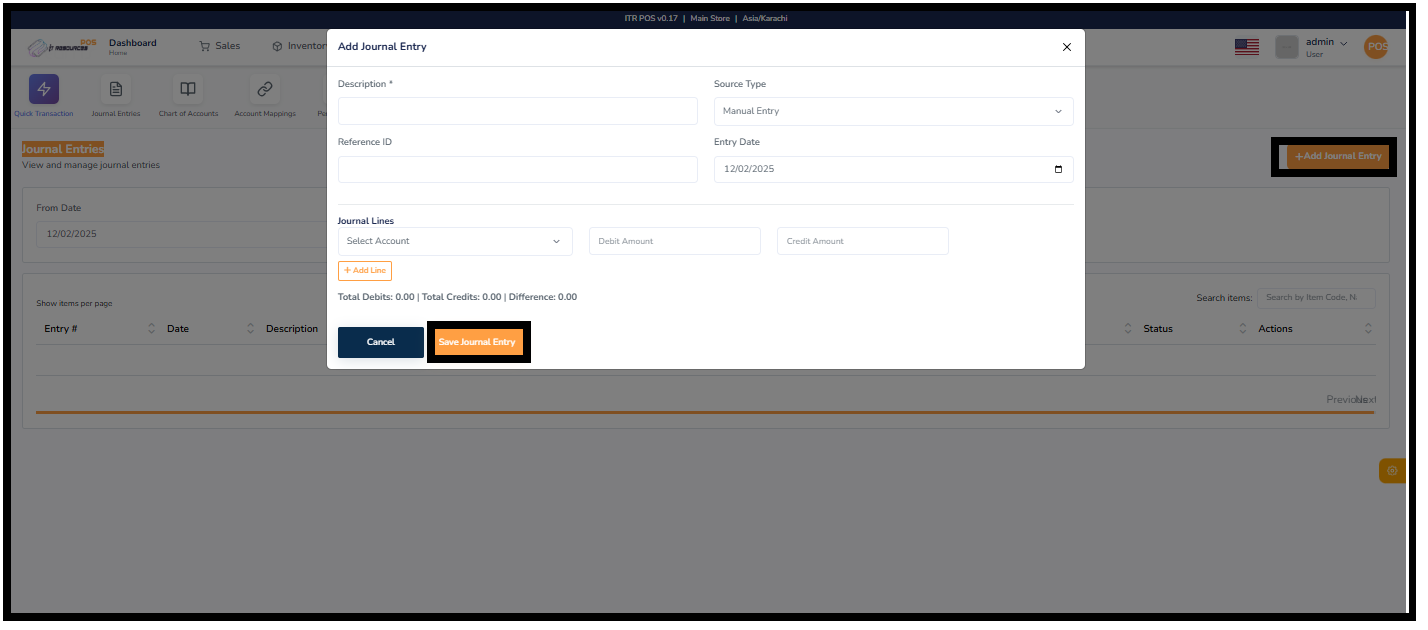
The Journal Entries section allows you to record, view, and manage all financial transactions that affect your accounts. It is used to enter debit and credit lines manually so your financial records remain accurate and transparent.
Click on Add Journal Entry, select the entry date, enter a description, and add multiple debit and credit lines. Once the total debits equal total credits, save the entry to update your financial records.
Use the From Date and To Date fields to filter entries for a specific time period. You can also search by description, reference, or account to quickly locate past entries.
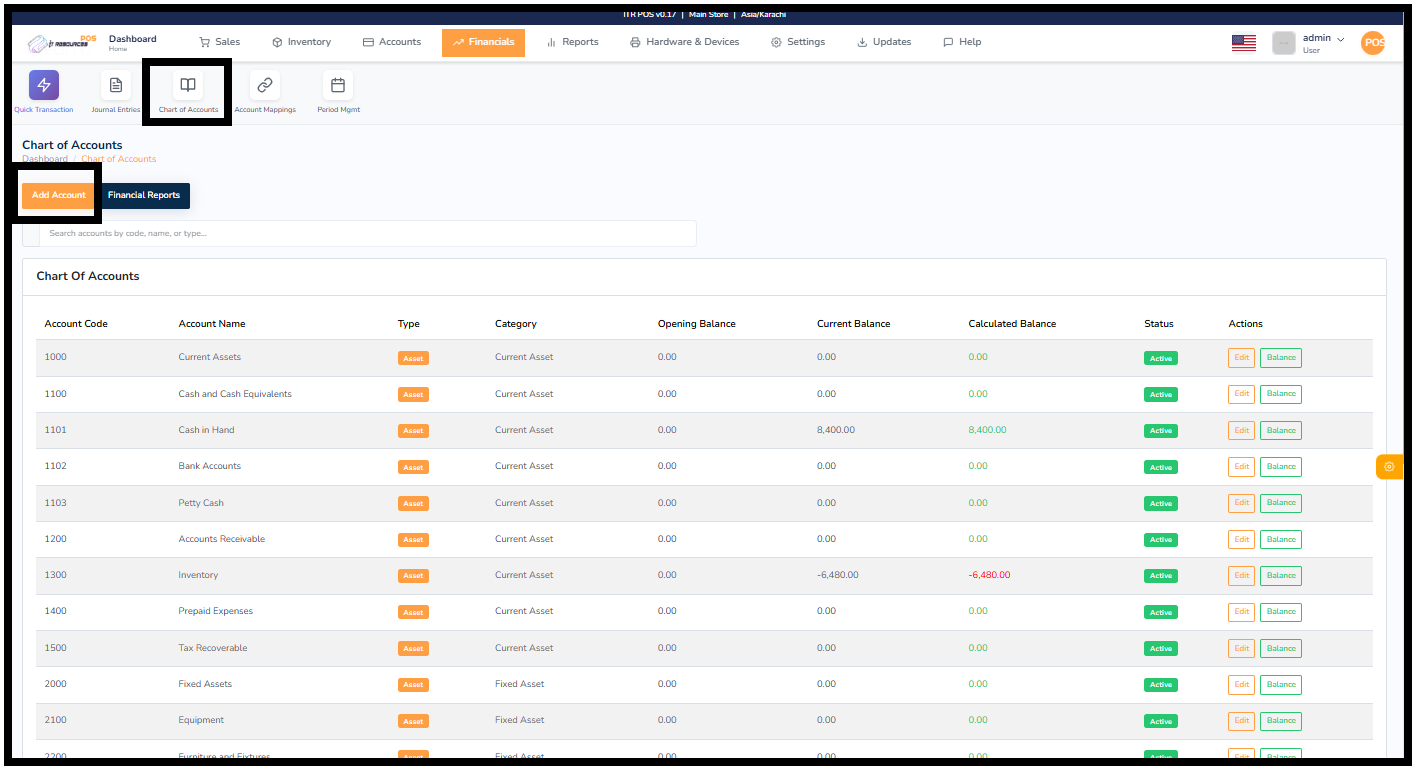
The Chart of Accounts section is the backbone of your financial system. Here you can view, organize, and manage all accounts used in your business such as assets, liabilities, expenses, income, and equity. Each account stores financial data that helps you generate accurate reports and maintain clear bookkeeping.
A well-organized Chart of Accounts helps you understand your business financially. It lets you track balances, manage categories, monitor opening/current balances, and ensure proper accounting for all financial activities.
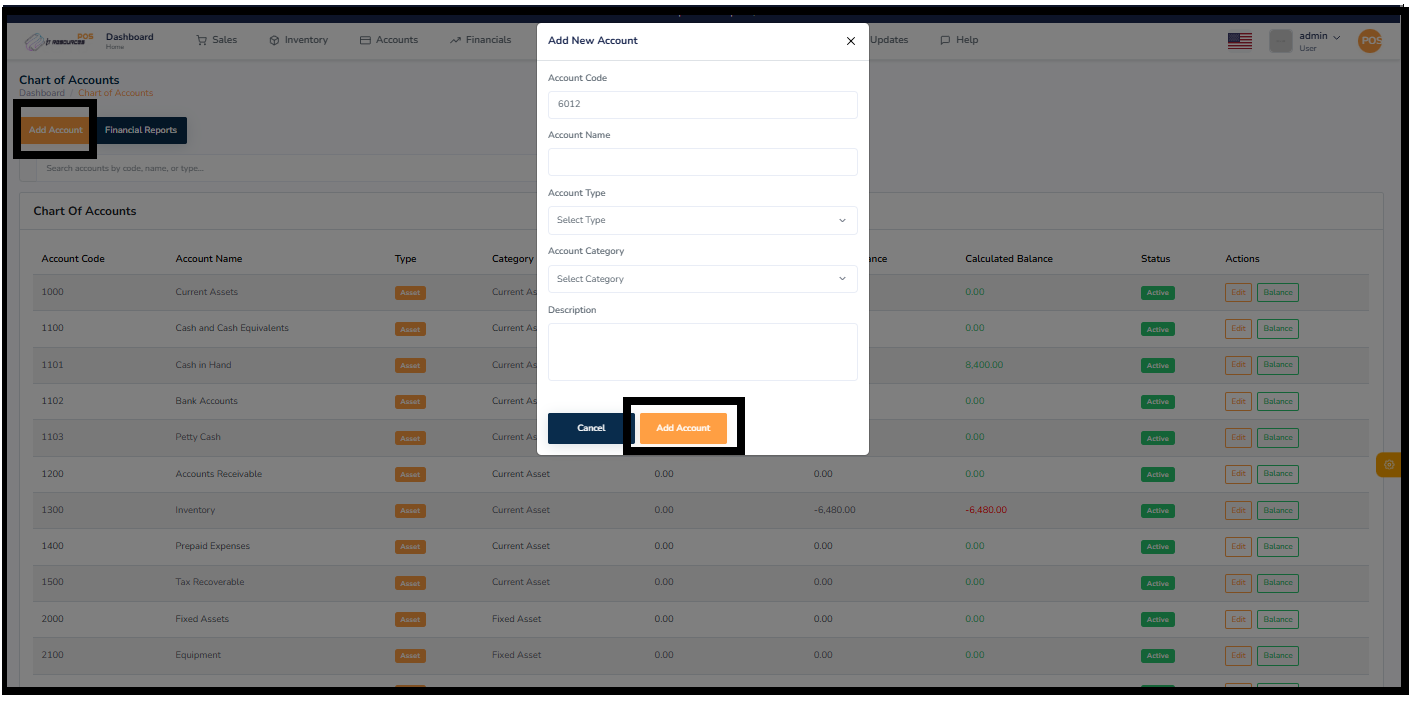
Clicking on the Add Account button opens a form where you can enter the account code, name, type (Asset, Expense, Liability, etc.), and category. You can also add an optional description to identify the purpose of the account. Once saved, the account becomes part of your system and is available for all financial transactions.
The account list displays each account's code, type, category, opening balance, current balance, status, and available actions. You can easily edit any account or view its detailed balance record by using the action buttons.
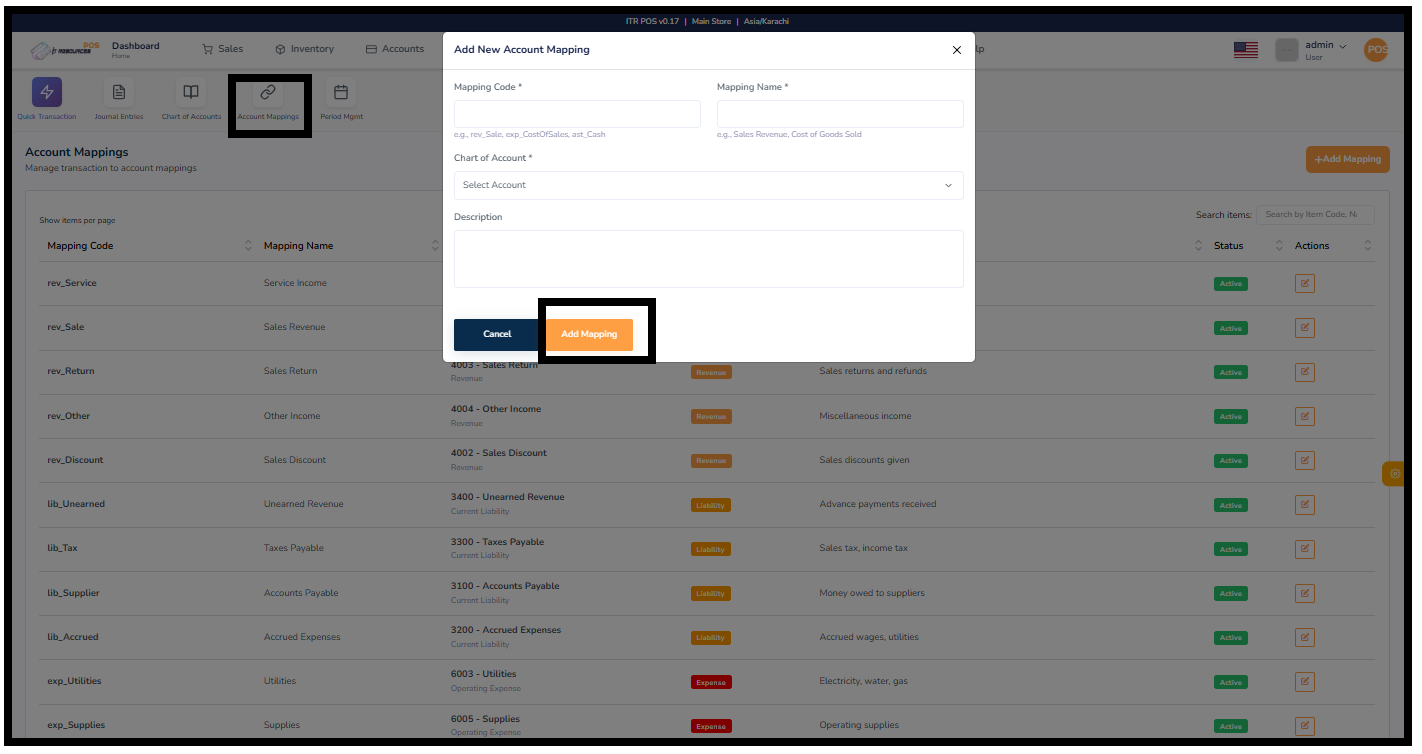
The Account Mapping module links system transactions—such as sales, returns, discounts, expenses, and liabilities—to their corresponding ledger accounts. This ensures that every transaction is automatically posted to the correct financial account, keeping your accounting accurate and organized.

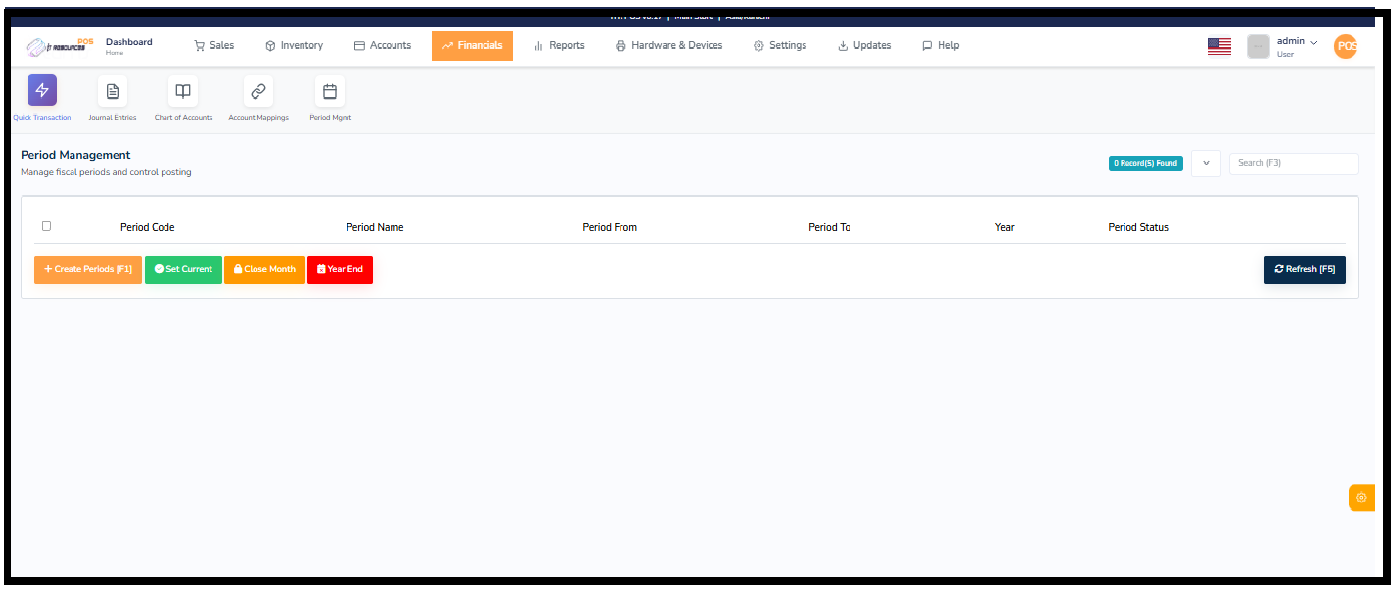
The Period Management section allows you to create, manage, and control fiscal periods used for financial posting. You can define multiple periods for a financial year, set the current active period, close monthly posting, and perform year-end closing operations. This ensures accurate financial tracking and prevents transactions from being posted in closed periods.
Create Periods lets you generate fiscal periods for a selected year. Each period includes a start date, end date, and period code. Once created, the periods appear in the list for editing or activation.
Set Current allows you to choose which period is currently active for posting. Transactions will only be posted inside the selected active period. This prevents accidental posting in the wrong date range.
Close Month locks the selected period so no new transactions can be posted in that period. This is normally used at the end of each month once financial reconciliation is complete.
The Year End function closes the entire fiscal year. It rolls forward balances and prepares the system for the next financial year. This action is usually performed after completing all yearly adjustments and audits.
The Reports section provides a complete overview of your store's activities. It includes detailed sales, inventory, accounts, and financial reports that help you monitor business performance and make informed decisions. From tracking daily sales to reviewing stock levels and analyzing financial data, this module helps you stay updated with accurate and real-time information.

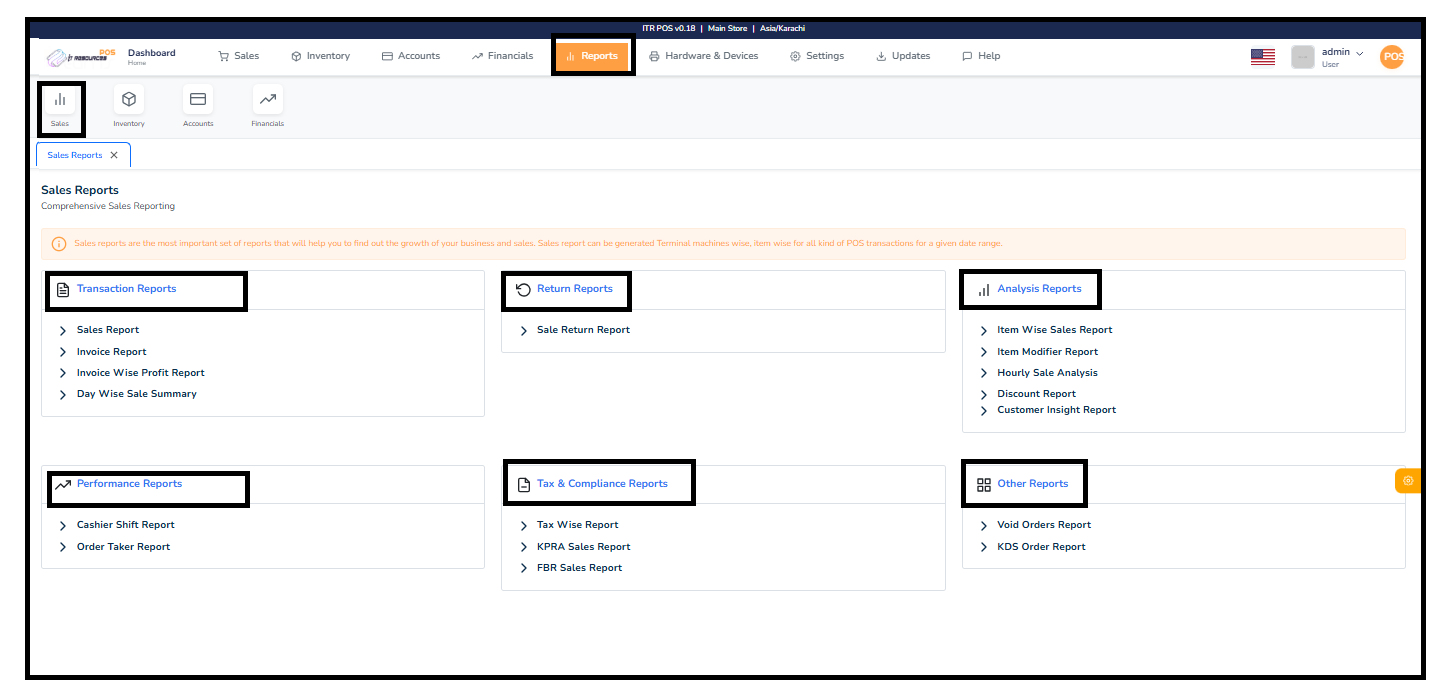
The Sales Reports section provides a complete overview of all sales activities in your store. These reports help you track transactions, returns, performance, and customer behavior. You can generate sales data for specific dates, terminals, users, or items to analyze growth and monitor daily operations effectively.
Sales reports are divided into multiple categories for easy navigation:
These reports allow you to monitor sales trends, check profitability, verify discounts, evaluate staff performance, and stay compliant with tax regulations. All reports can be filtered, viewed, and exported for business analysis.
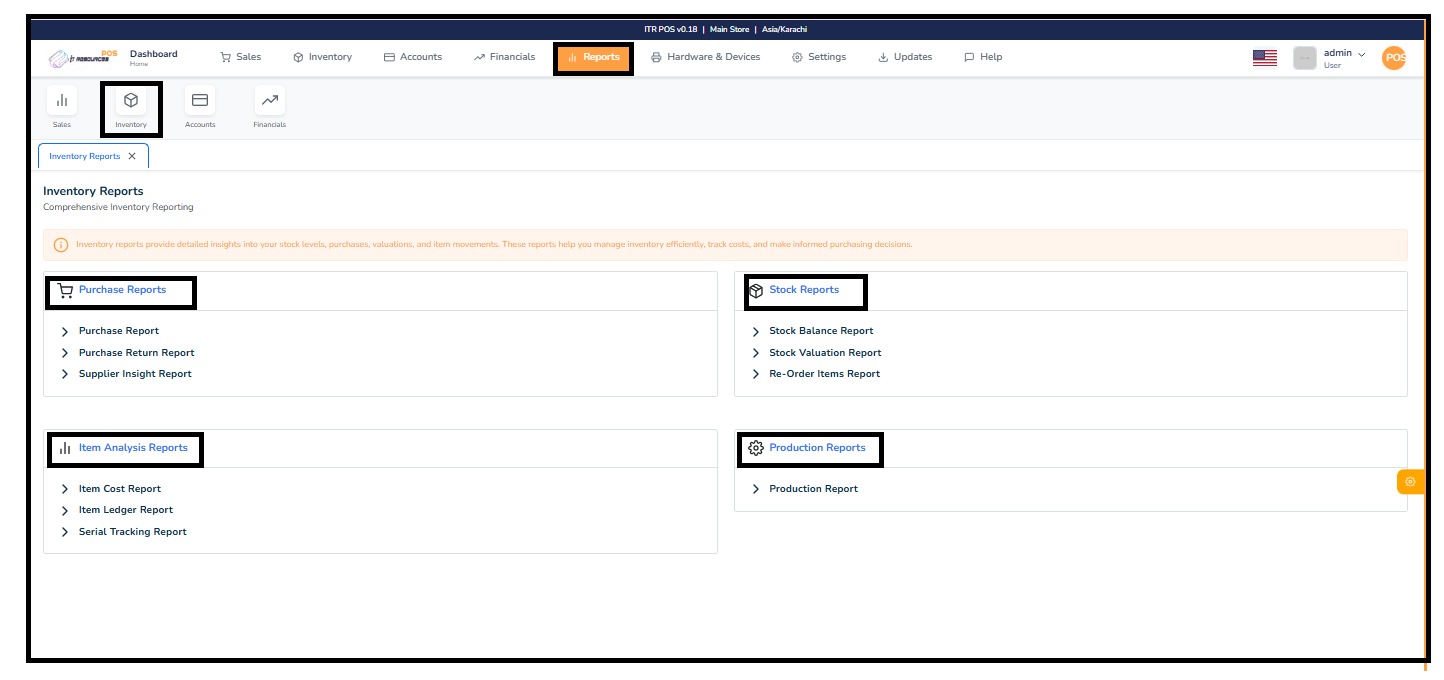
Inventory reports provide detailed insights into your stock levels, purchases, valuations, and item movements. These reports help you manage inventory efficiently, track costs, and make informed purchasing decisions.
Includes purchase report, purchase return report, and supplier insights to help you analyze vendor performance and purchasing trends.
Provides stock balance, valuation, and re-order level insights to ensure optimal inventory control.
Analyze cost, ledger activity, and serial tracking for individual items.
View production-related stock usage and finished goods movement.
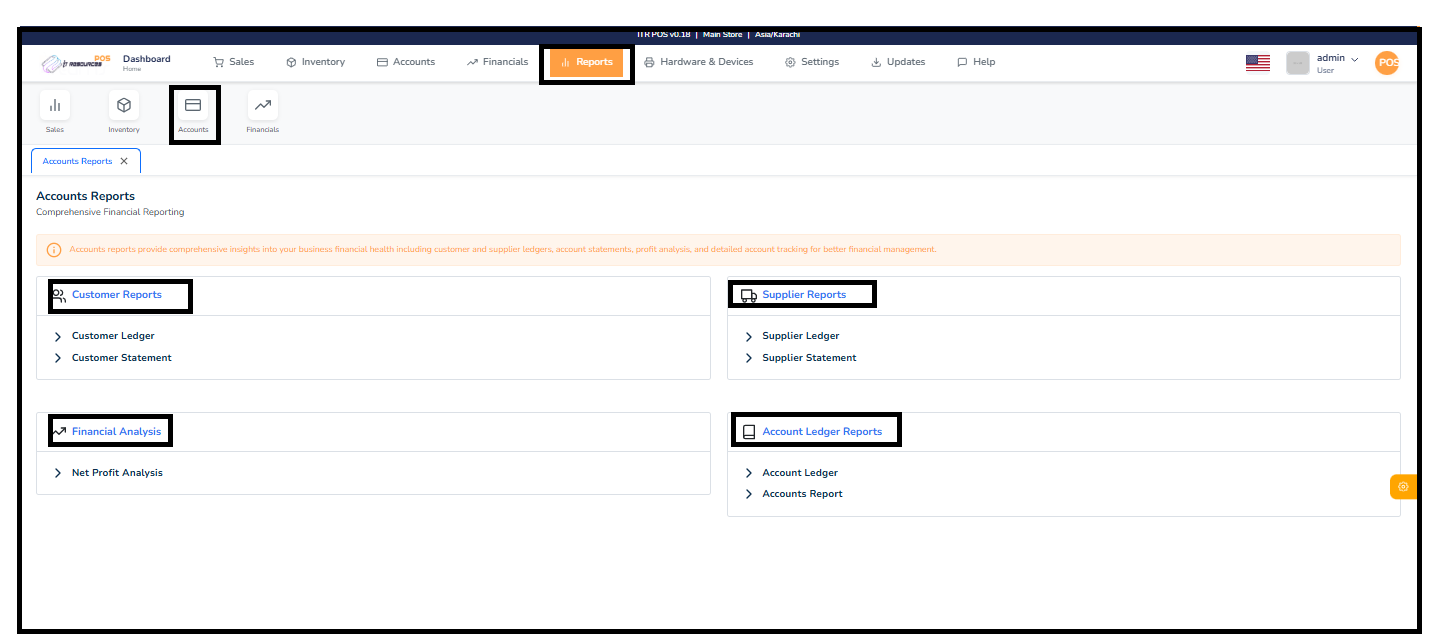
Accounts reports provide comprehensive insights into your business financial health, including customer and supplier ledgers, account statements, profit analysis, and detailed account tracking for better financial management.
These reports help you review customer-related financial activities such as customer ledgers and customer statements.
Supplier reports provide detailed information about supplier ledgers and supplier statements for managing payables efficiently.
This section includes profit analysis and other tools for evaluating your business's financial performance.
These reports allow you to view detailed account activity, including the account ledger and complete accounts report.
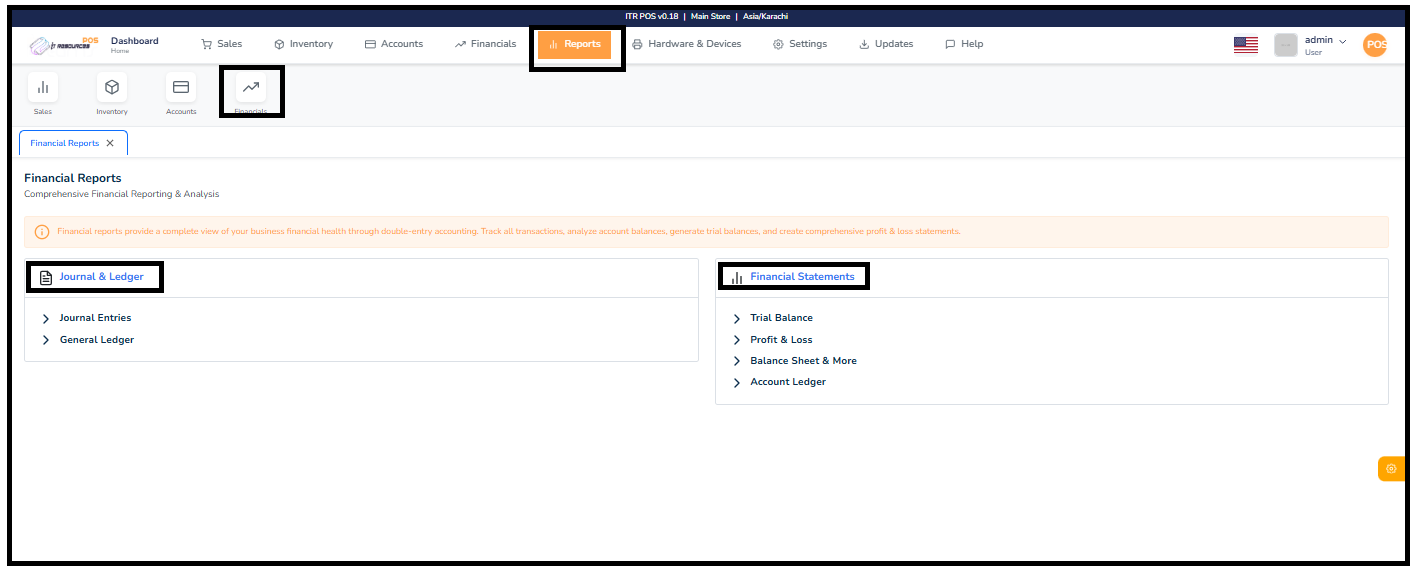
Financial reports provide a complete view of your business's financial health through double-entry accounting. Track all transactions, analyze account balances, generate trial balances, and create comprehensive profit & loss statements.
This section helps you manage core accounting records, including journal entries and the general ledger, ensuring accurate financial tracking and auditing.
View essential financial statements such as the Trial Balance, Profit & Loss report, Balance Sheet, and Account Ledger to understand your overall business performance.
The Hardware & Devices section provides a centralized place to manage all external equipment connected to the ITR POS system. It includes terminals, printers, KOT/KDS screens, tablet ordering devices, and backup tools. Through this area, users can easily configure and monitor each device, ensuring smooth billing, accurate kitchen communication, and overall reliable daily operations. This section helps streamline workflows and keeps the system organized by allowing quick access to all essential hardware settings in one place.

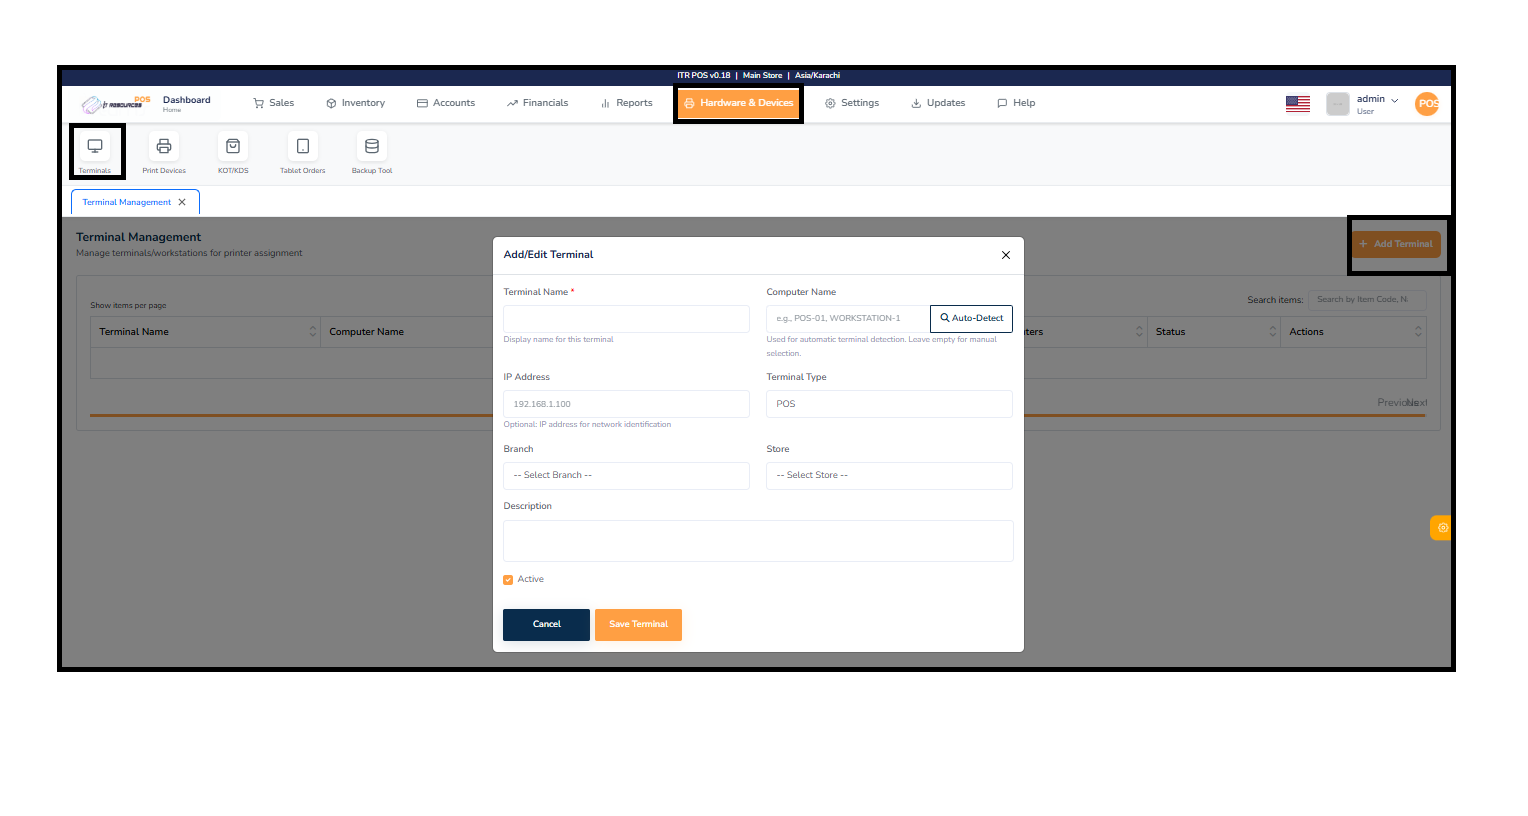
The Terminal Management module allows you to manage all terminals or workstations connected to your POS system. These terminals are typically used for assigning printers, handling billing operations, or managing sales counters within different branches.
A terminal represents a specific device or workstation such as a counter PC, billing station, or order-processing system. Each terminal can be configured with a unique computer name, IP address, terminal type, associated branch, and assigned printers.
Click the Add Terminal button on the top right. Provide the required details including terminal name, computer name, IP address, type, branch, and printer assignment. After filling in the information, save the terminal to activate it in the system.
All configured terminals appear in the terminal list table where you can view their status, assigned printers, and branch location. You can also edit or remove terminals as needed using the Actions column.

To configure a printer for sales, first install the printer on your system and perform a test print to ensure it is working correctly.
Then, go to the Control Panel, open Printer Properties, right-click on your printer, and enable the Share Printer option. Save the settings.
Next, open the POS software and navigate to Hardware & Devices, then click on Print Devices. Locate your Counter Receipt Printer and click Edit.
Keep all other settings as default, and in the Printer Name field, click on Detect Printer. A list of available printers will appear—select your installed printer.
Finally, click on the Actions button and perform a Test Print to confirm that the printer is properly configured and ready for use.
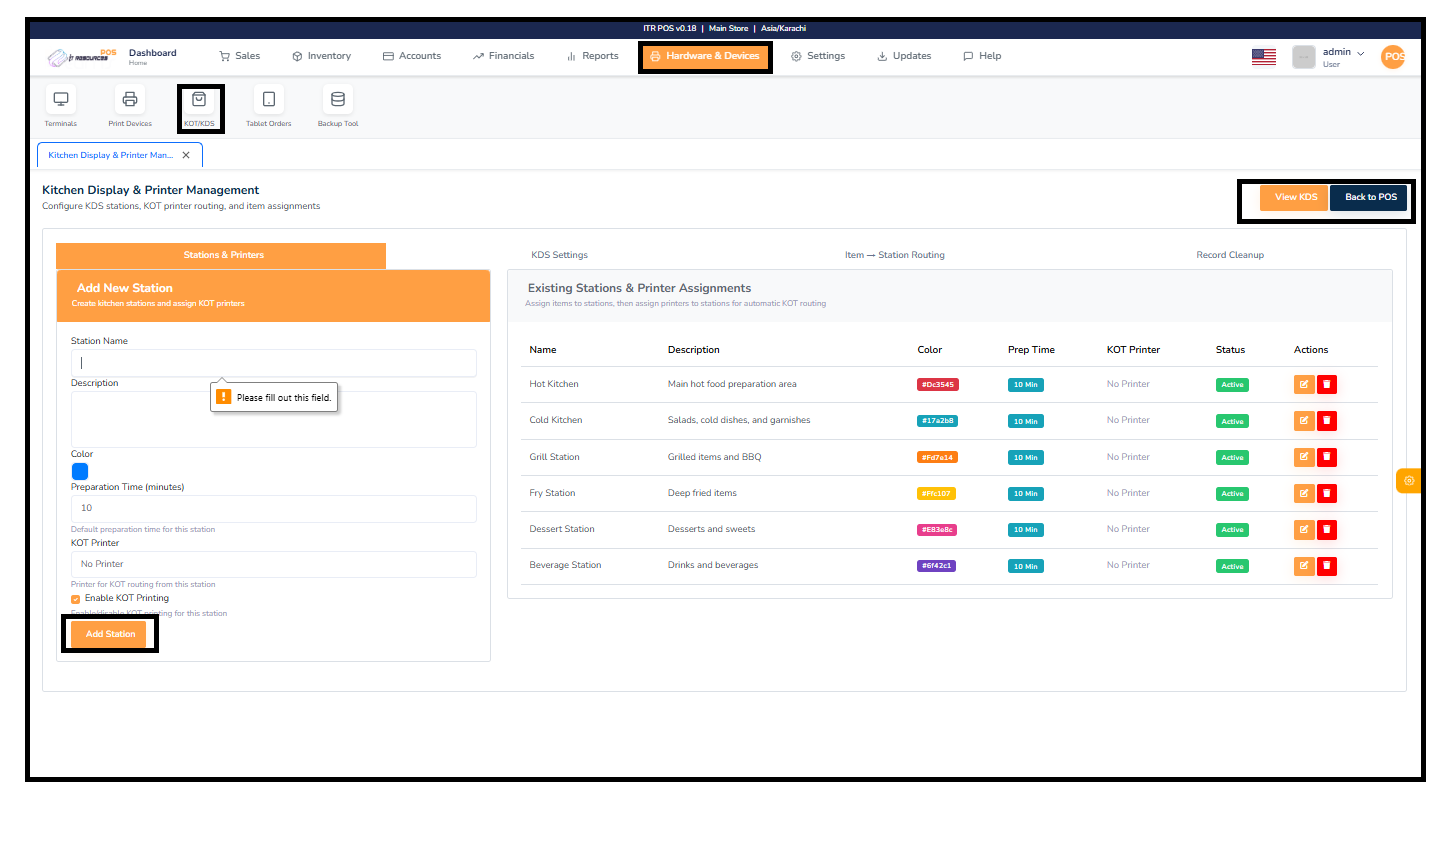
The Kitchen Display & Printer Management module allows you to set up kitchen stations and manage KOT printing for each area of your kitchen. It helps ensure items are routed to the correct station automatically.
To create a station, enter the station name, description, select a color, set the preparation time, and choose a KOT printer if needed. Click Add Station to save your setup.
All existing stations appear in the list, where you can edit details, change printers, adjust prep times, or activate/deactivate stations as required.
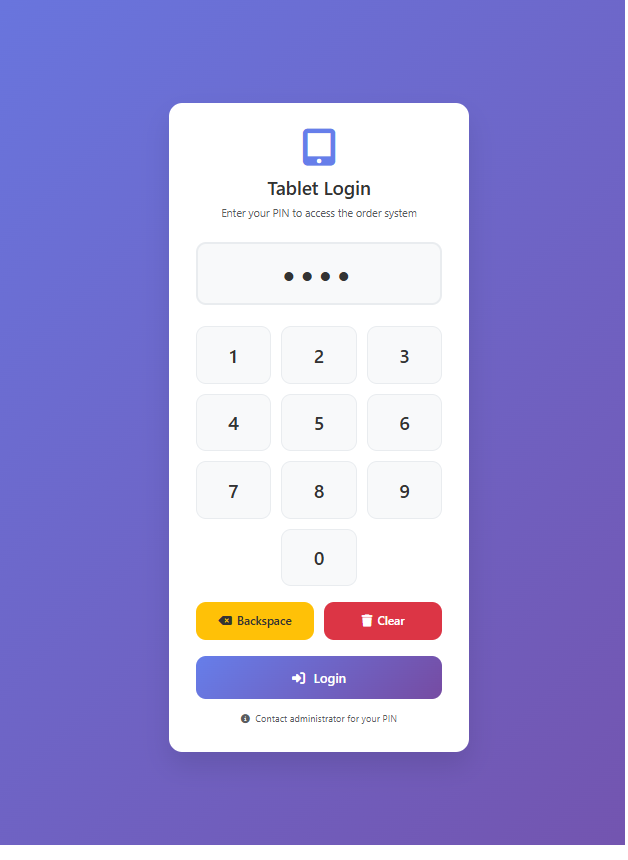
To access the tablet ordering system, each waiter or order-taker must have their own user profile in the Order Taker section of the POS.
To create a user profile, go to Order Taker in the Sales section. From the list of employees, assign a 4–6 digit passcode for each order taker. This same passcode is used on the tablet login screen. Enter the PIN, tap Login, and the user can start taking dine-in or take-away orders.

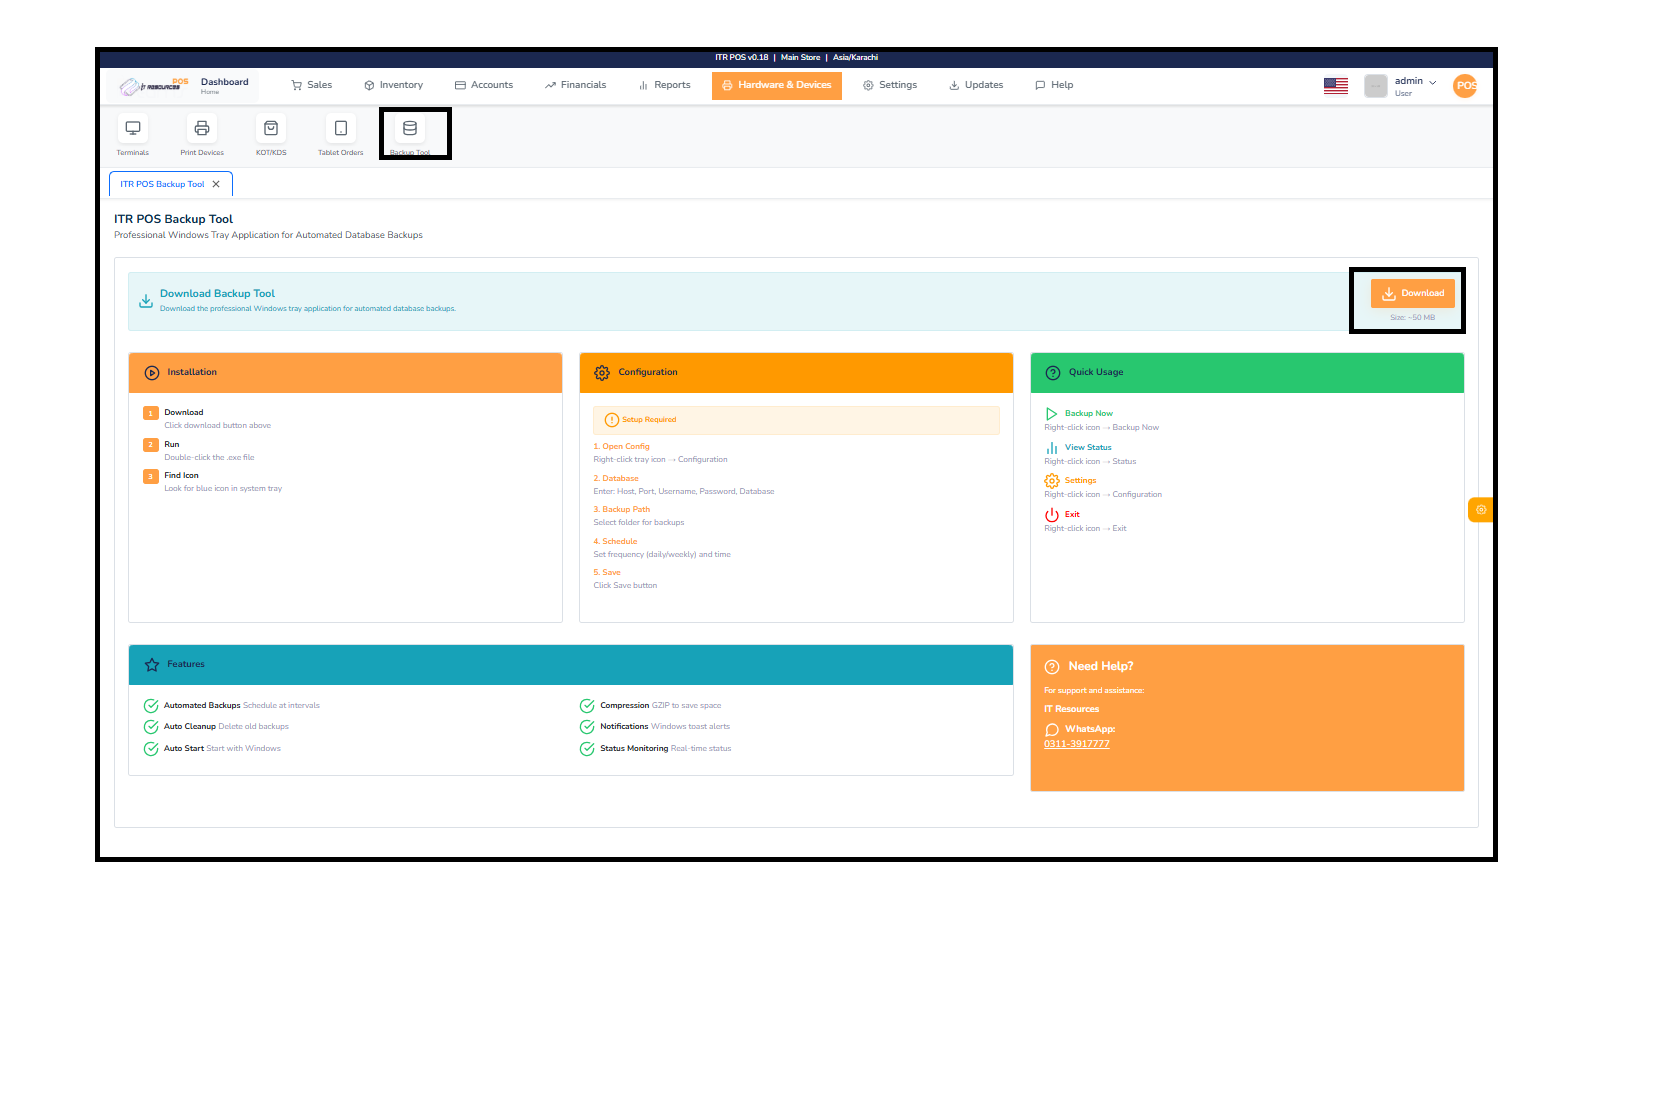
The Backup Tool is a Windows-based utility that automatically creates secure backups of your POS database. It helps you protect your data by scheduling daily or weekly backups, running silently in the system tray.
Click the Download button, run the setup file, and look for the Backup Tool icon in the Windows system tray. The tool starts automatically after installation.
Open the tray icon and go to Configuration. Enter your database details, select the backup folder, set the backup schedule, and click Save.
You can right-click the tray icon to Backup Now, view status, open settings, or exit the tool anytime.
The Settings module allows you to manage all core configurations of your POS system. It helps you control branches, store details, tax rules, user permissions, language preferences, and data operations—all in one place. These settings ensure that the system works according to your business structure and operational needs.
Through this section, you can update general settings, manage multiple branches, configure synchronization, define tax rates, handle database maintenance, and create or manage user accounts. Below is a short explanation of each option to help you understand what they do:
Proper setup of these options ensures smoother operations, accurate reporting, and a more customized POS experience.

Accounts: Manages all business financial accounts including cash, bank, and expense approvals.
Barcode Settings: Used to configure and generate barcodes for fast and accurate product scanning.
FBR Digital Integration: Connects with FBR's digital invoicing portal to automatically report daily sales.
FBR Integration: Ensures compliance with FBR tax rules and proper invoice reporting for legal operations.
KDS (Kitchen Display System): Displays order tickets on kitchen screens for faster and more organized food preparation.
KPRA Integration: Syncs invoices directly with KPRA tax reporting systems for automatic submission.
POS: Configures Point of Sale behavior including receipts, cashier options, and sales rules.
Print Settings: Allows customization of print formats for receipts, invoices, and reports.
Sales Orders: Tracks customer orders, including pending, in-process, and completed status.
System Settings: Controls global system behavior such as language, syncing, permissions, and database operations.
Tax Settings: Configures tax rates and tax rules so items are charged correctly during sales.

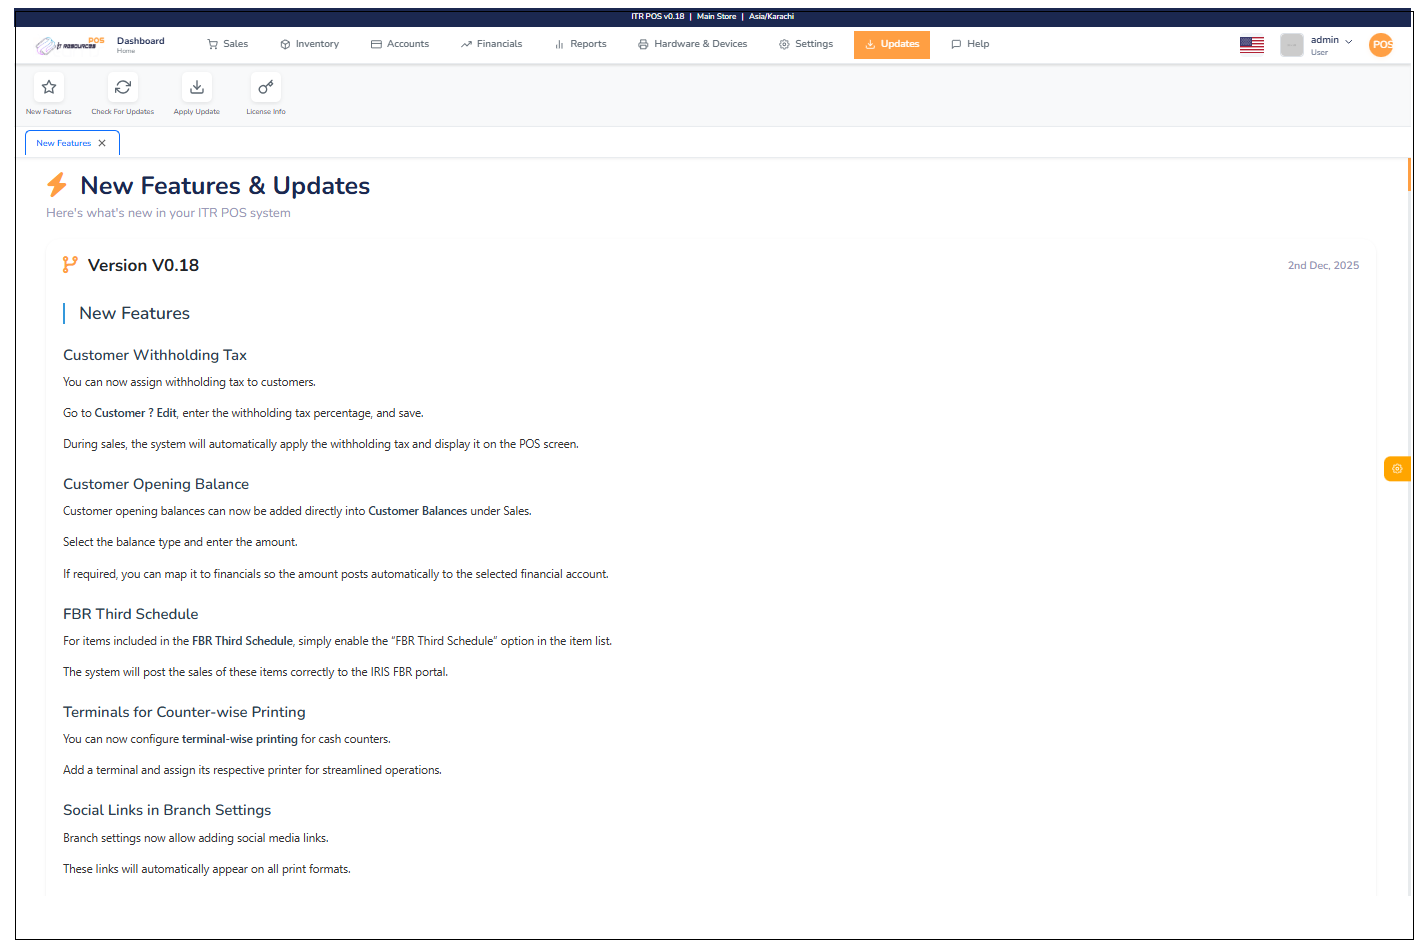
The Updates module helps you keep your POS system up to date with the latest improvements, features, and security patches. It ensures your software runs smoothly, remains secure, and includes all newly released enhancements.

The Updates section provides a detailed overview of all new enhancements, features, and improvements introduced in the latest version of your POS system. Each update is designed to enhance usability, improve performance, and deliver more control over your business operations.
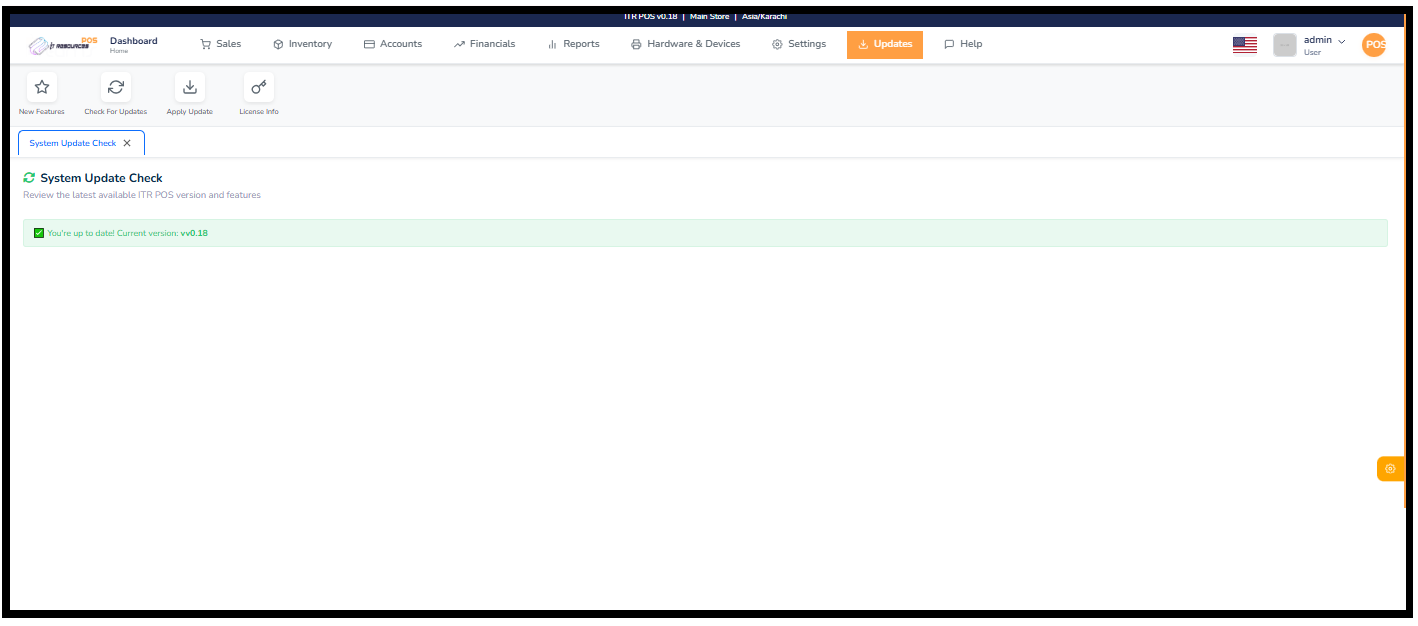
The System Update Check feature allows you to review and verify whether your ITR POS system is running on the latest available version. This ensures your application stays updated with new features, performance improvements, and security fixes.
To check for updates, navigate to the Updates section from the top menu and open the System Update Check tab. The system will automatically verify your current installed version and compare it with the latest available release.
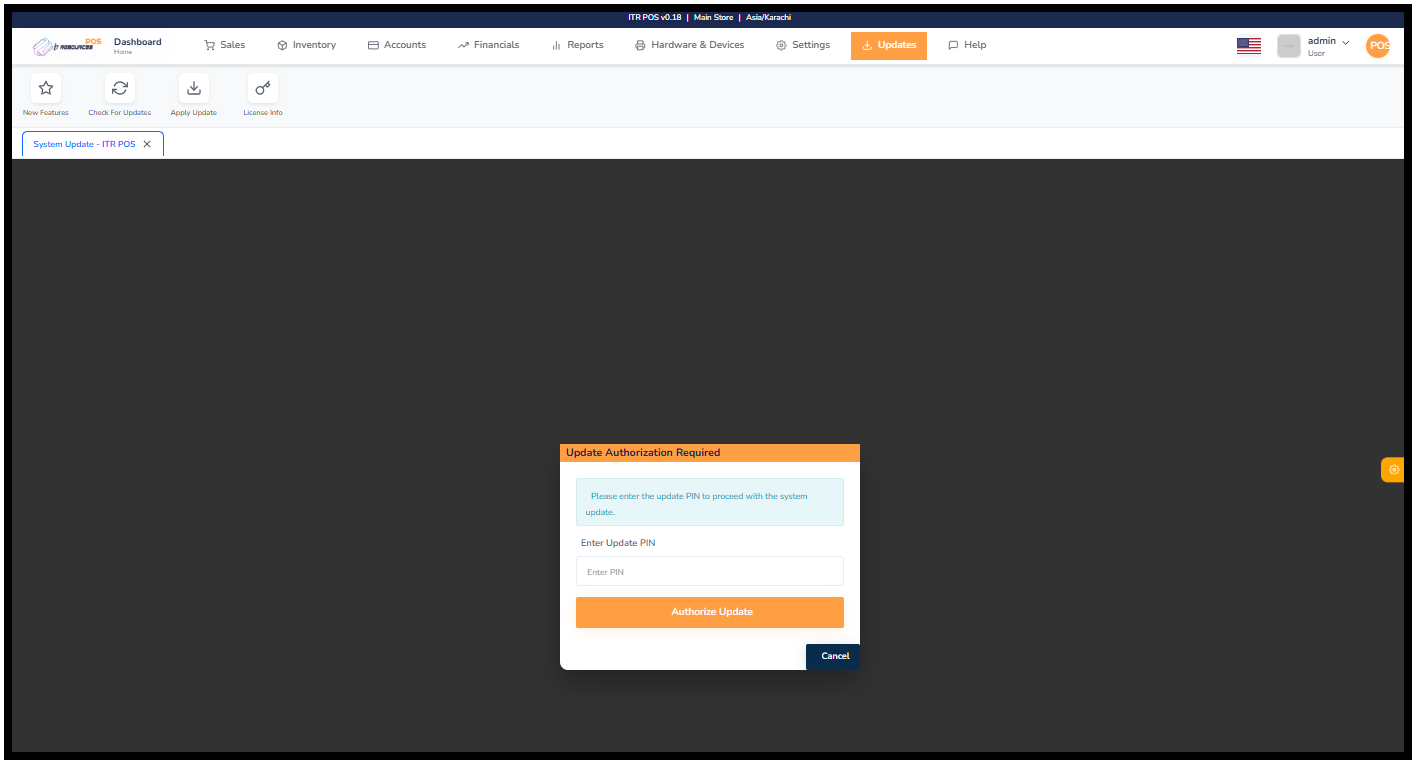
The Apply Update section allows you to install the latest system updates for the POS application. System updates include new features, security improvements, and important bug fixes to keep your system running smoothly.
When a system update is available, the system will display an Update Authorization Required popup. To proceed with the update, you must enter the authorized Update PIN.
This PIN is not generated automatically — you must contact the ITR Support Team to get your official Update PIN. Once you receive it, enter the PIN in the popup and click Authorize Update to begin the update process.
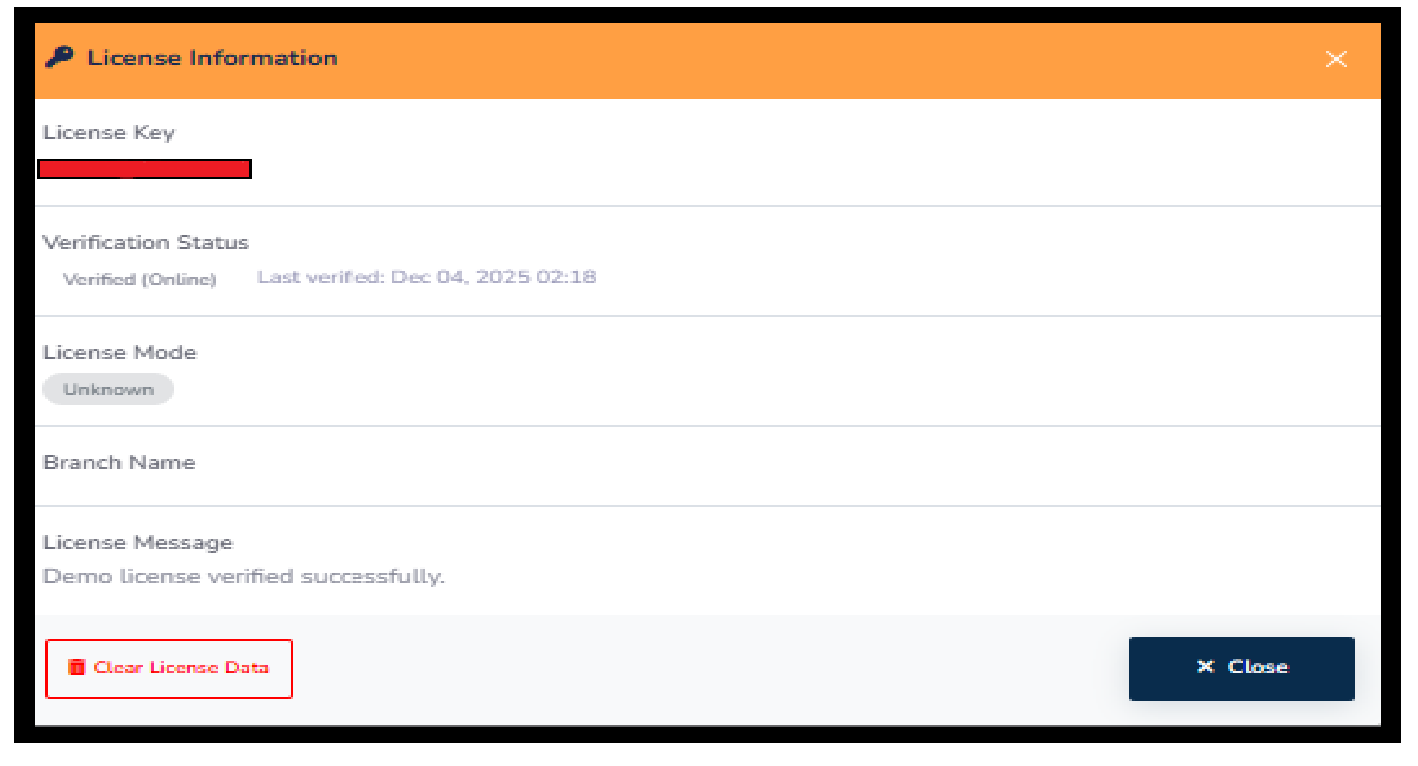
The License Information section provides details about your POS system license, including activation status, license expiry, and the store or user information associated with the license. This section helps ensure that your software remains valid and fully functional.
The Help section provides quick access to support resources whenever you need assistance. It ensures that users can resolve issues easily and get guidance without interrupting business operations.
From this section, you can contact the support team for technical help or watch helpful video tutorials for step-by-step guidance. This feature helps your business resolve problems faster, reduce downtime, and improve the overall user experience with ITR POS.

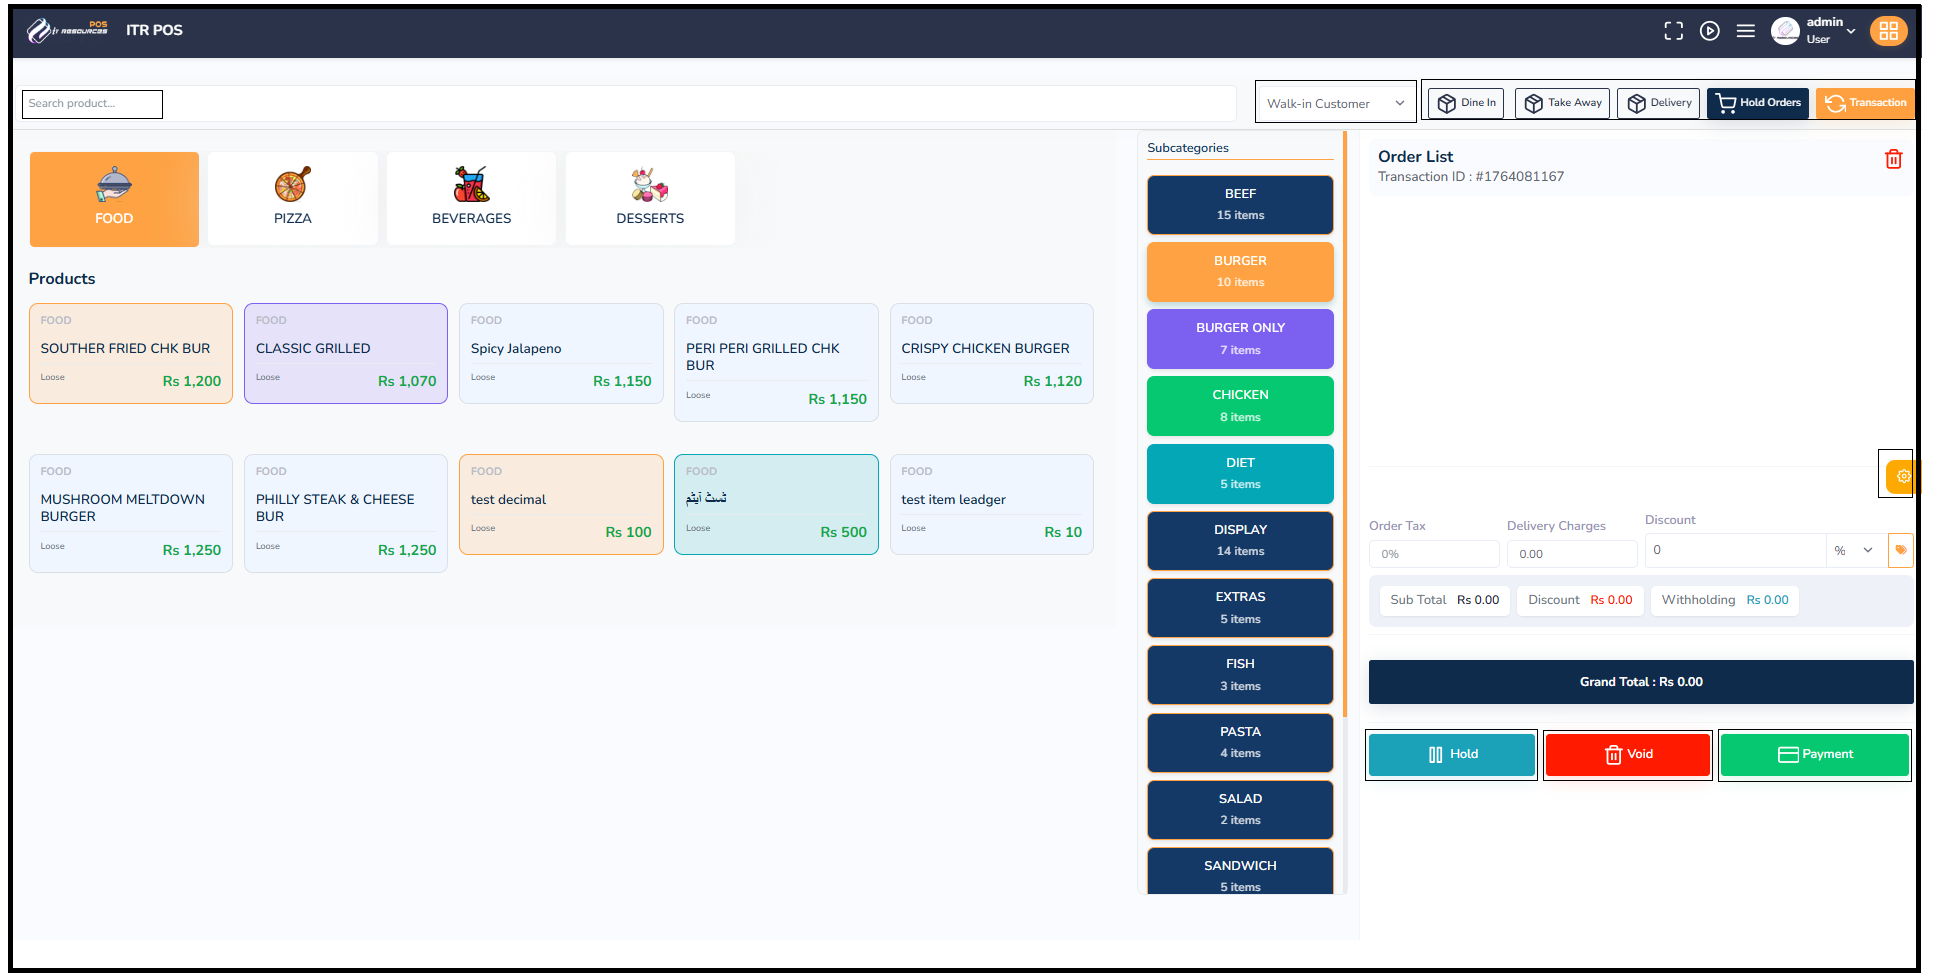
The POS (Point of Sale) screen is designed to handle fast and efficient order taking. It displays product categories, item lists, order details, taxes, discounts, and payment options in an easy-to-use interface.
Product Categories: The top section shows major categories like Food, Pizza, Beverages, and Desserts. Selecting a category filters items for quick access.
Products Grid: Displays all available items within the selected category along with their prices. Cashiers can add items to the cart with a single click.
Subcategories Panel: Helps narrow down items further (e.g., Burger, Beef, Chicken, Extras). This improves item searching speed during peak hours.
Order List: Shows all items added to the current order, including quantities, prices, and any applied modifications.
Order Controls: Options like Hold, Void, and Payment allow staff to pause an order, cancel it, or proceed to billing.
Customer Mode: Lets the cashier select whether the order is Dine-In, Take Away, or Delivery, ensuring accurate billing and tracking.
Search Product Bar: A quick search field to instantly find items by name or code without browsing categories.
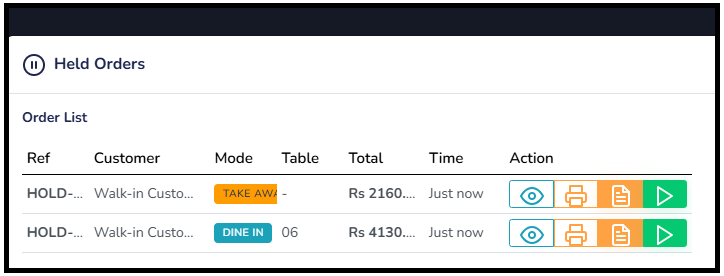
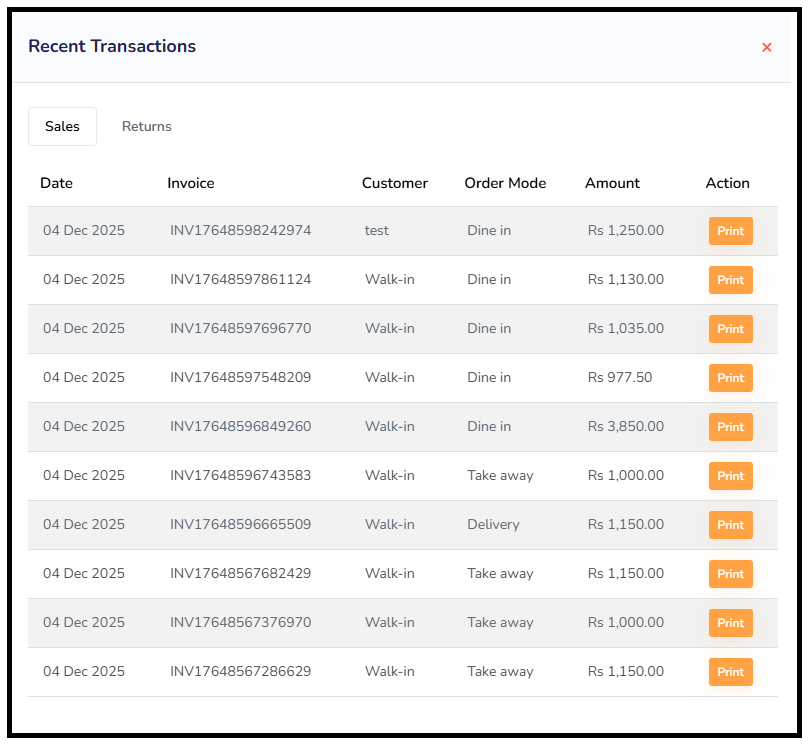
Quick Overview: Displays all held bills with reference number, customer name, order mode (Dine-in/Takeaway), and total amount.
Instant Actions: Buttons like Resume, Print, and View allow cashiers to quickly continue, verify, or print held orders.
Time Tracking: Shows when each order was held, helping staff prioritize older orders and manage workflow efficiently.
Mode & Table Visibility: Clearly highlights whether order is Takeaway or Dine-in along with table number for floor staff.
Clean Layout: Well-structured table format helps staff navigate multiple orders quickly and avoid mistakes.
This screen ensures smooth order handling by enabling staff to pause, review, and resume orders anytime without losing data or speed.
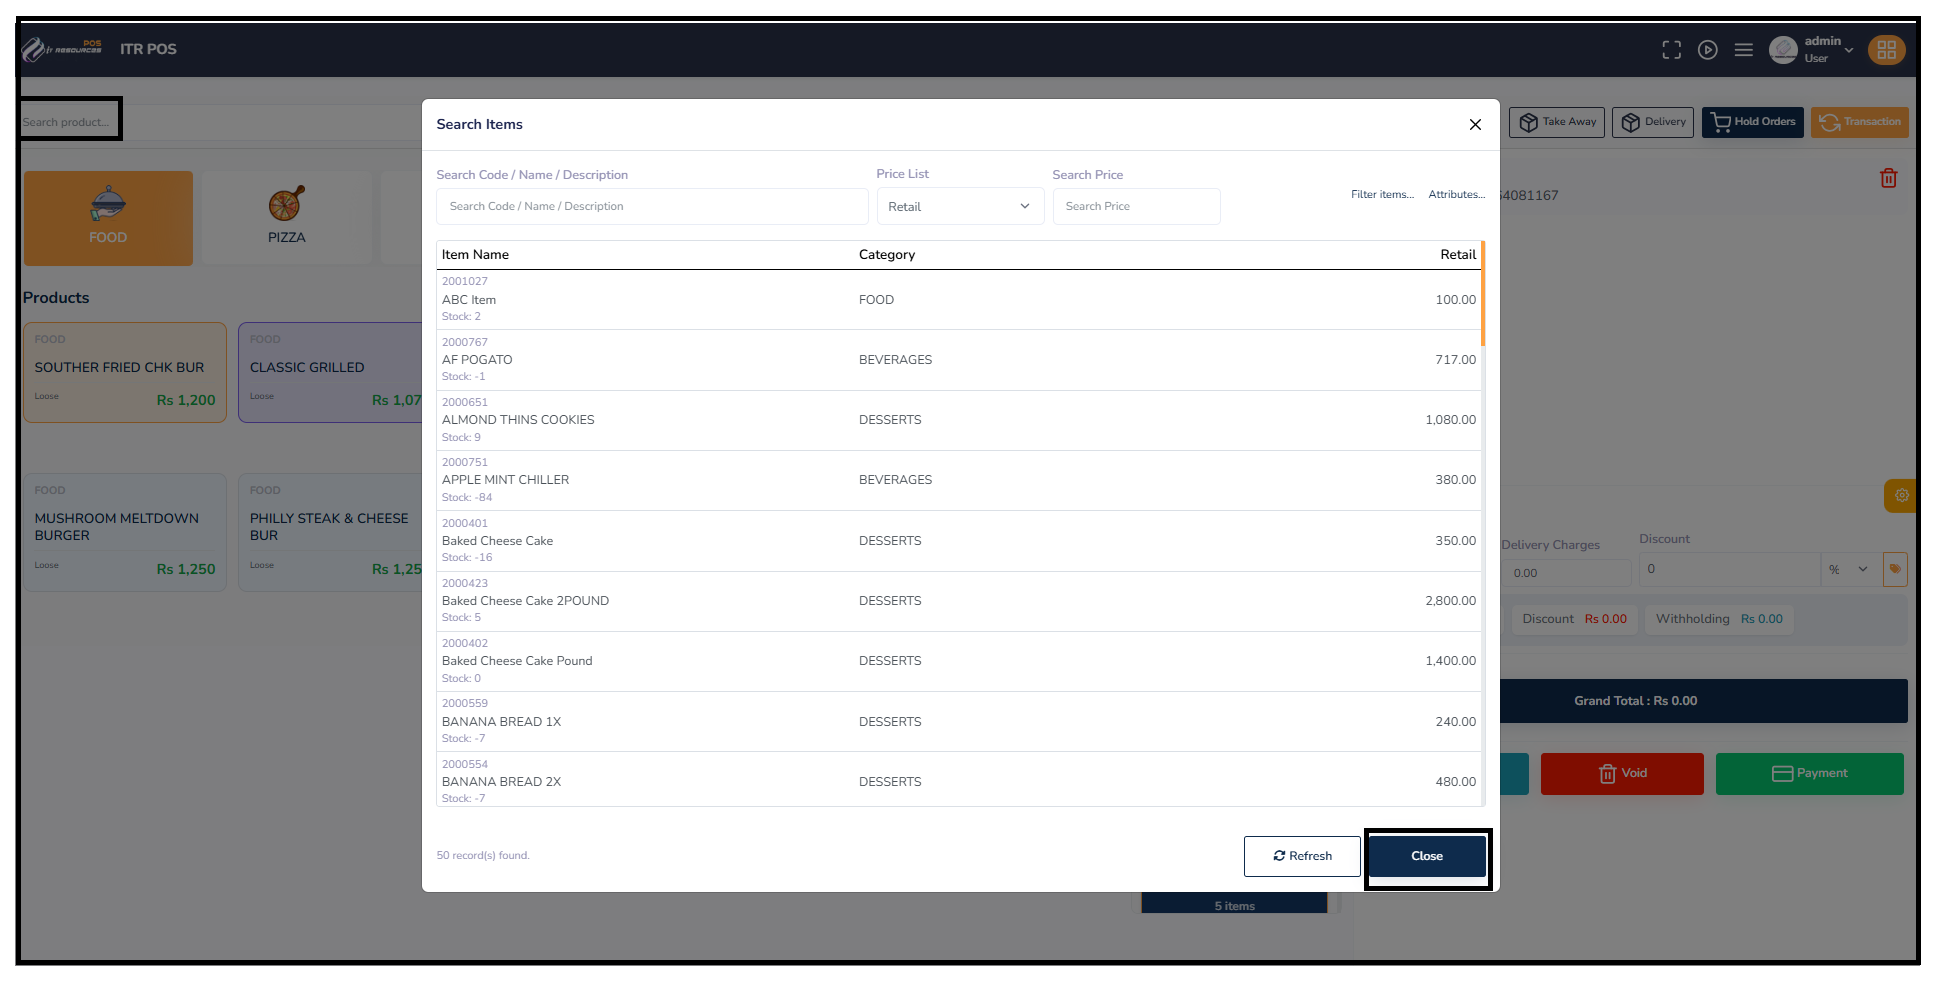
Advanced Search: Allows searching by item name, code, description, or price, ensuring accurate item selection.
Price List Selection: Cashiers can switch between Retail, Wholesale, or custom price lists depending on customer type.
Stock Visibility: Shows real-time stock levels (positive or negative), helping staff avoid selling unavailable items.
Quick Actions: Buttons like Refresh and Close allow cashiers to update the list or exit instantly.
Item Table: Displays item code, name, category, and price in a structured, easy-to-read format for fast selection.
These features work together to ensure fast billing, accurate item selection, and smooth overall POS operations.
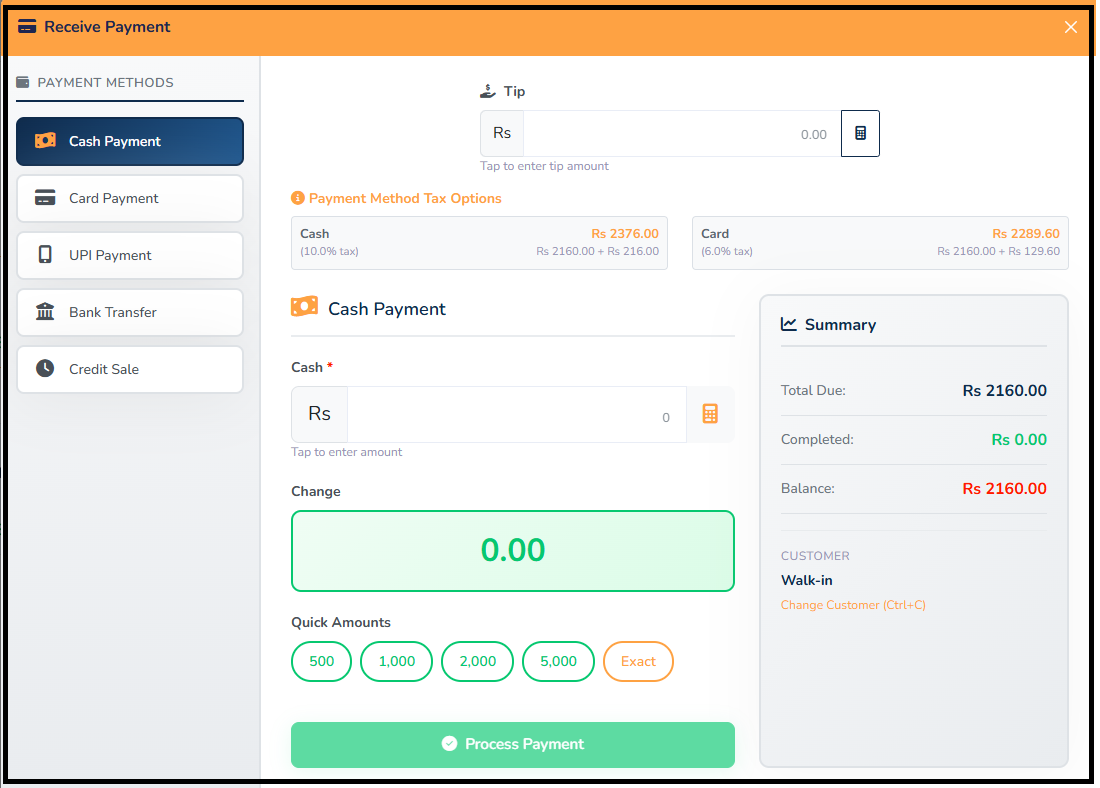
Multiple Payment Methods: Cash, Card, UPI, Bank Transfer, and Credit Sale options ensure flexibility for all customers.
Automatic Tax Calculation: Payment method–based tax is calculated automatically to provide transparent billing.
Quick Cash Entry: Predefined amounts (500, 1000, 2000, 5000) help cashiers enter received cash instantly.
Real-time Change Display: The system calculates the change automatically as soon as the cashier enters the cash received.
Summary Panel: Shows total due, completed amount, balance, and customer details for clear and accurate settlement.
This window simplifies payment handling by offering fast entry, automatic calculations, and clear visibility—ensuring error-free billing.
Multiple Payment Methods: Cash, Card, UPI, Bank Transfer, and Credit Sale options ensure flexibility for all customers.
Automatic Tax Calculation: Payment method–based tax is calculated automatically to provide transparent billing. For example, cash payment includes a 10% tax, while card payments include a 6% tax.
Quick Cash Entry: Predefined amounts (500, 1000, 2000, 5000) help cashiers enter received cash instantly, reducing manual input time and errors.
Real-time Change Display: The system calculates and displays the change automatically as soon as the cashier enters the amount of cash received.
Summary Panel: The panel displays the total due, completed amount, remaining balance, and customer details for easy and clear settlement.
This window simplifies payment handling by offering fast entry, automatic calculations, and clear visibility—ensuring error-free billing and smooth transaction processes.
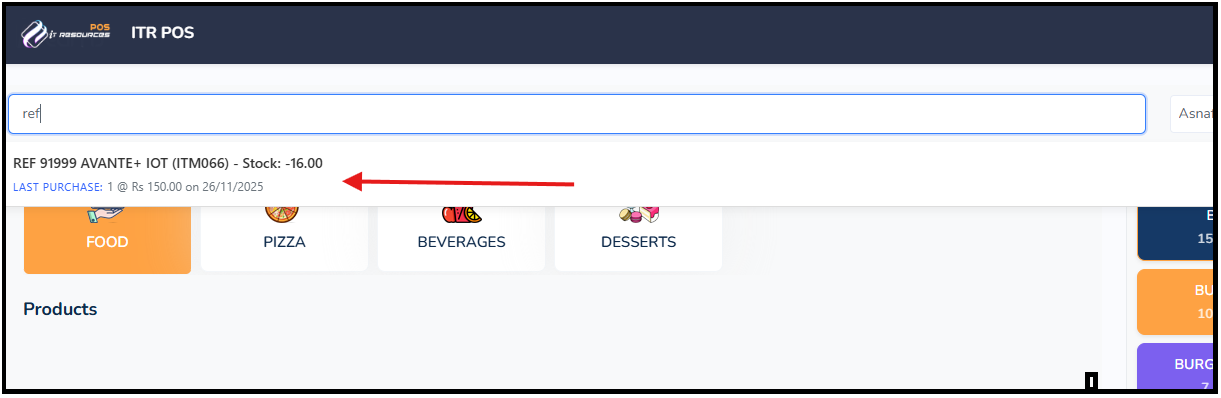
Product Search: The search bar allows users to quickly search for products by reference number, name, or keyword (e.g., "ref" is entered to search for a product).
Product Information: Once a product is selected, detailed information is displayed, including the reference number (e.g., "REF 91999 AVANTE+ IOT (ITM066)") and stock levels (e.g., "Stock: -16.00").
Last Purchase Info: The system displays the last purchase information, including the date and price (e.g., "LAST PURCHASE: 1 @ Rs 150.00 on 26/11/2025").
Real-time Stock Updates: The stock level is updated in real-time to reflect the availability of the product, ensuring accurate inventory management.
This window allows for quick product lookups and provides clear product details, including the last purchase history, to help staff make informed decisions during checkout and inventory management.
At IT Resources, our clients are the cornerstone of our success. We dedicate ourselves to understanding your unique business challenges and crafting tailored solutions that truly fit your needs. Our commitment goes beyond delivering software—we strive to build enduring partnerships that drive your growth and success.